Worlds Easiest Peanut Butter Blossoms: A No-Fail Treat
Worlds easiest peanut butter blossoms: the name says it all! These delightful treats are a classic for a reason – they’re incredibly simple to make, yet incredibly delicious. Whether you’re a seasoned baker or just starting out, this recipe is a guaranteed crowd-pleaser.
Imagine the warm, gooey chocolate chips nestled in the soft peanut butter cookie, creating a perfect balance of sweet and salty. These little bites of happiness are perfect for any occasion, from a casual weeknight snack to a festive holiday gathering.
Ready to embark on a baking adventure that’s as easy as it is satisfying? Let’s dive in!
From the origins of this beloved cookie to the variations that make it unique, we’ll explore the world of peanut butter blossoms, uncovering tips and tricks to ensure your baking experience is a breeze. Get ready to whip up a batch of these irresistible treats that will have everyone begging for more.
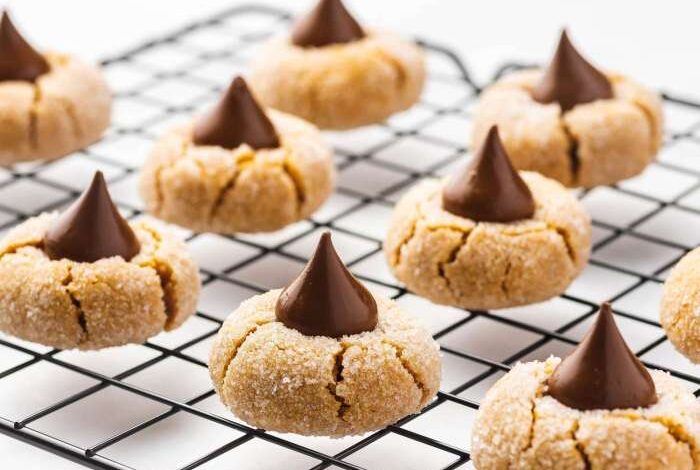
Peanut Butter Blossoms: A Sweet and Simple Delight
Peanut butter blossoms are a classic American cookie that has been enjoyed for generations. These simple and satisfying treats are known for their soft, chewy texture, rich peanut butter flavor, and irresistible chocolate kiss topping. They are a beloved staple at bake sales, potlucks, and holiday gatherings, bringing a touch of nostalgia and warmth to every occasion.
The History of Peanut Butter Blossoms
Peanut butter blossoms emerged as a popular dessert in the mid-20th century, coinciding with the rise of peanut butter as a beloved ingredient in American cuisine. The exact origin of this cookie is uncertain, but it is believed to have evolved from earlier peanut butter cookie recipes.
The addition of the chocolate kiss, creating the signature blossom shape, is thought to have emerged in the 1950s.
Why Peanut Butter Blossoms Are Easy to Make
Peanut butter blossoms are considered a beginner-friendly dessert due to their straightforward recipe and minimal ingredients. The dough requires only a few basic pantry staples, such as peanut butter, sugar, flour, and eggs. The baking process is simple and straightforward, requiring only a few steps.
The chocolate kisses add a touch of elegance and require no additional baking, making the recipe even more convenient.
Sometimes you just crave something simple and sweet, like those melt-in-your-mouth peanut butter blossoms. They’re so easy to make, it’s almost criminal! But for a more savory side, I always love a good roast leg of lamb. The combination of sweet and savory is just perfect for a satisfying meal.
And hey, maybe you can even whip up a batch of those peanut butter blossoms for dessert!
Ingredients and Equipment
The simplicity of peanut butter blossoms lies in their minimal ingredient list and straightforward preparation. With just a handful of pantry staples and basic kitchen tools, you can whip up a batch of these delightful treats.
Sometimes, the simplest recipes are the best, and those peanut butter blossoms are a prime example. They’re a classic for a reason! Speaking of simple and delicious, I recently made these easy caramel apple pie bars that were a huge hit.
They’re perfect for a quick dessert fix and remind me of those warm, comforting flavors of fall. But honestly, nothing beats the pure joy of a warm peanut butter blossom melting in your mouth. It’s a timeless treat!
Ingredients
The core ingredients for peanut butter blossoms are readily available and easy to find.
- Peanut Butter:This is the star ingredient, giving the blossoms their signature flavor and texture. The type of peanut butter you choose will significantly influence the final outcome.
- Sugar:Granulated sugar provides sweetness and helps bind the ingredients together.
- Egg:An egg acts as a binder, adding moisture and richness to the dough.
- Baking Soda:Baking soda is a leavening agent that helps the cookies rise and achieve their characteristic puffy shape.
- Flour:All-purpose flour provides structure and helps the cookies hold their shape.
- Chocolate Chips:These are pressed into the center of each cookie before baking, creating the signature “blossom” effect.
Types of Peanut Butter
The type of peanut butter you use can significantly affect the texture and flavor of your peanut butter blossoms.
- Creamy Peanut Butter:This type produces a smooth and soft cookie. Its consistency allows for easy mixing and spreading.
- Chunky Peanut Butter:This type adds a delightful crunch to the cookies. The presence of peanut pieces can make the dough slightly thicker, requiring additional flour for a smoother consistency.
- Natural Peanut Butter:These types of peanut butter often have a more intense peanut flavor and can be slightly drier than traditional varieties. You may need to add a tablespoon or two of milk to achieve the desired consistency.
Alternative Ingredients
For those with dietary restrictions or preferences, there are alternative ingredients you can use to make peanut butter blossoms.
- Vegan Peanut Butter:Many brands offer vegan peanut butter made from roasted peanuts and without any animal products. You can use this in place of regular peanut butter.
- Sugar Substitutes:If you’re watching your sugar intake, you can substitute granulated sugar with alternative sweeteners like stevia, erythritol, or monk fruit. However, these sweeteners may affect the texture and sweetness of the cookies, so you may need to adjust the amount used.
- Gluten-Free Flour:For those with gluten sensitivities, you can use a gluten-free flour blend like almond flour or coconut flour. Keep in mind that these flours have different absorption properties, so you may need to adjust the amount used.
Equipment
You’ll need a few basic kitchen tools to prepare peanut butter blossoms.
These peanut butter blossoms are so easy, they practically make themselves! Just mix, scoop, and bake. While they’re in the oven, I usually whip up a batch of my favorite best air fryer chicken , which pairs perfectly with the sweet and salty peanut butter flavor.
It’s the perfect combo for a quick and delicious dessert!
- Mixing Bowls:You’ll need at least two mixing bowls, one for mixing the wet ingredients and another for the dry ingredients.
- Measuring Cups and Spoons:Accurate measurements are crucial for baking. Use measuring cups and spoons to measure the ingredients precisely.
- Rubber Spatula:A rubber spatula is essential for scraping the sides of the bowl and ensuring all ingredients are well combined.
- Cookie Sheets:You’ll need cookie sheets to bake the blossoms. Line them with parchment paper for easy cleanup.
- Measuring Spoons:Measuring spoons are needed to portion the cookie dough onto the baking sheet.
Variations and Enhancements: Worlds Easiest Peanut Butter Blossoms
The basic peanut butter blossom recipe is incredibly versatile, offering a canvas for your creativity to shine. Let’s explore some exciting variations and enhancements that will elevate your peanut butter blossoms to new heights of deliciousness.
Alternative Fillings
Exploring different fillings is a fun way to personalize your peanut butter blossoms. The classic peanut butter filling can be swapped out for other delicious options, allowing you to cater to different tastes and preferences.
- Chocolate Filling:A rich chocolate filling, like Nutella or a homemade chocolate ganache, provides a decadent twist. The combination of peanut butter and chocolate is a classic pairing that always delights.
- Cream Cheese Filling:A tangy cream cheese filling adds a delightful contrast to the sweet peanut butter. You can mix in a little vanilla extract or a pinch of cinnamon for added flavor.
- Fruit Filling:For a refreshing twist, consider incorporating fruit fillings like raspberry or strawberry jam. The sweet and tart flavors of the fruit complement the peanut butter beautifully.
- Nut Butter Variations:Experiment with different nut butters like almond butter, cashew butter, or sunflower seed butter. Each nut butter brings its unique flavor profile, adding variety to your peanut butter blossoms.
Toppings and Flavor Combinations, Worlds easiest peanut butter blossoms
Adding toppings to your peanut butter blossoms can enhance their visual appeal and create exciting flavor combinations.
- Sprinkles:A generous sprinkle of colorful sprinkles adds a playful touch and brings a burst of sweetness. You can use classic rainbow sprinkles or opt for more thematic sprinkles like holiday-themed sprinkles or sprinkles that match the filling.
- Chopped Nuts:Toasted chopped nuts like pecans, walnuts, or almonds provide a satisfying crunch and add a nutty dimension to the flavor profile. Choose nuts that complement the filling or create a contrasting texture.
- Sea Salt:A sprinkle of sea salt on top enhances the sweetness of the peanut butter and creates a delightful balance of flavors. The salty-sweet combination is a classic for a reason.
- Chocolate Drizzle:A simple chocolate drizzle adds elegance and a touch of indulgence. You can use melted chocolate chips or chocolate ganache for a smooth and decadent finish.
Different Types of Chocolate Chips
The type of chocolate chips you use can significantly impact the flavor and texture of your peanut butter blossoms.
- Milk Chocolate Chips:Milk chocolate chips offer a classic sweetness and a creamy texture that blends well with peanut butter. They are a safe and popular choice for a familiar flavor profile.
- Dark Chocolate Chips:Dark chocolate chips provide a more intense chocolate flavor and a slightly bitter edge. This option is perfect for those who prefer a richer and more complex flavor experience.
- White Chocolate Chips:White chocolate chips offer a sweet and creamy flavor with a delicate vanilla note. They provide a lighter and more refreshing alternative to milk or dark chocolate.
- Semi-Sweet Chocolate Chips:Semi-sweet chocolate chips offer a balance of sweetness and bitterness, making them a versatile choice for a wide range of palates.
Creative Presentation and Serving
Presenting your peanut butter blossoms in a creative and inviting way can elevate the overall experience.
- Decorative Platter:Arrange your peanut butter blossoms on a decorative platter, adding sprigs of fresh mint or edible flowers for a touch of elegance.
- Themed Presentation:For holidays or special occasions, create themed presentations. For example, for Valentine’s Day, you could arrange the blossoms in the shape of a heart or use red and pink sprinkles.
- Individual Serving:Place each peanut butter blossom in a cupcake liner or a small paper bag for a charming and individual presentation.
Baking Tips and Troubleshooting

Baking peanut butter blossoms is a simple and enjoyable experience, but a few tips and tricks can elevate your baking game and ensure consistently delicious results.
Common Mistakes and Prevention
Avoiding common mistakes is crucial for achieving perfectly baked peanut butter blossoms. Here are some points to consider:
- Overmixing the Dough:Overmixing the dough can result in tough cookies. The goal is to combine the ingredients just until they are incorporated, leaving a few small lumps of peanut butter.
- Using Cold Ingredients:Cold ingredients, particularly the butter, can hinder the dough from coming together properly. It is best to use room temperature ingredients, allowing them to blend seamlessly.
- Incorrect Baking Time:Underbaking or overbaking can affect the texture and taste of the cookies. The baking time should be adjusted based on the size of the cookies and the oven’s temperature.
- Overcrowding the Baking Sheet:Overcrowding the baking sheet can lead to uneven baking and soft, mushy cookies. Allow ample space between each cookie for proper airflow and even heat distribution.
Troubleshooting Baking Issues
Sometimes, despite our best efforts, unexpected issues can arise during baking. Here are some common problems and solutions:
- Flat Cookies:If the cookies spread excessively, the dough may be too warm or the baking sheet is too hot. Allow the dough to chill for a few minutes before scooping and baking, and consider using a cool baking sheet.
- Tough Cookies:Overmixing or overbaking can result in tough cookies. Ensure the dough is mixed just until combined and bake according to the recipe’s instructions.
- Dry Cookies:Dry cookies may indicate overbaking or insufficient moisture in the dough. To prevent this, ensure the dough is properly hydrated and adjust the baking time as needed.
Ensuring Proper Baking and Texture
To achieve the desired texture and ensure the cookies are properly baked, follow these guidelines:
- Use a Cookie Scoop:Using a cookie scoop helps ensure consistent size and shape, resulting in evenly baked cookies.
- Check for Doneness:The edges of the cookies should be lightly browned, and the center should be set. A slight jiggle in the center is normal, but the cookie should not be soft or gooey.
- Cool Completely:Allow the cookies to cool completely on the baking sheet before transferring them to a wire rack. This will prevent them from becoming soggy.