Butter Flaky Pie Crust: The Secret to Perfect Pastry
Butter flaky pie crust, the epitome of culinary artistry, transforms simple ingredients into a masterpiece of texture and taste. This iconic pastry, with its delicate layers of golden-brown flakiness, has captivated taste buds for generations. The secret lies in the careful interplay of butter, flour, and water, where each element contributes to the final symphony of flavor and texture.
The science behind a perfect butter flaky pie crust is fascinating. The precise ratio of ingredients and the meticulous chilling process ensure that the butter remains cool and firm, preventing it from melting and creating a smooth, doughy texture. This allows the layers to separate during baking, resulting in the signature flaky structure that we all crave.
Understanding the Essence of Butter Flaky Pie Crust
The allure of a perfectly flaky pie crust lies in its delicate, airy texture that melts in your mouth. Each bite reveals layers of golden-brown pastry, a testament to the careful interplay of ingredients and technique. But what exactly makes a pie crust flaky?
Let’s delve into the science behind this culinary marvel.
There’s something so satisfying about a perfectly golden, butter-flaky pie crust. It’s a classic that always makes me think of cozy evenings, and I love experimenting with different fillings. Recently, I’ve been craving something a little more savory, and I’ve been thinking about trying a recipe for camp david spaghetti with italian sausage I saw online.
It’s a simple but hearty dish, and I can already picture it paired with a flaky, buttery crust. Maybe I’ll try making a mini pie crust filled with the spaghetti and sausage – now that’s a dessert I can get behind!
The Science of Flaky Pie Crust
The key to achieving a flaky pie crust lies in the controlled incorporation of butter. The fat molecules in butter are hydrophobic, meaning they repel water. When chilled butter is cut into the flour, it creates small pockets of fat that are surrounded by gluten strands.
These pockets of fat prevent the gluten from fully developing, resulting in a tender and flaky texture.
The key to flaky pie crust: Cold butter and minimal gluten development.
The Role of Gluten Development
Gluten is a protein complex formed when flour and water are combined. Gluten development is essential for structure in bread and other baked goods, but it can make pie crust tough. The goal with flaky pie crust is to minimize gluten development.
This is achieved through a combination of techniques:
- Using cold ingredients: Cold butter and water slow down gluten development, allowing for a more tender crust.
- Quick mixing: Overmixing develops gluten, so it’s important to mix the dough just until it comes together.
- Using a high-fat flour: Flours with a higher fat content, such as cake flour, will create a more tender crust.
Understanding the Flaky Texture, Butter flaky pie crust
When the pie crust is baked, the butter melts and creates steam. This steam expands the pockets of fat, separating the gluten strands and creating the signature layers of a flaky crust. The more layers of butter, the more layers of flakiness you’ll achieve.
There’s something so satisfying about biting into a perfectly flaky pie crust, the layers of butter melting in your mouth. It’s a technique I’ve mastered over the years, and I love experimenting with different fillings. Recently, I’ve been craving something savory, and I’ve been making a delicious spaetzle sauerkraut and sausage casserole that’s a real crowd-pleaser.
But I’m always looking for new ways to incorporate that buttery, flaky crust into my dishes. Maybe a savory pie crust filled with the casserole? Now that’s an idea worth exploring!
The Art of Pie Crust Making
The essence of a truly delightful pie lies in its crust, a symphony of textures that creates a satisfying contrast to the sweet or savory filling. A buttery, flaky pie crust is a testament to the baker’s skill, a delicate balance of ingredients and techniques.
Mastering this art involves understanding the role of each ingredient, mastering the chilling process, and developing a light touch with the dough.
The Importance of Chilling the Dough
Chilling the dough is not just a step in the process; it’s a crucial element that determines the flakiness of the crust. The cold butter, when incorporated into the dough, creates pockets of fat that will later transform into those beautiful, delicate layers.
- The cold butter prevents it from melting too quickly during mixing. This allows for the formation of small, evenly distributed butter particles throughout the dough.
- As the dough chills, the butter solidifies, creating a barrier that inhibits gluten development. This ensures the crust remains tender and flaky, rather than tough and chewy.
- Chilling the dough also helps to relax the gluten, making it easier to roll out without tearing.
A Step-by-Step Guide to Butter Flaky Pie Crust
Here’s a step-by-step guide to creating a perfect butter flaky pie crust:
- Ingredients:
- 2 1/4 cups all-purpose flour
- 1 teaspoon salt
- 1 cup (2 sticks) unsalted butter, very cold and cubed
- 1/2 cup ice water
- Mixing the Dough:
- In a large bowl, whisk together the flour and salt.
- Add the cubed butter and use a pastry blender or your fingertips to work the butter into the flour until the mixture resembles coarse crumbs. The goal is to have pea-sized butter pieces distributed evenly throughout the flour.
- Gradually add the ice water, one tablespoon at a time, mixing with a fork until the dough just comes together. Be careful not to overmix.
- Chilling the Dough:
- Divide the dough in half. Shape each half into a disc, wrap tightly in plastic wrap, and refrigerate for at least 30 minutes, or up to 2 days.
- Rolling Out the Dough:
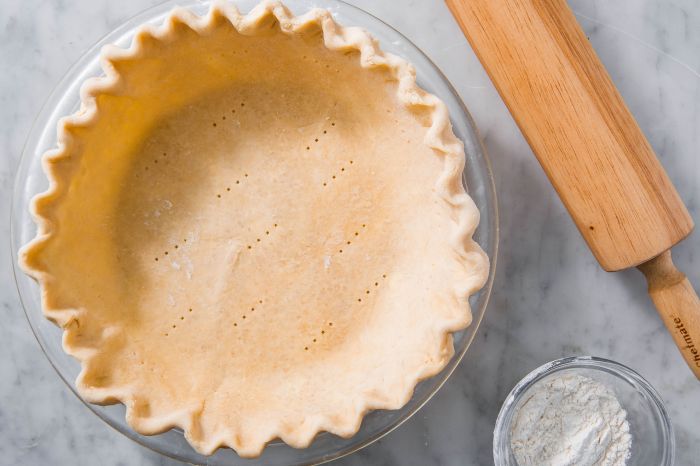
- Lightly flour a work surface. Remove one disc of dough from the refrigerator and roll it out into a 12-inch circle. Use a rolling pin with a light touch, applying even pressure to ensure an even thickness.
- If the dough becomes too sticky, lightly dust it with additional flour. Be careful not to over-flour, as this can make the crust tough.
- Transferring to the Pie Plate:
- Carefully transfer the rolled-out dough to a 9-inch pie plate. Gently press the dough into the bottom and sides of the plate, leaving a slight overhang.
- Trim the excess dough and crimp the edges to create a decorative finish.
- Pricking the Crust:
- Use a fork to prick the bottom of the crust several times to prevent air bubbles from forming during baking.
- Baking the Crust:
- Bake the crust in a preheated oven at 425°F (220°C) for 10-12 minutes, or until it is golden brown.
- Let the crust cool completely before filling.
The Importance of Even Thickness
The even thickness of the rolled-out dough is crucial for consistent flakiness. If the dough is too thin in some areas, those areas will bake faster, leading to a tough, overcooked crust. Conversely, thicker areas will bake slower and may remain doughy.
“Rolling the dough to an even thickness ensures that all parts of the crust bake at the same rate, resulting in a consistently flaky and delicious outcome.”
There’s something so satisfying about biting into a perfectly flaky pie crust, the buttery layers melting in your mouth. It’s a skill that takes time to master, but the rewards are well worth the effort. And while I’m on the subject of deliciousness, have you tried Marie’s easy slow cooker pot roast ?
It’s the perfect comfort food to pair with a slice of pie. Speaking of crust, did you know that using cold butter and water is key to achieving that perfect flaky texture? It’s all about keeping the butter cold so it doesn’t melt too quickly.
Variations and Enhancements
The foundation of a perfect pie crust is butter, but exploring different types and adding flavors can elevate your baking game. Let’s dive into some variations and enhancements that can transform your pie crust from good to extraordinary.
Butter Selection
The type of butter you choose plays a crucial role in the texture and flavor of your pie crust. Here’s a breakdown of common options and their unique qualities:
- Salted Butter:The most common type, salted butter adds a subtle salty flavor to the crust, balancing the sweetness of the filling. The salt also helps to enhance the overall flavor profile.
- Unsalted Butter:This provides a clean, pure flavor and allows you to control the saltiness of the crust. Unsalted butter is ideal for recipes that call for specific salt levels.
- European-Style Butter:With a higher fat content and a richer flavor, European-style butter creates a more tender and flaky crust. The increased fat content also contributes to a buttery aroma.
- Cultured Butter:This butter undergoes a fermentation process, resulting in a tangy and slightly acidic flavor. Cultured butter adds a unique complexity to the pie crust.
Flavor Enhancements
Adding flavorings to your pie crust is a simple way to create unique and exciting variations. Consider incorporating:
- Herbs:Fresh or dried herbs like thyme, rosemary, or sage can add an earthy and savory dimension to your crust. For example, a rosemary-infused crust pairs beautifully with savory pies.
- Spices:Warm spices like cinnamon, nutmeg, or ginger can create a comforting and aromatic crust, perfect for sweet pies. For example, a cinnamon-sugar crust enhances the flavors of apple pie.
- Citrus Zest:Lemon, orange, or lime zest adds a bright and citrusy flavor to the crust, complementing fruit pies or tarts. For example, a lemon zest crust complements a lemon meringue pie.
Pie Crust Recipe Variations
Beyond butter and flavorings, there are various approaches to crafting a pie crust. Here’s a comparison of common pie crust recipes:
| Recipe Type | Ingredients | Techniques | Characteristics |
|---|---|---|---|
| Classic Pie Crust | Flour, cold butter, salt, water | Cut butter into flour using a pastry cutter or fork, then add cold water until a dough forms. | Classic, buttery, flaky |
| All-Butter Pie Crust | Flour, cold butter, salt, ice water | Cut butter into flour using a pastry cutter or fork, then add ice water until a dough forms. | Rich, buttery, flaky |
| Shortcrust Pastry | Flour, cold butter, salt, sugar, egg yolk | Cut butter into flour using a pastry cutter or fork, then add egg yolk and water until a dough forms. | Tender, crumbly, ideal for tarts |
| Vegan Pie Crust | Flour, vegan butter, salt, water | Cut vegan butter into flour using a pastry cutter or fork, then add water until a dough forms. | Flaky, vegan-friendly |
Baking Techniques and Considerations

Baking a pie crust to perfection involves a combination of techniques and considerations that contribute to its golden-brown color, crisp texture, and overall deliciousness. The goal is to ensure the crust is cooked through without becoming overly dry or tough.
Achieving a Golden Brown Crust
A golden brown crust is not only visually appealing but also indicates that the crust is cooked through. Here are some tips to achieve this:
- Brush with Milk or Egg Wash:Before baking, brush the top of the crust with milk or an egg wash. This helps to create a golden brown color and adds a slight sheen. Milk provides a lighter brown, while an egg wash creates a richer, deeper color.
- Use a Baking Stone or Sheet Pan:Baking the pie crust on a baking stone or a sheet pan placed on the bottom rack of the oven helps to distribute heat evenly and prevent the bottom of the crust from becoming soggy.
- Monitor the Crust:Keep a close eye on the crust during baking, as the browning process can happen quickly. If the crust starts to brown too quickly, reduce the oven temperature slightly.
Pre-Baking the Crust
Pre-baking the pie crust, also known as blind baking, is essential for preventing sogginess, especially when filling the pie with wet ingredients.
- Blind Baking:This involves baking the crust with pie weights or dry beans to prevent it from puffing up and to ensure it cooks evenly.
- Preventing Sogginess:Pre-baking helps to create a barrier between the filling and the crust, preventing the crust from becoming soggy and absorbing excess moisture.
Adjusting Baking Time and Temperature
The baking time and temperature for a pie crust depend on the filling and the thickness of the crust.
- Filling Type:For pies with wet fillings like fruit pies, pre-baking the crust is essential. For pies with drier fillings, such as custard or savory fillings, pre-baking may not be necessary.
- Crust Thickness:Thicker crusts require longer baking times than thinner crusts.
- Oven Temperature:Generally, pie crusts are baked at 375°F (190°C). However, you may need to adjust the temperature based on the type of filling and crust thickness. For example, thicker crusts or those with wet fillings may require a lower temperature to prevent burning.
Pie Crust Applications and Inspiration: Butter Flaky Pie Crust
The beauty of a butter-flaky pie crust lies not only in its texture but also in its versatility. It serves as a canvas for an array of sweet and savory fillings, lending itself to a wide range of culinary creations.
This versatility allows you to explore a world of flavors and textures, transforming a simple pie crust into a masterpiece.
Pie Crust Applications
Pie crusts are incredibly versatile, offering a range of applications beyond traditional pies. Here’s a glimpse into the diverse world of pie crust creations:
| Application | Description | Example |
|---|---|---|
| Pies | Classic application, offering a wide range of sweet and savory fillings. | Apple pie, Chicken pot pie, Pumpkin pie |
| Tarts | Smaller, individual-sized pies with a variety of fillings. | Fruit tarts, Quiche Lorraine, Savory tarts with goat cheese and caramelized onions |
| Hand Pies | Individual, handheld pies perfect for snacking or on-the-go meals. | Apple hand pies, Chicken pot pie hand pies, Sausage and cheese hand pies |
| Galettes | Free-form pies with a rustic, open-faced design. | Fruit galettes, Savory galettes with vegetables and herbs |
| Pastries | A broad category encompassing various baked goods with a flaky crust. | Croissants, Puff pastry, Danish pastries |
| Savory Dishes | Beyond sweet fillings, pie crusts can be used for savory dishes. | Pot pies, Quiches, Empanadas |
Examples of Pie Fillings
The right filling can elevate your pie crust to new heights. Here are some examples of fillings that pair beautifully with a butter-flaky crust:
- Sweet Fillings:Apple, Cherry, Blueberry, Peach, Pumpkin, Custard, Chocolate, Lemon
- Savory Fillings:Chicken, Beef, Sausage, Vegetables (potatoes, onions, mushrooms), Cheese, Herbs
Creative Pie Crust Shapes and Decorations
Beyond the classic round shape, pie crusts can be transformed into visually stunning creations.
- Shapes:Hearts, Stars, Flowers, Animals, Geometric patterns
- Decorations:Lattice tops, Cut-out designs, Braided edges, Whimsical shapes, Edible flowers