
Air Fryer Baby Back Ribs
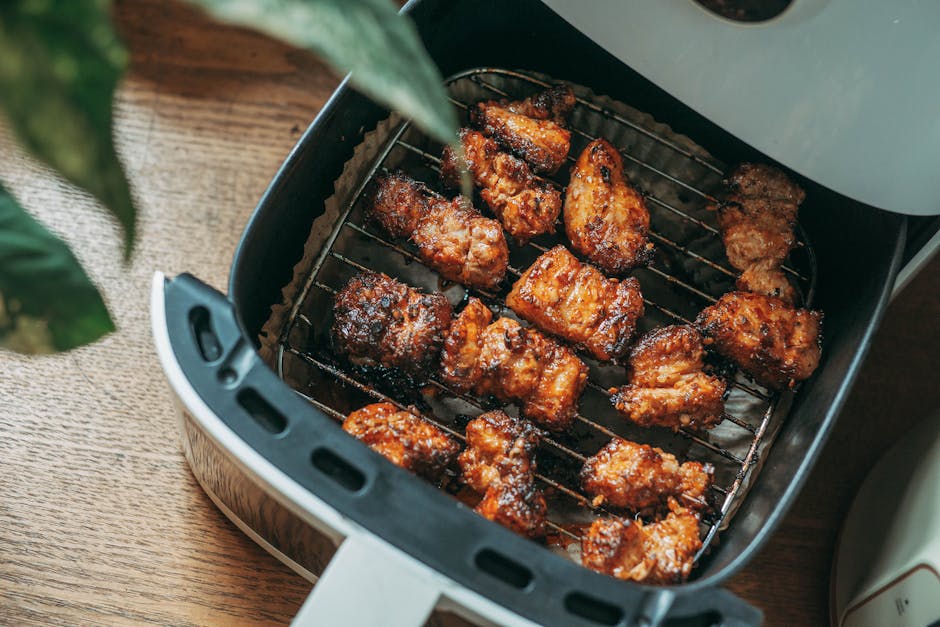
Air Fryer Baby Back Ribs: The Ultimate Guide to Tender, Flavorful, and Crispy Perfection
Achieving perfectly tender and flavorful baby back ribs at home can often feel like a culinary mountain to climb. Traditional methods like slow smoking or oven braising require significant time, specialized equipment, or a delicate balance of temperature and humidity. However, the advent of the air fryer has revolutionized the way we approach cooking ribs, offering a remarkably efficient and effective solution for achieving restaurant-quality results with minimal fuss. This comprehensive guide will delve deep into the art and science of preparing baby back ribs in your air fryer, covering everything from selecting the right ribs and essential seasonings to mastering the cooking process for unparalleled tenderness and a satisfyingly crisp exterior. Forget hours spent by a smoky grill or a steamy oven; the air fryer delivers succulent, fall-off-the-bone baby back ribs in a fraction of the time, making them an accessible and impressive dish for any occasion.
Understanding Baby Back Ribs: The Foundation of Flavor
Before embarking on your air fryer rib journey, it’s crucial to understand what you’re working with. Baby back ribs, also known as loin ribs, are sourced from the upper portion of the rib cage, closest to the spine. They are characterized by their smaller size, leaner meat, and a higher meat-to-bone ratio compared to spare ribs. This makes them a popular choice for those seeking a more delicate rib experience. The "baby" in their name refers to their size, not the age of the pig. Their inherent tenderness is a significant advantage when using high-heat cooking methods like air frying, as they are less prone to drying out and require less aggressive cooking to become palatable. When selecting baby back ribs, look for racks that are well-marbled, with a good amount of meat covering the bones. The color should be a healthy pinkish-red. Avoid racks that appear overly dry or have excessive fat caps, though a moderate amount of intramuscular fat will contribute to moisture and flavor during cooking.
The Air Fryer Advantage: Speed, Tenderness, and Crispy Texture
The air fryer, essentially a powerful convection oven in miniature, circulates hot air at high speeds around the food. This intense, even heat transfer is the key to its rib-transforming capabilities. Unlike conventional ovens that rely on radiant heat, the air fryer’s convection system creates a crisped exterior by evaporating moisture from the surface of the ribs, while the enclosed environment helps to trap steam, ensuring the meat remains incredibly moist and tender internally. This dual action is precisely what we aim for in perfectly cooked ribs: a satisfyingly caramelized and slightly chewy bark on the outside, giving way to succulent, easily separable meat on the inside. The speed advantage is also undeniable. Traditional rib recipes can take anywhere from 3 to 8 hours, depending on the method. Air fryer baby back ribs can typically be prepared in under an hour, making them a viable option for weeknight dinners or impromptu gatherings.
Essential Seasonings and Rubs: Building the Flavor Profile
The foundation of any great rib dish lies in its seasoning. For air fryer baby back ribs, a well-balanced rub is paramount. While pre-made BBQ rubs are readily available, creating your own allows for complete control over flavor profiles and ingredient quality. A classic dry rub for baby back ribs typically includes a blend of sweetness, saltiness, smokiness, and a touch of heat.
- Sweetness: Brown sugar (light or dark) or even a touch of honey or maple syrup. This caramelizes beautifully under the air fryer’s heat, contributing to the desirable bark.
- Saltiness: Kosher salt is the preferred choice due to its larger crystals and cleaner flavor. Sea salt can also be used. Salt is essential for drawing out moisture and tenderizing the meat.
- Smokiness: Smoked paprika is a cornerstone ingredient, providing a rich, smoky depth without actual smoking. You can also incorporate chipotle powder for a spicier, smokier note.
- Heat: Cayenne pepper, chili powder, or a pinch of red pepper flakes will add a pleasant kick. Adjust the quantity to your personal preference.
- Aromatics: Garlic powder and onion powder are fundamental for adding savory complexity.
A common starting point for a basic yet delicious dry rub is: 2 tablespoons brown sugar, 1 tablespoon smoked paprika, 1 tablespoon garlic powder, 1 teaspoon onion powder, 1 teaspoon kosher salt, and 1/2 teaspoon black pepper. You can then experiment with additions like cumin, mustard powder, or coriander.
Preparation Steps: From Rack to Air Fryer Ready
- Remove the Membrane: This is a crucial step for achieving tender ribs. The thin, silvery membrane on the bone side of the ribs is tough and waxy and can impede the penetration of seasonings. To remove it, slide a butter knife or the tip of a paring knife under the membrane at one end. Gently work the knife to loosen the membrane, then grip it with a paper towel (this provides better traction) and pull it off the entire rack. Discard the membrane.
- Pat Dry: Thoroughly pat the ribs dry with paper towels. This is essential for allowing the rub to adhere properly and for promoting a crisp exterior.
- Apply the Binder (Optional but Recommended): A thin layer of binder helps the dry rub stick better. Common binders include yellow mustard, hot sauce, Worcestershire sauce, or even a thin coating of olive oil. Rub a thin, even layer all over the ribs.
- Apply the Dry Rub: Generously coat both sides of the ribs with your chosen dry rub. Ensure an even distribution, pressing it gently into the meat to help it adhere. Don’t be shy with the rub; it’s where a significant portion of the flavor comes from.
- Resting (Optional): For deeper flavor penetration, you can let the seasoned ribs rest at room temperature for 30 minutes to an hour before cooking. Some recipes even suggest refrigerating them overnight after seasoning.
The Air Frying Process: Achieving Perfect Tenderness and Crispness
The cooking time and temperature will vary slightly depending on the size of your air fryer, the thickness of your ribs, and your desired level of crispness. However, a general guideline will lead you to success.
- Preheat Your Air Fryer: Always preheat your air fryer to the recommended temperature, typically around 375°F (190°C). This ensures even cooking from the moment the ribs hit the basket.
- Arrange the Ribs: Place the seasoned ribs in a single layer in the air fryer basket. Do not overcrowd the basket, as this will prevent proper air circulation and lead to uneven cooking. If necessary, cook in batches. Ribs can often be cooked curved, bone-side down, to fit more easily.
- Initial Cook: Air fry the ribs at 375°F (190°C) for approximately 15-20 minutes.
- Flip and Continue Cooking: Carefully flip the ribs using tongs. Continue air frying for another 15-20 minutes. At this point, the ribs should be starting to develop a nice color.
- Optional Basting/Saucing: If you prefer sauced ribs, this is the time to apply your favorite BBQ sauce. Brush a generous layer of sauce over the ribs and continue air frying for an additional 5-10 minutes, or until the sauce is sticky and caramelized. Be mindful that sugars in BBQ sauce can burn easily, so watch them closely.
- Check for Doneness: The ribs are done when they are tender and the meat is easily pulled away from the bone. You can test for doneness by gently pulling on a bone with tongs or a fork. The meat should feel very tender and almost fall off the bone. The internal temperature should reach at least 165°F (74°C), but for truly tender ribs, you’re aiming for higher temperatures within the meat fibers.
- Resting: Once cooked, remove the ribs from the air fryer and let them rest on a cutting board, loosely tented with foil, for 5-10 minutes. This allows the juices to redistribute throughout the meat, resulting in a more succulent and flavorful final product.
Tips for Enhanced Flavor and Texture
- Rib Size Matters: Thicker racks will require slightly longer cooking times. Adjust accordingly.
- Don’t Fear the Fat: While we remove the membrane, don’t trim away all visible fat. The fat renders during cooking, basting the meat and adding moisture and flavor.
- Experiment with Sauces: Beyond traditional BBQ sauce, consider glazes made with honey, bourbon, or even fruit preserves. Apply them in the last 10-15 minutes of cooking to prevent burning.
- Smoke Adds Depth: If you have a smoker box for your air fryer or can incorporate a teaspoon of liquid smoke into your rub, you can enhance the smoky flavor.
- Crispy Bark Management: If you desire an extra-crispy bark, you can increase the temperature to 400°F (200°C) for the last 5 minutes of cooking, watching very carefully to prevent burning.
- Understanding "Fall-Off-The-Bone": True "fall-off-the-bone" ribs are often a result of overcooking. The ideal is tender meat that easily pulls away from the bone with a gentle tug, not meat that crumbles away uncontrollably.
Troubleshooting Common Air Fryer Rib Issues
- Ribs are Dry: This can happen if cooked at too high a temperature for too long, or if the membrane wasn’t removed. Ensure proper resting time and consider a binder.
- Ribs are Not Tender: This usually means they haven’t cooked long enough. Increase cooking time in 5-10 minute increments.
- Bark is Too Soft: This can be due to insufficient drying before seasoning or cooking at too low a temperature for too long. Ensure thorough patting dry and consider a higher final temperature.
- Uneven Cooking: This is almost always a sign of overcrowding the air fryer basket. Cook in smaller batches.
Serving Air Fryer Baby Back Ribs
Air fryer baby back ribs are incredibly versatile and pair well with a wide range of classic BBQ side dishes. Think creamy coleslaw, baked beans, potato salad, corn on the cob, or a simple green salad. They also make for fantastic rib sandwiches or can be served as a standalone appetizer.
Conclusion: Effortless Rib Perfection
The air fryer has democratized the art of making delicious, tender, and crispy baby back ribs. By understanding the basics of rib selection, mastering the art of seasoning, and following a straightforward air frying process, you can consistently achieve impressive results that rival those from dedicated BBQ joints. The speed, convenience, and exceptional outcome make air fryer baby back ribs a must-try for any home cook looking to elevate their grilling (or rather, air frying) game. Embrace the simplicity, experiment with your favorite flavors, and prepare to be amazed by the succulent perfection that emerges from your air fryer.


