Flaky Food Processor Pie Crust: A Guide to Perfect Pastry
Flaky food processor pie crust is a game-changer for bakers of all levels. It’s a simple, efficient technique that delivers a consistently perfect crust with a light, airy texture that crumbles beautifully. The secret lies in the right balance of ingredients, the precision of the food processor, and a few key tips to ensure success.
This post will explore the science behind flaky pie crusts, delve into the intricacies of using a food processor for perfect results, and address common challenges. We’ll also touch on alternative methods and explore creative variations to inspire your baking journey.
Understanding Flaky Pie Crusts
The hallmark of a perfect pie crust is its flakiness, a delightful texture that shatters into delicate layers with each bite. This textural delight is not merely aesthetic; it enhances the overall eating experience, offering a satisfying contrast to the fillings.
I’ve been on a roll lately with my food processor pie crust – it’s so flaky and perfect for all sorts of pies. This week, I decided to try it out for a classic homemade chicken pot pie , and let me tell you, it was a total hit! The crust held up beautifully against the creamy chicken filling, and everyone raved about how delicious it was.
I’m definitely going to be making this pie again soon – maybe even with a different filling next time!
A flaky crust is a testament to the science of baking, where the interplay of ingredients and techniques results in a culinary masterpiece.
The Science of Flakiness
Flakiness in pie crusts is achieved through a combination of factors, including gluten development, fat distribution, and hydration levels. Gluten, a protein found in flour, forms a network that gives structure to the dough. However, excessive gluten development can lead to a tough crust.
Fat, typically in the form of butter or shortening, plays a crucial role in creating layers by preventing gluten from forming a continuous network. When fat is incorporated into the dough, it creates pockets of air that become separated by thin layers of dough.
As the dough bakes, the heat causes the fat to melt and expand, pushing the dough layers apart, resulting in flakiness. The hydration level of the dough also influences flakiness. Too much water leads to a tough crust, while insufficient hydration can result in a dry and crumbly texture.
The ideal hydration level allows for the formation of delicate layers without compromising the structural integrity of the crust.
Common Ingredients and Their Contributions
- Flour:The primary ingredient in pie crusts, flour provides the structural framework. Different types of flour, such as all-purpose flour and pastry flour, have varying gluten content, influencing the texture of the crust. Pastry flour, with its lower gluten content, produces a more tender and flaky crust.
- Fat:Fat is essential for flakiness. Butter, shortening, and lard are commonly used fats in pie crusts. Butter, with its high water content, contributes to a richer flavor and tender texture, but it can also lead to a less flaky crust compared to shortening.
Shortening, a highly refined fat with a higher melting point, produces a more flaky crust due to its ability to create distinct layers. Lard, a traditional fat, offers a rich flavor and excellent flakiness, but it may not be suitable for those with dietary restrictions.
- Water:Water is essential for activating the gluten in flour and binding the ingredients together. The amount of water used directly influences the hydration level of the dough, impacting the texture of the crust. Too much water can lead to a tough crust, while insufficient hydration can result in a dry and crumbly texture.
- Salt:Salt enhances the flavor of the crust and helps control gluten development. Salt inhibits gluten formation, promoting a more tender and flaky crust.
- Sugar:A small amount of sugar is often added to pie crusts for flavor and browning. Sugar caramelizes during baking, contributing to the crust’s golden hue.
Food Processor Techniques for Pie Crusts
The food processor is a kitchen appliance that can be used to make flaky pie crusts with ease. By using the right techniques, you can ensure that your pie crust is tender, flaky, and delicious.
Choosing the Right Blade
The type of blade you use in your food processor will affect the texture of your pie crust. A standard blade will chop the ingredients evenly, but it may not produce the desired flakiness. For a truly flaky pie crust, a slicing bladeis essential.
It cuts the ingredients into thin, flat pieces, which creates layers that separate during baking, resulting in a flaky texture.
Pulse Settings and Timing
Using the pulse setting on your food processor is crucial for creating a flaky pie crust. Pulsing the ingredients helps to avoid over-mixing, which can lead to a tough crust. The goal is to incorporate the fat into the flour without overworking the dough.
Here are some tips for using the pulse setting:* Start with short pulses:Pulse the ingredients for a few seconds at a time, checking the mixture after each pulse.
Avoid over-mixing
Stop pulsing as soon as the ingredients are evenly combined and the fat is incorporated.
Listen to the sound
As the ingredients are pulsed, the sound of the food processor will change. When the fat is properly incorporated, the sound will become softer and more muffled.
Steps for Making a Flaky Pie Crust in a Food Processor
Here are the steps for making a flaky pie crust using a food processor:
1. Measure the ingredients accurately
Using a kitchen scale to measure the flour and fat will ensure the most accurate results.
2. Chill the ingredients
Keep the flour, butter, and water chilled before mixing. This helps to prevent the fat from melting and the dough from becoming too soft.
3. Pulse the flour and fat
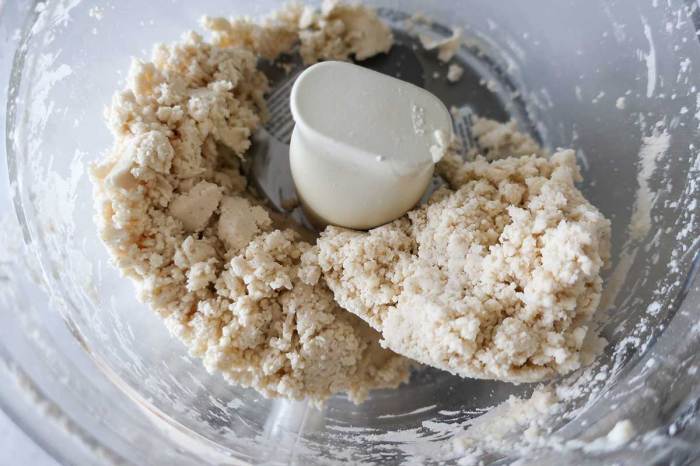
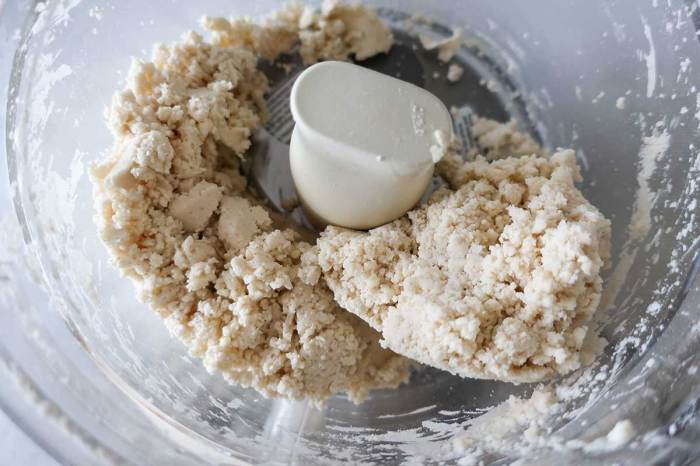
Pulse the flour and chilled butter until the mixture resembles coarse crumbs.
4. Add the water
Slowly add the ice water, pulsing until the dough just comes together. Do not over-mix.
5. Form the dough
I love the ease of a food processor for pie crusts, but sometimes I crave something a little heartier. That’s when I turn to a comforting dish like spaetzle sauerkraut and sausage casserole. It’s the perfect blend of savory and satisfying, and it always reminds me of cozy evenings spent with loved ones.
But when I’m back in the mood for something flaky and sweet, I’ll be reaching for that food processor again to whip up a batch of my favorite pie crust!
Turn the dough out onto a lightly floured surface and shape it into a disc.
6. Chill the dough
Wrap the dough in plastic wrap and chill it in the refrigerator for at least 30 minutes.
Sometimes, when I’m craving something savory, I turn to my trusty food processor to whip up a batch of flaky pie crust. But lately, I’ve been wanting something lighter, and that’s where my recipe for spinach egg white muffins comes in.
These little bites of goodness are packed with protein and flavor, and they’re perfect for a quick and healthy breakfast or snack. Of course, nothing beats the satisfying crunch of a perfectly flaky pie crust, so I’ll definitely be back to my food processor soon!
7. Roll out the dough
Roll out the chilled dough on a lightly floured surface to the desired thickness.
Troubleshooting Common Problems
While using a food processor for pie crusts is generally straightforward, you might encounter some challenges. Here are some tips for troubleshooting common problems:* Over-mixing:If you over-mix the dough, it will become tough and less flaky. If this happens, try adding a little more ice water to the dough and then chill it for another 30 minutes before rolling it out.
Uneven incorporation of ingredients
If the fat is not evenly incorporated into the flour, the crust will not be flaky. To avoid this, pulse the ingredients in short bursts until the mixture resembles coarse crumbs.
Dough too dry
If the dough is too dry, it will be difficult to roll out. Add a tablespoon of ice water at a time until the dough is moist enough to come together.
Dough too wet
If the dough is too wet, it will be sticky and difficult to handle. Add a tablespoon of flour at a time until the dough is firm enough to form a disc.By following these tips, you can use a food processor to create a flaky and delicious pie crust that will impress your family and friends.
Common Flaky Pie Crust Challenges
Even with a food processor, achieving a perfectly flaky pie crust can be tricky. Several common challenges can lead to a tough, dense, or even soggy crust. Understanding these challenges and implementing solutions will help you consistently create the flaky, buttery pie crust you desire.
Incorrect Handling of Ingredients
The ingredients in a pie crust play a crucial role in its texture. Improper handling can affect the final outcome.
- Overmixing the Dough:Overmixing the dough develops gluten, which makes the crust tough. When using a food processor, pulse the ingredients until just combined, ensuring the butter remains in small, pea-sized pieces.
- Using Warm Butter:Cold butter is essential for creating flaky layers. Warm butter will melt too quickly, resulting in a dense crust.
- Overworking the Dough After Processing:Once the dough is processed, avoid overworking it by hand. Gently shape the dough into a disc and chill it immediately.
Incorrect Temperature
The temperature of the ingredients is critical for achieving a flaky crust.
- Using Room Temperature Water:Using room temperature water will cause the butter to melt too quickly, resulting in a dense crust.
- Chilling the Dough Insufficiently:Chilling the dough allows the gluten to relax and the butter to solidify. This is essential for creating flaky layers.
Inadequate Chilling Time
Chilling the dough is a crucial step in the pie crust making process.
- Insufficient Chilling:Chilling the dough for at least 30 minutes allows the butter to solidify, creating flaky layers.
- Chilling the Dough Too Long:Chilling the dough for too long can cause the butter to become too hard, making it difficult to roll out.
Table Comparing Common Flaky Pie Crust Issues and Solutions
| Issue | Cause | Solution | Example |
|---|---|---|---|
| Tough Crust | Overmixing the dough | Pulse the dough until just combined, ensuring the butter remains in small pieces. | [Illustration of a tough pie crust, showing a dense, compact texture.] |
| Dense Crust | Using warm butter | Use cold butter, ensuring it’s well chilled before incorporating it into the dough. | [Illustration of a dense pie crust, showing a lack of flaky layers.] |
| Soggy Crust | Insufficient chilling time | Chill the dough for at least 30 minutes, allowing the butter to solidify. | [Illustration of a soggy pie crust, showing a soft and damp texture.] |
Alternative Methods for Flaky Pie Crusts: Flaky Food Processor Pie Crust
While a food processor is a fantastic tool for achieving flaky pie crusts, it’s not the only way. You can create perfectly flaky crusts using traditional methods, like a pastry blender or your hands. These methods offer a hands-on approach that allows you to feel the texture of the dough and control the amount of gluten development.
Pastry Blender Method, Flaky food processor pie crust
The pastry blender method is a classic technique that involves using a pastry blender to cut cold butter into flour. The resulting mixture resembles coarse crumbs, which are then combined with ice water to form the dough. This method works because the cold butter doesn’t melt as quickly, allowing for more air pockets to form, leading to a flaky crust.The pastry blender method is a good option for those who prefer a more tactile approach and want to control the size of the butter pieces.
It’s also a good choice for beginners, as it’s less intimidating than the food processor method.Here are the steps for making a flaky pie crust using a pastry blender:
1. Combine dry ingredients
In a large bowl, whisk together 2 cups all-purpose flour, 1 teaspoon salt, and 1/2 cup granulated sugar.
2. Cut in the butter
Add 1 cup cold, unsalted butter, cut into small pieces. Use a pastry blender to cut the butter into the flour until the mixture resembles coarse crumbs.
3. Add the water
Gradually add 6-8 tablespoons of ice water, one tablespoon at a time, stirring with a fork until the dough just comes together.
4. Form the dough
Divide the dough in half and shape each half into a disc. Wrap each disc in plastic wrap and refrigerate for at least 30 minutes.
Hand-Mixing Method
The hand-mixing method is a more hands-on approach that involves using your fingers to cut the butter into the flour. This method requires a bit more effort but allows for greater control over the texture of the dough.This method is ideal for those who prefer a more hands-on approach and want to feel the texture of the dough.
It’s also a good choice for those who want to avoid using a food processor.Here are the steps for making a flaky pie crust using the hand-mixing method:
1. Combine dry ingredients
In a large bowl, whisk together 2 cups all-purpose flour, 1 teaspoon salt, and 1/2 cup granulated sugar.
2. Cut in the butter
Add 1 cup cold, unsalted butter, cut into small pieces. Use your fingers to rub the butter into the flour until the mixture resembles coarse crumbs.
3. Add the water
Gradually add 6-8 tablespoons of ice water, one tablespoon at a time, stirring with a fork until the dough just comes together.
4. Form the dough
Divide the dough in half and shape each half into a disc. Wrap each disc in plastic wrap and refrigerate for at least 30 minutes.
Comparing the Methods
| Method | Description | Pros | Cons | Example Recipes ||—|—|—|—|—|| Food Processor | Uses a food processor to cut butter into flour | Fast and efficient, produces consistent results | Can overwork the dough, resulting in a tough crust | Classic Apple Pie, Pumpkin Pie || Pastry Blender | Uses a pastry blender to cut butter into flour | Provides a hands-on approach, allows for control over the size of the butter pieces | Can be time-consuming, requires some effort | Blueberry Pie, Peach Pie || Hand-Mixing | Uses fingers to cut butter into flour | Most hands-on approach, allows for greater control over the texture of the dough | Can be time-consuming, requires some effort | Key Lime Pie, Lemon Meringue Pie |
Creative Pie Crust Variations
The classic buttery pie crust is a timeless favorite, but don’t be afraid to get creative and explore a world of flavor and texture possibilities. Adding unique ingredients and techniques can elevate your pie crusts from ordinary to extraordinary, making them the perfect complement to any filling.
Flavorful Pie Crusts
Adding herbs, spices, cheese, or nuts to your pie crust can infuse it with a burst of flavor and create a more complex sensory experience. Here are some ideas for incorporating these ingredients:* Herbs:Fresh or dried herbs like thyme, rosemary, sage, or basil can add a savory dimension to sweet or savory pies.
Spices
Warm spices like cinnamon, nutmeg, ginger, or cardamom can enhance the flavor of sweet pies and create a comforting aroma.
Cheese
Grated Parmesan, cheddar, or Gruyere can add a salty and nutty flavor to savory pies and create a richer, more robust texture.
Nuts
Chopped pecans, walnuts, or almonds can add a crunchy texture and a nutty flavor to both sweet and savory pies.
Textural Variations
Experimenting with different flours, fats, and techniques can create a range of textures in your pie crusts, from delicate and flaky to robust and chewy.* Flours:Using a combination of all-purpose flour and whole wheat flour can add a subtle nutty flavor and a slightly chewier texture.
Fats
Using a combination of butter and shortening can create a flakier crust, while using only butter will result in a more tender and buttery crust.
Techniques
Using a food processor to cut the fat into the flour will create a flakier crust, while using a pastry blender or your fingers will result in a more tender crust.
Visual Appeal
Beyond flavor and texture, you can also enhance the visual appeal of your pie crusts by incorporating decorative elements. * Lattice Tops:Create a classic lattice top by weaving strips of dough over the pie filling.
Crimped Edges
Use a fork or your fingers to create a decorative edge around the pie crust.
Cut-Out Designs
Use cookie cutters to cut out shapes from the dough and place them on top of the pie filling.
Creating a Savory Herb Pie Crust
Here’s a step-by-step guide to creating a savory herb pie crust:
1. Gather Ingredients
1 1/2 cups all-purpose flour
1/2 teaspoon salt
1/2 cup (1 stick) unsalted butter, chilled and cut into small pieces
1/4 cup shortening, chilled
1/4 cup chopped fresh herbs (such as thyme, rosemary, or sage)
1/4 cup ice water
2. Combine Dry Ingredients
In a food processor, combine the flour and salt. Pulse until well combined.
3. Cut in Fat
Add the chilled butter and shortening to the food processor. Pulse until the mixture resembles coarse crumbs.
4. Add Herbs
Add the chopped herbs to the food processor and pulse until combined.
5. Add Water
Gradually add the ice water, pulsing until the dough just comes together. Do not overmix.
6. Form Dough
Shape the dough into a disc, wrap in plastic wrap, and refrigerate for at least 30 minutes.
7. Roll Out Dough
Roll out the dough on a lightly floured surface to a 12-inch circle.
8. Transfer to Pie Plate
Transfer the dough to a pie plate and trim the edges.
9. Bake
Bake according to your recipe instructions.
Creating a Sweet Cinnamon-Sugar Pie Crust
Here’s a step-by-step guide to creating a sweet cinnamon-sugar pie crust:
1. Gather Ingredients
1 1/2 cups all-purpose flour
1/2 teaspoon salt
1/2 cup (1 stick) unsalted butter, chilled and cut into small pieces
1/4 cup shortening, chilled
1 tablespoon granulated sugar
1/2 teaspoon ground cinnamon
1/4 cup ice water
2. Combine Dry Ingredients
In a food processor, combine the flour, salt, sugar, and cinnamon. Pulse until well combined.
3. Cut in Fat
Add the chilled butter and shortening to the food processor. Pulse until the mixture resembles coarse crumbs.
4. Add Water
Gradually add the ice water, pulsing until the dough just comes together. Do not overmix.
5. Form Dough
Shape the dough into a disc, wrap in plastic wrap, and refrigerate for at least 30 minutes.
6. Roll Out Dough
Roll out the dough on a lightly floured surface to a 12-inch circle.
7. Transfer to Pie Plate
Transfer the dough to a pie plate and trim the edges.
8. Bake
Bake according to your recipe instructions.

