No Knead Dutch Oven Bread: Easy, Crusty, and Delicious
No knead Dutch oven bread is a revelation for anyone who loves the aroma and taste of freshly baked bread but dreads the hours of kneading. This method utilizes the power of slow fermentation and a hot Dutch oven to create a crusty, flavorful loaf with minimal effort.
The magic lies in the combination of a simple dough, a long, slow rise, and the heat of a Dutch oven. This creates a bread with a crispy exterior and a soft, chewy interior. The beauty of no knead bread is its simplicity.
It’s a method that allows you to enjoy the satisfaction of baking bread without the commitment of traditional kneading.
No-Knead Dutch Oven Bread

The world of baking has been revolutionized by the no-knead bread method, offering a simple and rewarding way to enjoy homemade bread without the hassle of extensive kneading. This technique, often referred to as “no-knead” or “artisan” bread, involves a long, slow fermentation process that develops deep flavors and a chewy, airy crumb.
Using a Dutch oven to bake the bread is crucial to achieving that perfect crust, and it’s a technique that has gained immense popularity in recent years.
Benefits of Using a Dutch Oven for Baking Bread
The Dutch oven plays a crucial role in creating that beautiful crust and achieving the perfect texture in no-knead bread. The enclosed environment of the Dutch oven traps steam, creating a moist atmosphere that allows the bread to rise significantly before the crust sets.
This results in a soft, airy interior and a crispy, golden-brown crust.
- Even Baking:The Dutch oven’s thick walls distribute heat evenly, ensuring that the bread bakes consistently from all sides. This prevents hot spots and ensures that the bread is cooked thoroughly without burning.
- Enhanced Crust Development:The high temperature and steam generated inside the Dutch oven contribute to the development of a thick, crispy crust. The steam creates a moist environment, allowing the bread to rise more, while the high heat encourages browning and crust formation.
- Improved Texture:The combination of steam and heat creates a chewy, airy crumb with a satisfying texture. The long fermentation process also contributes to the bread’s texture, allowing the gluten to relax and develop a complex network.
History and Origins of No-Knead Bread Baking
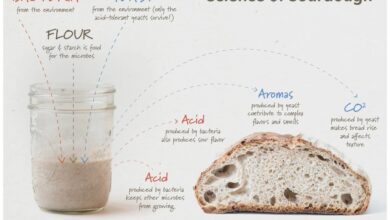
The no-knead bread baking method has its roots in the traditional sourdough bread making techniques of Europe. The long fermentation process, often lasting for several hours or even overnight, allows the natural yeast in sourdough starter to develop complex flavors and a unique texture.
However, the modern no-knead bread method, as we know it today, emerged in the early 2000s with the publication of Jim Lahey’s recipe in The New York Times.
- Jim Lahey’s Recipe:Lahey’s recipe, published in 2006, popularized the no-knead bread method. It involves mixing flour, water, yeast, and salt, letting the dough rise for 12-18 hours, and then baking it in a preheated Dutch oven. This simple recipe quickly became a sensation, inspiring countless home bakers to try their hand at making delicious bread.
- Modern Adaptations:Since Lahey’s recipe, countless variations and adaptations have emerged. From different types of flour to the addition of ingredients like herbs, seeds, and nuts, the no-knead bread method has become a canvas for culinary creativity. The basic principles remain the same, however, emphasizing the long fermentation process and the use of a Dutch oven for baking.
There’s something so satisfying about pulling a perfectly crusty loaf of no-knead Dutch oven bread from the oven, its aroma filling the kitchen. But sometimes, you crave something a little more smoky and savory. That’s when I turn to a recipe for bbq country style ribs , the kind that falls off the bone with a sweet and tangy sauce.
And just like with the bread, the ribs need a little time to develop their flavor, so I can always find a way to make both on the same day.
Ingredients and Equipment
This no-knead bread recipe is known for its simplicity, requiring just a handful of basic ingredients and a few essential tools. The ingredients work together to create a flavorful and chewy loaf, while the equipment ensures even baking and a beautiful crust.
Ingredients
The ingredients for no-knead Dutch oven bread are straightforward and readily available.
There’s something so satisfying about pulling a perfectly golden loaf of no-knead Dutch oven bread from the oven. The crust is crisp, the crumb is soft, and the aroma is intoxicating. And what better way to enjoy it than with a slice of homemade pie?
This weekend, I’m planning on making a strawberry rhubarb custard pie – the tartness of the rhubarb will be the perfect complement to the richness of the bread. I can’t wait to savor every bite!
- Flour:All-purpose flour is the primary ingredient, providing the structure and texture to the bread. It contains gluten, a protein that forms long strands when mixed with water, giving the dough its elasticity and ability to rise.
- Yeast:Active dry yeast is the leavening agent, responsible for the bread’s rise. It feeds on the sugars in the flour and produces carbon dioxide gas, which creates air pockets within the dough, making it light and airy.
- Salt:Salt enhances the flavor of the bread and helps control the yeast’s activity. It also strengthens the gluten strands, leading to a more stable dough structure.
- Water:Water is essential for activating the yeast and hydrating the flour. The amount of water determines the dough’s consistency, influencing its texture and rise.
Equipment
The equipment for this recipe is minimal and includes:
- Dutch oven:A Dutch oven is crucial for this recipe. It creates a steamy environment during baking, leading to a soft and chewy interior and a crispy crust. The heavy lid helps to trap heat and moisture, ensuring even cooking.
- Large bowl:A large bowl is needed for mixing the dough. It should be big enough to accommodate the dough as it rises.
- Measuring cups and spoons:Accurate measurements are important for consistent results. Use standard measuring cups and spoons for precise ingredient quantities.
- Parchment paper:Parchment paper is useful for lining the Dutch oven, preventing the bread from sticking. It also makes cleanup easier.
- Sharp knife or razor blade:A sharp knife or razor blade is needed for scoring the bread before baking. This helps to control the direction of the loaf’s rise and creates a beautiful pattern on the crust.
The Dough-Making Process
This is where the magic truly begins. The no-knead method is all about patience and letting time do the work for you. You’ll be amazed at how simple it is to create a delicious, crusty loaf of bread with minimal effort.
Mixing the Dough
The initial mixing process is crucial for incorporating the ingredients and starting the gluten development. You’ll be combining flour, water, yeast, and salt in a large bowl.
- In a large bowl, combine the flour and salt. This ensures the salt is evenly distributed throughout the dough, preventing it from inhibiting the yeast’s activity.
- Add the water and stir with a wooden spoon until a shaggy dough forms. Don’t worry if it seems dry or sticky. This is a key step in the no-knead method.
- Sprinkle the yeast on top of the dough and let it sit for 10-15 minutes. This allows the yeast to begin to activate and start the fermentation process.
- Once the yeast has had time to bloom, use your hands to gently fold the dough over itself a few times. This helps to distribute the yeast and begin to develop the gluten strands. The dough will still be quite sticky at this stage.
- Cover the bowl with plastic wrap or a clean kitchen towel and let the dough rise at room temperature for 12-18 hours. This is the autolyse process.
The Autolyse Process
This extended rest period allows the flour’s proteins to absorb water and begin to form gluten. Gluten is a network of proteins that gives bread its structure and elasticity. During autolyse, the gluten develops slowly and naturally, creating a dough that is both flavorful and easy to work with.
First Rise and Shaping
The first rise is crucial for developing the bread’s texture and flavor. During this stage, the yeast consumes the sugars in the flour, producing carbon dioxide gas that creates air pockets within the dough. This process results in a light and airy bread.
The first rise typically takes around 12 to 18 hours at room temperature, allowing the yeast to work its magic.
No-knead Dutch oven bread is all about simplicity, just like my go-to dessert, black forest cake i. It’s a recipe that requires minimal effort but delivers maximum flavour. While the bread bakes in the oven, I can whip up a batch of the cake, knowing it’ll be a perfect complement to the warm, crusty loaf.
Both are delicious, easy to make, and perfect for sharing with friends and family.
Shaping the Dough
Once the dough has risen, it’s time to shape it into a loaf. This step requires gentle handling to avoid deflating the air pockets created during the rise. The goal is to create a smooth and even surface that will bake evenly.
Here’s how to shape the dough:
- Lightly flour a work surface. This will prevent the dough from sticking.
- Turn the dough out onto the floured surface. Gently press down on the dough to release any excess air.
- Fold the dough in half. This creates a smooth and even surface.
- Fold the dough in half again. Repeat this step two or three times to ensure a consistent shape.
- Place the dough in a lightly greased Dutch oven. The Dutch oven creates a humid environment that helps the bread rise evenly.
Tips for Achieving a Smooth and Even Surface
- Use a light hand when handling the dough. Avoid overworking the dough, as this can deflate the air pockets and result in a dense bread.
- Keep the dough warm during the first rise. This helps the yeast to work efficiently. A warm kitchen or a slightly heated oven (around 80 degrees Fahrenheit) can be helpful.
- Don’t be afraid to use a little extra flour. If the dough is sticking to your hands, lightly dust it with flour.
- Allow the dough to rise undisturbed. Avoid opening the Dutch oven or checking on the dough too often, as this can disrupt the rise.
Second Rise and Baking
The second rise is a crucial step in the no-knead bread process, allowing the dough to develop its final structure and texture. It’s a chance for the yeast to continue working its magic, transforming the dough into a light and airy loaf.
This stage also gives the dough time to relax, which helps to create a more even rise and a smoother texture.
Second Rise
The second rise typically takes about 1-2 hours, depending on the temperature of your kitchen. The dough should double in size, and it will feel soft and puffy. You can tell if the dough is ready by lightly pressing your finger into it; if it springs back slowly, it’s ready to bake.
Baking, No knead dutch oven bread
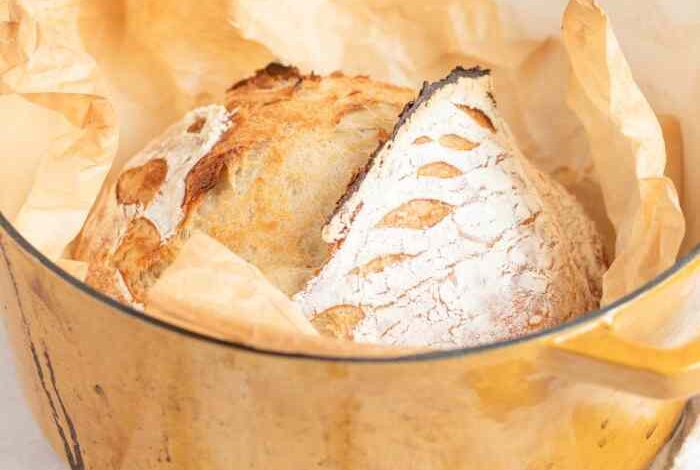
Baking the bread in a Dutch oven creates a beautiful, crusty loaf. The Dutch oven traps the steam from the dough, which helps to create a soft, chewy crumb and a crispy crust.
Baking Process
- Preheat your Dutch oven in the oven at 450°F (230°C) for at least 30 minutes. This ensures the oven is hot enough to bake the bread quickly and evenly.
- Carefully remove the hot Dutch oven from the oven. Transfer the dough from the bowl to the preheated Dutch oven.
- Score the top of the dough with a sharp knife or razor blade to allow steam to escape during baking. This prevents the loaf from cracking and helps to create a beautiful crust.
- Place the lid on the Dutch oven and bake for 30 minutes. This initial baking time allows the steam to build up and create a moist environment, resulting in a soft, airy crumb.
- After 30 minutes, remove the lid and bake for an additional 15-20 minutes, or until the crust is golden brown and the loaf sounds hollow when tapped.
Role of the Dutch Oven Lid
The Dutch oven lid is essential for creating a crusty loaf. It traps the steam from the dough, which helps to create a soft, chewy crumb and a crispy crust. The steam also helps to prevent the bread from drying out too quickly, which would result in a tough, dry loaf.
Cooling and Serving

The no-knead bread baking journey culminates in the delicious moment of enjoying your freshly baked loaf. However, before indulging, it’s crucial to allow the bread to cool properly to ensure optimal texture and flavor.
Cooling the Bread
Cooling the bread is essential for achieving a perfect crust and soft interior. It allows the bread to firm up and prevents the steam trapped inside from making the bread soggy.
- Allow the bread to cool in the Dutch oven for 10-15 minutes.This allows the crust to set and prevents it from becoming too soft.
- Transfer the bread to a wire rack to cool completely.This allows air circulation around the bread, ensuring even cooling and preventing moisture buildup.
- Avoid cutting the bread while it’s still warm.The crumb will be too soft and the bread may collapse.
Ideal Serving Temperature
The ideal serving temperature for no-knead bread is room temperature. At this temperature, the flavors are fully developed, and the bread is at its best texture.
Pairing with Toppings and Spreads
No-knead bread is incredibly versatile and pairs well with a wide array of toppings and spreads.
- Sweet Options:Enjoy the bread with jams, jellies, honey, or even a simple pat of butter.
- Savory Options:Pair the bread with savory spreads like hummus, pesto, or tapenade.
- Hearty Options:For a more substantial meal, consider serving the bread with soups, stews, or salads.
Variations and Adaptations
The beauty of no-knead Dutch oven bread lies in its simplicity and versatility. While the basic recipe is fantastic, it serves as a springboard for endless flavor combinations and creative shaping.
Flavor Variations
Adding herbs, spices, or other ingredients to your dough is a great way to personalize your bread. Here are some ideas:
- Herbs:Fresh or dried herbs like rosemary, thyme, oregano, basil, or chives can add a delightful aroma and flavor. For a more subtle flavor, incorporate herbs into the dough. For a stronger flavor, sprinkle herbs on top before baking.
- Spices:Spices like cinnamon, nutmeg, ginger, cardamom, or even a pinch of cayenne pepper can create warm and complex flavors.
- Seeds:Adding seeds like sunflower seeds, pumpkin seeds, or poppy seeds adds texture and nutty flavors.
- Cheese:For a savory twist, incorporate shredded cheese like cheddar, mozzarella, or parmesan into the dough. Remember that cheese melts, so don’t add too much.
- Other Ingredients:You can also experiment with other ingredients like olives, dried fruits, or even chopped nuts. Remember to adjust the amount of liquid in the dough if adding ingredients that absorb moisture.
Shaping Methods
While the classic oval loaf is a beautiful and delicious choice, there are other ways to shape your no-knead Dutch oven bread:
- Boule:A boule is a round loaf with a slightly irregular shape. To form a boule, simply shape the dough into a tight ball and let it rise in a lightly oiled bowl. This method is ideal for creating a crusty exterior with a soft and airy interior.
- Rolls:For smaller portions, divide the dough into equal pieces and shape them into rolls. You can then bake them in a baking sheet or individual muffin tins. Rolls are perfect for sandwiches or as a side dish.
Troubleshooting and Tips: No Knead Dutch Oven Bread

No-knead bread, despite its simplicity, can sometimes present challenges. This section will guide you through common issues and offer solutions to help you achieve consistently delicious results.
Understanding Dough Consistency
The consistency of your dough is crucial for a successful loaf. If the dough is too wet, it will be sticky and difficult to handle, leading to a dense and gummy loaf. Conversely, if the dough is too dry, it will be stiff and difficult to rise, resulting in a crumbly loaf.
Here are some tips for achieving the right consistency:* Use a kitchen scale:Weighing your ingredients ensures accurate proportions, which is essential for consistent results.
Adjust the flour
If your dough is too wet, add a tablespoon of flour at a time until it reaches the desired consistency. If it’s too dry, add a tablespoon of water at a time.
Patience is key
The dough needs time to absorb the water and develop gluten. Allow it to rest for at least 12 hours, preferably 18-24 hours.
Troubleshooting Common Issues
Dough Not Rising Enough
A lack of rise can be caused by several factors:* Incorrect yeast amount:Ensure you’re using the right amount of active dry yeast.
Warm water
The water temperature should be between 105°F and 115°F for optimal yeast activity.
Cold environment
The dough needs a warm environment to rise properly. Keep it in a draft-free place at room temperature.
Bread Crumb Is Dense
A dense crumb can be caused by:* Overmixing:Overmixing develops too much gluten, resulting in a tough loaf.
Not enough rising time
The dough needs sufficient time to rise to develop a light and airy crumb.
Crust Is Too Hard
A hard crust can be due to:* Overbaking:Baking for too long can result in a dry and tough crust.
High oven temperature
A very high oven temperature can cause the crust to harden quickly.
Bread Is Flat
A flat loaf can be caused by:* Not enough rising time:The dough needs sufficient time to rise to develop a good volume.
Over-proofing
Over-proofing weakens the gluten structure, leading to a flat loaf.
Incorrect shaping
Proper shaping helps the dough maintain its volume during baking.
Tips for Consistent Results
Use a Dutch oven
A Dutch oven creates a steamy environment that helps the bread rise and develop a crispy crust.
Score the loaf
Scoring the top of the loaf before baking allows steam to escape, preventing the crust from cracking.
Don’t peek
Resist the urge to open the oven door during baking, as this can cause the bread to deflate.
Cool completely
Allow the bread to cool completely before slicing to prevent it from becoming gummy.
Benefits of No-Knead Dutch Oven Bread
No-knead Dutch oven bread offers a delightful combination of convenience, flavor, and health benefits, making it a rewarding experience for any home baker. From the satisfaction of crafting fresh bread to the health advantages of whole grains, this method offers a delightful culinary journey.
Health Benefits of Whole Grain Bread
Whole grain bread provides a range of nutritional benefits compared to refined white bread. Whole grains are rich in fiber, vitamins, minerals, and antioxidants.
- Improved Digestion:The fiber in whole grains promotes regular bowel movements and helps prevent constipation.
- Reduced Risk of Chronic Diseases:Studies suggest that regular consumption of whole grains may lower the risk of heart disease, type 2 diabetes, and some types of cancer.
- Increased Energy Levels:Whole grains provide sustained energy release, helping you feel fuller for longer and preventing energy crashes.
Convenience and Time-Saving Aspects of No-Knead Baking
The no-knead method eliminates the need for extensive kneading, making bread baking significantly more accessible and time-efficient.
- Minimal Effort:The dough requires only a few minutes of mixing and a short period of kneading. The rest of the process involves minimal effort, allowing you to focus on other tasks.
- Flexible Scheduling:The long, slow rise of the dough allows for flexibility in your baking schedule. You can mix the dough in the morning and bake it in the evening, or even prepare it a day in advance.
- Reduced Cleanup:With minimal kneading, there’s less mess to clean up, making the baking process more enjoyable.
The Satisfaction of Baking Fresh Bread at Home
Baking your own bread is a rewarding experience that brings a sense of accomplishment and provides a delicious treat.
- Freshness and Flavor:Homemade bread boasts a superior flavor and texture compared to store-bought varieties. The aroma of freshly baked bread is also a delightful sensory experience.
- Customization and Control:You have complete control over the ingredients, ensuring you’re using high-quality, wholesome ingredients. You can also experiment with different flavors and add-ins to create unique loaves.
- Sense of Achievement:Baking bread from scratch is a satisfying accomplishment that allows you to enjoy the fruits of your labor.