Three Layer Caramel Cake
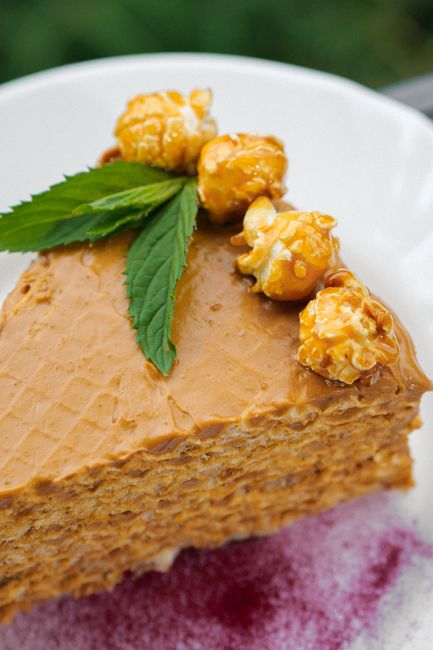
Three Layer Caramel Cake: A Decadent Masterpiece for Every Occasion
The allure of a three-layer caramel cake lies in its multi-dimensional flavor and texture. This isn’t just a dessert; it’s an experience. Each layer contributes a distinct yet harmonious element, from the moist, tender cake crumb to the rich, gooey caramel frosting that cascades down the sides. Achieving this perfect balance requires understanding the nuances of each component and how they interrelate. This article will delve deep into the anatomy of a superior three-layer caramel cake, exploring ingredient selection, essential techniques, and troubleshooting common issues, ultimately empowering bakers to create this show-stopping dessert with confidence.
The Foundation: Crafting the Perfect Caramel Cake Layers
The cake layers form the structural and flavor bedrock of this confection. For a truly exceptional three-layer caramel cake, a robust yet tender cake recipe is paramount. Many recipes utilize a butter-based cake, providing richness and a tender crumb, while others opt for an oil-based cake for added moisture, which can be beneficial given the inherent moisture of caramel. A common and highly effective approach involves a classic vanilla or brown sugar cake. Brown sugar, with its molasses notes, inherently complements the caramel flavor, creating a deeper, more complex taste profile.
Ingredient quality significantly impacts the final outcome. Unsalted butter, softened to room temperature, is essential for proper creaming with sugar, which incorporates air and contributes to a lighter texture. Using high-quality granulated sugar and packed light brown sugar ensures sweetness and moisture respectively. All-purpose flour, sifted before measuring, prevents over-measuring and leads to a lighter cake. Baking powder and baking soda are the leavening agents, and their freshness is critical. Eggs, also at room temperature, emulsify the batter, add richness, and contribute to structure. Whole milk or buttermilk, again at room temperature, provides moisture and activates the leavening agents. A touch of vanilla extract enhances the overall flavor.
The creaming method is a cornerstone of cake baking. Creaming softened butter with sugar until light and fluffy is a crucial step that aerates the mixture, creating tiny air pockets that expand during baking, resulting in a tender crumb. Following this, eggs are added one at a time, fully incorporating each before adding the next. This emulsification process binds the fat and liquid, preventing the batter from separating. The dry ingredients (flour, leavening agents, salt) are typically whisked together separately. Then, the wet ingredients (milk/buttermilk, vanilla) are combined. Alternating the addition of the dry and wet ingredients to the creamed butter and sugar mixture is a vital technique. This ensures the gluten in the flour is not overdeveloped, which would lead to a tough cake. Starting and ending with the dry ingredients is a common and effective practice. Mix only until just combined; overmixing develops gluten, leading to a dense, chewy cake.
Baking the layers requires precision. Three 8-inch or 9-inch round cake pans are standard for a three-layer cake. Greasing and flouring the pans, or using parchment paper rounds, is essential to prevent sticking. Evenly dividing the batter among the prepared pans ensures consistent baking times and heights. Baking temperatures typically range from 325°F to 350°F (160°C to 175°C), with lower temperatures often preferred for taller cakes to promote even cooking. Baking times can vary but usually fall between 25-35 minutes. The cake is done when a toothpick inserted into the center comes out clean or with a few moist crumbs attached. Overbaking will result in dry, crumbly layers. Allowing the cakes to cool in the pans for 10-15 minutes before inverting them onto a wire rack to cool completely is crucial. Warm cakes are fragile and prone to breaking.
The Star of the Show: Mastering the Caramel Frosting
The caramel frosting is what elevates a good cake to a truly exceptional three-layer caramel cake. This is where richness, sweetness, and a luxurious texture come into play. There are several approaches to caramel frosting, each offering a slightly different experience. A cooked caramel frosting, made by caramelizing sugar and then incorporating butter, cream, and flavorings, offers the most intense caramel flavor and a thicker, more spreadable consistency. A buttercream-based caramel frosting, where caramel sauce is incorporated into a standard buttercream, is often easier to make and can be very delicious.
For a classic cooked caramel frosting, the process begins with dry caramelization. Granulated sugar is heated in a heavy-bottomed saucepan over medium heat. It’s important to resist the urge to stir initially; instead, gently swirl the pan to ensure even melting. As the sugar melts and begins to color, it will turn amber. This is the critical stage to watch closely, as burnt caramel is bitter and unusable. Once it reaches a deep amber hue, remove it from the heat. This caramelization process is a chemical reaction that creates complex flavor compounds.
Immediately after caramelizing the sugar, softened unsalted butter is whisked in. Be cautious, as the mixture will bubble and steam vigorously. Next, heavy cream, warmed slightly, is gradually incorporated. Again, expect significant bubbling. Warmed cream prevents the caramel from seizing up. The mixture should be whisked until smooth and homogenous. Flavorings like vanilla extract and a pinch of salt are then added to balance the sweetness and enhance the caramel notes. Some recipes might call for a touch of corn syrup to prevent crystallization and add gloss.
The frosting will need to cool to a spreadable consistency. As it cools, it will thicken considerably. If it becomes too firm, it can be gently re-warmed over a double boiler or in the microwave on low power, stirring frequently. If it’s too thin, chilling it in the refrigerator for short intervals, stirring periodically, can help it thicken.
Alternatively, a caramel buttercream can be achieved by making a rich caramel sauce separately (similar to the cooked frosting but often with a higher cream-to-sugar ratio and less butter for a thinner sauce) and then incorporating it into a softened butter and powdered sugar mixture. The key here is to ensure the caramel sauce has cooled sufficiently before adding it to the buttercream to prevent melting the butter. The ratio of caramel sauce to buttercream will determine the intensity of the caramel flavor and the overall consistency of the frosting.
Assembly: Building the Three-Layered Masterpiece
The assembly of a three-layer caramel cake requires careful attention to detail for both structural integrity and aesthetic appeal. The cooled cake layers should be trimmed if necessary to ensure they are level. A serrated knife is ideal for this task. Place the first cake layer on your serving plate or cake stand. Apply an even layer of caramel frosting. A simple offset spatula is your best friend here for spreading smoothly. It’s crucial to get close to the edge but not let it spill over too much initially, as this will be addressed with the crumb coat.
The second cake layer is then carefully placed on top of the first, ensuring it is centered. Another layer of frosting is applied. The third cake layer is placed on top. At this stage, the cake might not look perfectly smooth, and that’s where the crumb coat comes in. A thin, even layer of frosting is applied over the entire cake – top and sides – to trap any loose crumbs. This layer doesn’t need to be perfect; its purpose is functional. Chill the cake in the refrigerator for at least 30 minutes to allow the crumb coat to set. This will create a firm base for the final layer of frosting, preventing crumbs from mixing into it and ensuring a clean finish.
Once the crumb coat is firm, apply the final, thicker layer of caramel frosting. Work from the top down, using your offset spatula to spread the frosting smoothly over the top and then down the sides. For that signature cascade effect, you can dollop extra frosting on the top edge and gently guide it down the sides with your spatula. Achieving perfectly smooth sides can be challenging, but practice makes perfect. A bench scraper can be helpful for creating sharper edges. For a more rustic look, swirls and textured finishes are also appealing.
Optional but highly recommended additions to a three-layer caramel cake include a drizzle of extra caramel sauce over the top and sides just before serving, or a sprinkle of flaky sea salt. The salt cuts through the sweetness of the caramel, creating a delightful sweet-and-salty contrast that enhances the overall flavor experience. Chopped toasted pecans or walnuts can add a welcome crunch and nutty flavor.
Troubleshooting Common Caramel Cake Issues
Even experienced bakers can encounter challenges when making a three-layer caramel cake. Understanding potential pitfalls can help you achieve consistently delicious results.
Cake Layers Too Dense or Dry: This is often due to overmixing the batter, which develops gluten. Ensure you mix the dry and wet ingredients only until just combined. Overbaking is another common culprit for dry cakes. Always test for doneness with a toothpick and err on the side of slightly underbaking if you’re unsure, as the residual heat will continue to cook the cake. Using room temperature ingredients also contributes to a lighter, more tender crumb.
Caramel Frosting Too Hard or Too Soft: If your cooked caramel frosting seizes up and becomes hard, it likely means it was exposed to too much cold at once or wasn’t stirred enough when hot. Gently re-warm it over a double boiler or in short microwave bursts, stirring constantly, until it reaches a spreadable consistency. If the frosting is too soft to spread, it needs to cool and thicken. Chilling it in the refrigerator for short intervals, with frequent stirring, will help. If it’s too soft after cooling, it might indicate an imbalance in the liquid-to-fat ratio or that the cream was too hot when added to the caramelized sugar.
Caramel Frosting Crystallized: This often happens when the sugar is stirred too early in the caramelization process or if there’s too much moisture. For cooked caramel, ensure the sugar is allowed to melt and caramelize undisturbed for the initial stages. Adding a small amount of corn syrup can also help prevent crystallization.
Frosting Won’t Stick to the Cake: This usually points to an insufficient or poorly executed crumb coat. Ensure the cake layers are completely cooled and that the crumb coat is applied thinly and evenly, then allowed to set firmly in the refrigerator.
Uneven Cake Layers: This can be caused by uneven oven temperature or uneven batter distribution. Ensure your oven racks are in the center and consider using an oven thermometer to verify the temperature. Use a kitchen scale to divide the batter equally between pans.
Ultimately, a three-layer caramel cake is a rewarding baking project. By understanding the science behind each ingredient and technique, and by paying attention to the details during assembly, you can consistently create a dessert that is not only visually stunning but also a true delight for the palate, offering a symphony of sweet, rich, and satisfying flavors and textures that will leave a lasting impression.