Homemade Pasta Without a Pasta Machine: Its Easier Than You Think
Homemade pasta without a pasta machine? It might sound daunting, but it’s actually incredibly rewarding and surprisingly simple. Forget the misconception that you need fancy equipment to enjoy fresh, handmade pasta. With a few basic ingredients, some simple tools, and a little patience, you can create delicious pasta from scratch, right in your own kitchen.
The beauty of making pasta without a machine lies in its accessibility. It’s a process that invites experimentation and creativity, allowing you to tailor your pasta to your taste. Whether you’re a seasoned cook or a novice in the kitchen, this guide will equip you with the knowledge and confidence to embark on your pasta-making journey.
Essential Ingredients and Tools

Making homemade pasta without a machine requires a few essential ingredients and tools. You can achieve delicious results with a little effort and the right supplies.
Ingredients for Basic Pasta Dough
A simple pasta dough recipe typically includes only a few ingredients. Here’s a list of essential ingredients for a basic pasta dough:
- Flour:Flour is the main ingredient in pasta dough. The type of flour you use will affect the texture and taste of your pasta.
- Eggs:Eggs add richness and structure to the dough. The number of eggs used can vary depending on the type of pasta you are making.
- Water:Water helps to bind the ingredients together and create a smooth dough.
- Salt:Salt enhances the flavor of the pasta and helps to balance the sweetness of the dough.
Basic Kitchen Tools for Making Pasta
You don’t need a fancy pasta machine to make delicious homemade pasta. A few basic kitchen tools will do the trick.
- Mixing bowls:You’ll need a couple of mixing bowls, one for mixing the dry ingredients and another for mixing the wet ingredients.
- Measuring cups and spoons:Accurate measurements are crucial for a successful pasta dough.
- Wooden spoon or spatula:A wooden spoon or spatula is useful for mixing and kneading the dough.
- Rolling pin:A rolling pin is essential for rolling out the dough to the desired thickness.
- Sharp knife or pizza cutter:A sharp knife or pizza cutter is needed to cut the dough into desired shapes.
- Pasta drying rack:A pasta drying rack is useful for drying the pasta after it has been cut.
Types of Flour for Pasta Making, Homemade pasta without a pasta machine
The type of flour you use for pasta will have a significant impact on the texture and taste of your final product.
Making homemade pasta without a pasta machine can be a fun and rewarding experience, especially when you’re whipping up a delicious comfort food like a homemade chicken pot pie. The flaky crust and creamy filling are a perfect pairing for the tender, homemade pasta, creating a meal that’s both satisfying and heartwarming.
And the best part? You don’t need any fancy equipment to make those perfect pasta sheets, just a little patience and a rolling pin!
| Type of Flour | Characteristics | Pasta Type |
|---|---|---|
| Durum Wheat Semolina (00 Flour) | High in protein, coarse texture, yellow color. | Traditional Italian pasta like spaghetti, fettuccine, and penne. |
| All-Purpose Flour | Versatile, lower protein content than semolina. | Good for making fresh pasta, but may result in a softer texture. |
| Bread Flour | High in protein, strong gluten development. | Ideal for pasta that requires a chewy texture, like pappardelle or lasagna sheets. |
Pasta Dough Preparation

Pasta dough is the foundation of any delicious homemade pasta dish. While a pasta machine makes the process easier, achieving perfect pasta dough by hand is achievable with a bit of patience and practice. Understanding the role of hydration levels and mastering kneading techniques are key to creating a smooth, elastic dough that will roll out beautifully and cook evenly.
Hydration Levels and Their Impact on Dough Texture
The hydration level of pasta dough, measured as the ratio of water to flour, significantly impacts the texture of your pasta.
- Low Hydration (Less Water):Dough with lower hydration levels will be firmer and more crumbly, producing a pasta that holds its shape well but can be slightly more delicate.
- High Hydration (More Water):Higher hydration doughs are more supple and elastic, resulting in a pasta with a slightly softer texture that can be more prone to breaking when cooked.
The ideal hydration level for your pasta dough depends on the type of pasta you are making. For example, a thicker pasta like pappardelle benefits from a slightly lower hydration level, while delicate pasta like fettuccine or tagliatelle requires a higher hydration level for a more supple texture.
Preparing a Basic Pasta Dough
- Gather Your Ingredients:You will need all-purpose flour, eggs, and a pinch of salt. The exact proportions will vary depending on the recipe and desired hydration level.
- Create a Well in the Flour:Pour the flour onto a clean surface and create a well in the center. Crack the eggs into the well, add the salt, and start incorporating the flour into the eggs with a fork.
- Begin Kneading:Once the eggs are mostly incorporated, use your hands to bring the dough together. Knead the dough on a lightly floured surface for 10-15 minutes, or until it becomes smooth and elastic. You may need to add a little more flour if the dough is too sticky, or a few drops of water if it’s too dry.
- Rest the Dough:Wrap the dough in plastic wrap and let it rest at room temperature for at least 30 minutes. This allows the gluten to relax, making the dough easier to work with.
- Roll and Cut:Once the dough has rested, you can roll it out and cut it into your desired pasta shapes. If you are not using a pasta machine, you can use a rolling pin or even a wine bottle to roll out the dough.
Making pasta from scratch without a machine is a labor of love, but it’s so rewarding! It’s like a little culinary adventure, especially when you’re experimenting with different flavors and textures. I’m always looking for new ways to add a touch of indulgence to my homemade pasta, and recently I discovered the fudge of the irish recipe – a decadent chocolate fudge that would be perfect as a dessert after a pasta feast.
I can already imagine the rich chocolate flavors contrasting beautifully with the earthy tones of a simple tomato sauce.
Shaping the Pasta: Homemade Pasta Without A Pasta Machine

Now that your dough is ready, it’s time to get creative and shape your pasta! You can achieve a wide range of pasta shapes using just a rolling pin and a sharp knife. No fancy pasta machine required!
Rolling Out the Dough
Rolling out the dough to the desired thickness is the first step. You can achieve this using a rolling pin, a simple yet effective tool.
- Start by dusting your work surface lightly with flour to prevent sticking.
- Place the dough on the surface and use a rolling pin to roll it out evenly, applying gentle but firm pressure.
- Roll the dough in one direction, then turn it 90 degrees and repeat.
- Continue rolling and turning until you reach the desired thickness. You can use a ruler to measure the thickness.
Cutting the Pasta
Once the dough is rolled out, you can start cutting it into your desired shapes.
Cutting with a Knife
A sharp knife is essential for clean, precise cuts. * Fold the dough in half or thirds, depending on the desired width of the pasta. Cut the dough into strips using a sharp knife. For thin pasta like fettuccine or tagliatelle, make thin strips.
For thicker pasta like pappardelle, cut wider strips.
Using a Pastry Cutter
A pastry cutter is a helpful tool for creating even cuts, particularly for wider pasta shapes. * Place the rolled-out dough on a lightly floured surface.
Using a pastry cutter, cut the dough into strips of your desired width.
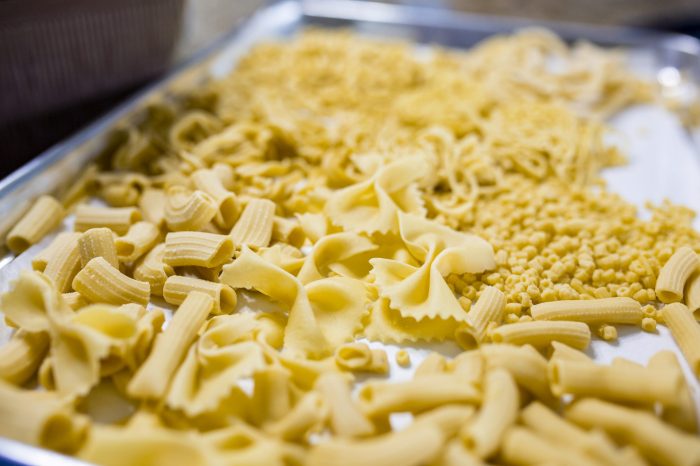
Pasta Shapes
There are endless possibilities when it comes to shaping pasta. Here are some popular shapes you can create without a pasta machine:
| Pasta Shape | Cutting Method | Description |
|---|---|---|
| Fettuccine | Knife | Thin, flat ribbons of pasta. |
| Tagliatelle | Knife | Similar to fettuccine but slightly wider. |
| Pappardelle | Knife or Pastry Cutter | Wide, flat ribbons of pasta, typically used for hearty sauces. |
| Ravioli | Knife or Pastry Cutter | Small, square pasta pockets filled with various fillings. |
| Tortellini | Knife or Pastry Cutter | Small, ring-shaped pasta filled with meat or cheese. |
Storage and Preservation
Making your own pasta is a rewarding experience, but what do you do with all that deliciousness? You can’t eat it all at once! Luckily, there are several ways to store and preserve your homemade pasta for future use.
Whether you prefer to freeze it for quick meals or dry it for long-term storage, these methods will help you enjoy your pasta creations for weeks to come.
Freezing
Freezing is the most common method for preserving homemade pasta. It allows you to store pasta for up to 2 months without sacrificing its texture and flavor. To freeze pasta, follow these steps:
- Lay out the freshly made pasta on a lightly floured surface to prevent sticking.
- Once the pasta is dry, separate the strands or shapes and place them in a single layer in a freezer-safe bag or container.
- Remove as much air as possible from the bag before sealing it tightly.
- Label the bag with the date and type of pasta.
- Store the bag in the freezer for up to 2 months.
To use frozen pasta, simply add it directly to boiling water without thawing. It will cook in about the same amount of time as fresh pasta.
Drying
Drying pasta is a traditional method that allows for longer storage, up to a year. It’s also a great way to preserve pasta in a natural way, without using any preservatives.To dry pasta, follow these steps:
- Lay out the freshly made pasta on a lightly floured surface to prevent sticking.
- Separate the strands or shapes and ensure they are not touching.
- Hang the pasta in a dry, well-ventilated area, such as a pantry or a room with good airflow.
- Avoid direct sunlight, as it can cause the pasta to bleach and lose its color.
- Allow the pasta to dry for 1-2 days, or until it is completely dry and brittle.
- Store the dried pasta in an airtight container in a cool, dry place.
To use dried pasta, simply rehydrate it by soaking it in warm water for about 30 minutes before cooking. You can also cook it directly in boiling water, but it will take a little longer than fresh or frozen pasta.