
Butter Flaky Pie Crust
The Ultimate Guide to Achieving Buttery, Flaky Pie Crust Perfection
Mastering the art of a truly buttery, flaky pie crust is a cornerstone of exceptional baking. This isn’t merely about achieving a pleasant texture; it’s about creating a foundation that complements fillings, adds visual appeal, and elevates the entire pie experience. The elusive "flakiness" is a direct result of steam pockets formed by distinct layers of fat and flour, separated by water. Achieving this delicate balance requires a deep understanding of ingredient ratios, temperature control, and precise technique. Overworking the dough, using ingredients at the wrong temperature, or incorporating too much moisture are common pitfalls that lead to tough, dense, or greasy crusts. This comprehensive guide will dissect each critical element, offering actionable advice and troubleshooting tips to ensure your homemade pie crust consistently achieves buttery, flaky perfection.
The foundation of any superior pie crust lies in its fundamental ingredients: flour, fat, water, and salt. The quality and proportion of each play an indispensable role in the final outcome. All-purpose flour is the standard for most pie crusts, providing a balanced protein content that contributes to structure without becoming overly tough. A slightly lower protein flour, like cake flour, can be used in combination with all-purpose for an even more tender crust, though it may compromise some structural integrity. The key to flakiness is the fat. Butter, with its high water content and distinctive flavor, is the undisputed champion for achieving a rich, buttery taste and delicate flakiness. However, its lower melting point requires careful handling to prevent it from fully incorporating into the flour. This is where the magic of layering begins. Shortening, a hydrogenated vegetable oil, has a higher melting point than butter, making it easier to work with and contributing to a crisper, flakier texture due to its ability to create larger, distinct pockets of fat. Lard, historically a popular choice, offers excellent flakiness and a unique mouthfeel, though its availability and desirability have waned for some bakers. Many successful recipes employ a combination of butter and shortening to leverage the distinct benefits of each. A common ratio might be 50/50 or 75/25 butter to shortening, ensuring both flavor and superior flakiness. Salt is not merely for taste; it also strengthens the gluten structure, preventing the crust from becoming overly tender and potentially tearing. The amount of salt is generally subtle, typically around one teaspoon per 2-2.5 cups of flour.
Temperature is the single most critical factor in achieving a flaky pie crust. Every ingredient, from the fat to the water, must be kept as cold as possible throughout the entire process, until baking. This is the fundamental principle that governs the formation of flaky layers. Cold fat, when cut into the flour, creates small, distinct pieces. As these pieces melt during baking, they release steam, which lifts the surrounding flour and fat layers, creating the characteristic flakiness. If the fat is too warm, it will begin to melt and incorporate into the flour prematurely, resulting in a more cake-like or mealy texture rather than distinct layers. Therefore, it is imperative to use ice-cold butter and/or shortening. This means refrigerating them for at least 30 minutes to an hour before using, and if your kitchen is warm, consider chilling them again just before cutting. The water used to bind the dough must also be ice-cold, ideally with ice cubes added directly to the measuring cup. This serves a dual purpose: it chills the water and prevents you from adding too much. The goal is to add just enough water to bring the dough together, avoiding the development of excess gluten, which leads to toughness. Even the flour should ideally be chilled. Storing flour in the refrigerator or freezer can help ensure it starts at a low temperature.
The method of incorporating the fat into the flour is paramount for developing distinct layers. This process is commonly referred to as "cutting in" the fat. Various tools can be employed, each with its advantages and potential for overworking. A pastry blender is a popular choice, designed to efficiently cut through solid fats, creating pea-sized to small corn-kernel-sized pieces. The key is to work quickly and avoid over-processing. You want visible pieces of fat remaining throughout the flour mixture. A food processor can be used, but it requires extreme caution. Pulse the flour and salt first, then add the cold fat and pulse in short, brief bursts, stopping as soon as the desired consistency is achieved. Over-processing in a food processor is incredibly easy and will result in a tough crust. Using your fingertips is a more traditional method, but it’s crucial to work quickly and use only the tips of your fingers, minimizing the transfer of body heat to the dough. The goal is to achieve a texture where the flour is coated in small pieces of fat, resembling coarse crumbs with some larger, visible chunks of butter or shortening. These larger chunks are essential for creating those pockets of steam during baking.
Once the fat is properly incorporated, the ice-cold water is gradually added to bind the ingredients. This stage is where many bakers falter by adding too much liquid, leading to a tough and dense crust. Start with the minimum amount of water suggested in your recipe and add it a tablespoon at a time. Use a fork or a bench scraper to gently toss the flour and fat mixture as you add the water. The dough is ready when it just begins to come together. It should still appear somewhat shaggy, with dry spots, rather than forming a smooth, cohesive ball. Overmixing at this stage will develop gluten, resulting in a tough crust. The goal is to hydrate the flour just enough to bind the fat pieces together. Once the dough is just combined, it’s crucial to gather it into a cohesive ball with minimal handling.
Shaping and chilling the pie dough are critical steps that cannot be skipped for optimal flakiness. Once the dough has been brought together, divide it into portions for your top and bottom crusts (if using a double-crust pie). Gently flatten each portion into a disc, about 1-1.5 inches thick. This initial flattening helps to initiate the layering and makes rolling out the dough easier later. Then, wrap each disc tightly in plastic wrap. This prevents the dough from drying out and helps to maintain its cold temperature. The chilling period is not just about making the dough easier to handle; it’s vital for several reasons. Firstly, it allows the gluten that may have developed during mixing to relax, preventing shrinkage and toughness during rolling and baking. Secondly, and most importantly for flakiness, it solidifies the fat. As the fat chills, it firms up again, ensuring that distinct pieces of fat are present when you roll out the dough. This chilling process should take place in the refrigerator for at least 30 minutes to an hour, and preferably longer, even up to 2 days. For particularly warm climates or if you’ve handled the dough extensively, an additional brief chill after rolling and lining the pie plate can further enhance flakiness.
Rolling out the chilled dough is another opportunity to preserve those precious fat layers. Lightly flour your work surface and your rolling pin. Work from the center of the dough disc outwards, rotating the dough frequently to prevent sticking and ensure even thickness. Avoid pressing down too hard, as this can crush the fat pieces. If the dough starts to crack or feel too firm, let it rest at room temperature for a few minutes. If it becomes too soft and sticky, re-chill it. The goal is to roll the dough into a circle approximately 12 inches in diameter for a standard 9-inch pie plate, ensuring it’s about 1/8-inch thick. A common mistake is to roll the dough too thin, which can lead to a delicate crust that tears easily.
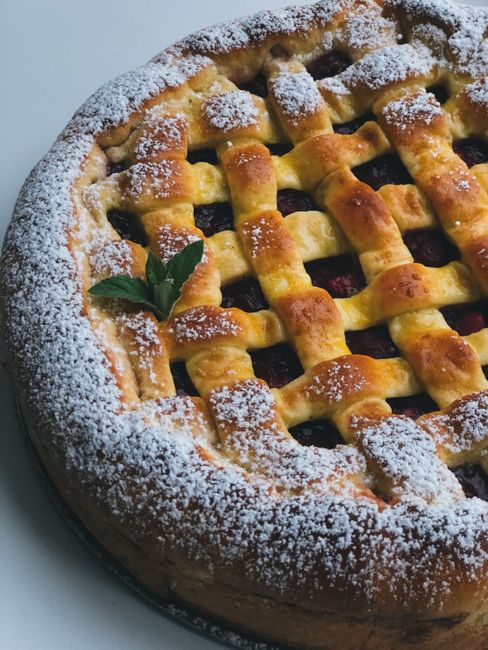
Lining the pie plate with the rolled-out dough requires a gentle touch. Carefully transfer the dough to the pie plate. You can do this by gently folding it in half or quarters and unfolding it inside the plate, or by carefully rolling it around your rolling pin and unrolling it into the plate. Press the dough gently into the bottom and up the sides of the pie plate, ensuring there are no air pockets. Trim any excess dough, leaving about a 1-inch overhang, which will be used to create a decorative crust edge. For a single-crust pie, the edges should then be crimped or fluted. For a double-crust pie, this is the point where you would add your filling and then place the second rolled-out crust on top, sealing and crimping the edges together.
To enhance flakiness and achieve a beautiful golden-brown finish, consider blind baking the bottom crust for pies with wet fillings (like custard or cream pies). This involves pricking the bottom of the crust with a fork, lining it with parchment paper or aluminum foil, and filling it with pie weights, dried beans, or rice. Bake the crust until it’s partially set. Then, remove the weights and parchment and bake for a few more minutes until lightly golden. This pre-baking step prevents the bottom crust from becoming soggy. For pies with very wet fillings, a good strategy is to brush the bottom crust with a thin layer of egg white after blind baking and before adding the filling. This acts as a sealant.
When it comes to baking the actual pie, oven temperature and placement are crucial. A properly preheated oven ensures that the pie cooks evenly from the start, promoting the rapid release of steam from the fat pockets. Most pies benefit from being baked at a moderately high temperature initially, around 400-425°F (200-220°C), for the first 15-20 minutes. This initial blast of heat helps to set the crust and initiate flakiness. Then, the temperature can be reduced to 350-375°F (175-190°C) to allow the filling to cook through without burning the crust. Placing the pie on the lowest rack of the oven is often recommended, especially for fruit pies, to ensure the bottom crust cooks thoroughly and becomes crisp. If the edges of the crust begin to brown too quickly, you can shield them with strips of aluminum foil or a pie crust shield.
Troubleshooting common pie crust problems is an essential part of the learning process. A tough crust is almost always a result of overworking the dough, which develops excess gluten, or using too much water. If your dough is tough, try using less water next time, mixing just until it comes together, and refrigerating it for a longer period. A greasy crust indicates that the fat was too warm and incorporated too much into the flour, or that too much shortening was used relative to butter. Ensure all ingredients are kept cold and consider a butter-shortening ratio that balances flavor and texture. A crust that shrinks excessively is usually due to under-chilling, overworking, or not allowing the gluten to relax during the chilling period. Always ensure adequate chilling time and handle the dough with a light touch. A soggy bottom crust is a common issue, especially with fruit pies. Proper blind baking, sealing the crust with egg white, or ensuring the oven temperature is high enough for the bottom crust to cook thoroughly are effective solutions.
In conclusion, achieving a consistently buttery, flaky pie crust is a journey that rewards patience, precision, and a deep understanding of the underlying science. By meticulously controlling ingredient temperatures, employing gentle handling techniques, and adhering to proper chilling and baking protocols, you can unlock the secrets to a perfect pie crust that will be the star of any dessert. Remember, practice makes perfect, and each pie you bake will offer valuable insights into refining your technique and achieving your personal definition of pie crust excellence.


