Homemade Banana Pudding With Whipped Cream Topping
The Ultimate Homemade Banana Pudding with Whipped Cream Topping: A Step-by-Step Guide
Achieving the perfect homemade banana pudding with a cloud-like whipped cream topping is a culinary triumph, a dessert that evokes nostalgia and pure indulgence. This classic comfort food, when made from scratch, transcends the ordinary, offering a symphony of textures and flavors. The creamy custard, sweet ripe bananas, and delicate vanilla wafers create a harmonious blend, elevated by the lightness of freshly whipped cream. This comprehensive guide provides a detailed, SEO-friendly approach to crafting this beloved dessert, ensuring a successful outcome for both novice bakers and seasoned dessert enthusiasts. We will delve into ingredient selection, preparation techniques, troubleshooting tips, and variations to make your homemade banana pudding truly unforgettable.
The foundation of any exceptional banana pudding lies in its custard. For this, we will be creating a rich, smooth, and intensely flavored vanilla custard from scratch, foregoing the shortcut of instant pudding mixes. The key to a superior custard is the careful cooking of egg yolks and milk, thickened with cornstarch or flour, and infused with the aromatic essence of real vanilla. Begin with high-quality ingredients. For the custard, you will need whole milk, granulated sugar, egg yolks, cornstarch (or all-purpose flour), and pure vanilla extract. The ratio of these ingredients is crucial for achieving the desired consistency and flavor profile. Typically, for a standard 9×13 inch baking dish, you will use around 4 cups of whole milk, 1 to 1.5 cups of granulated sugar (adjust to your sweetness preference), 4-6 large egg yolks (more yolks yield a richer custard), and about 1/3 cup of cornstarch or flour. Sift your dry ingredients – sugar, cornstarch/flour – together in a heavy-bottomed saucepan. This prevents clumping and ensures an even distribution. In a separate bowl, whisk the egg yolks until they are light yellow and slightly thickened. This process, known as tempering, is vital for preventing the eggs from scrambling when introduced to the hot milk.
Next, gradually whisk about half a cup of the milk into the egg yolk mixture. This gently warms the yolks and makes them more receptive to the heat of the remaining milk. Now, pour the tempered egg yolk mixture back into the saucepan with the remaining milk and the sugar/cornstarch mixture. Place the saucepan over medium-low heat. Stir constantly with a whisk, ensuring you scrape the bottom and sides of the pan. This constant agitation is paramount to prevent scorching and the formation of lumps. The custard will begin to thicken as it heats. This process can take anywhere from 10 to 20 minutes, depending on your stovetop and the saucepan’s heat distribution. You are looking for a consistency that coats the back of a spoon and holds a line when you run your finger through it. Do not rush this step; low and slow is the mantra for a smooth, lump-free custard. Once thickened, remove the saucepan from the heat immediately. Stir in your pure vanilla extract. The heat of the custard will activate the vanilla’s aroma and flavor. For an even smoother custard, you can strain it through a fine-mesh sieve into a clean bowl. This is an optional but highly recommended step to remove any potential small lumps or bits of cooked egg.
Cover the surface of the custard directly with plastic wrap. This prevents a skin from forming on top, which can alter the texture and appearance of your final pudding. Allow the custard to cool to room temperature, and then refrigerate it for at least 2-3 hours, or preferably overnight. Chilling allows the flavors to meld and the custard to fully set. The cooler the custard, the better it will hold its shape when assembled. While the custard chills, prepare your bananas and vanilla wafers. The quality of your bananas is as important as the custard itself. For banana pudding, you want ripe but not overly mushy bananas. Yellow bananas with a few brown spots are ideal. They offer the perfect balance of sweetness and structure. You will need about 4-6 medium-sized bananas, depending on your preference for banana intensity and the size of your baking dish. Slice the bananas into ¼-inch thick rounds. Work quickly once you start slicing, as bananas tend to brown rapidly. You can toss them gently with a little lemon juice to slow down oxidation, but this is generally not necessary if you are assembling soon after slicing.
Vanilla wafers are the classic cookie of choice for banana pudding. Their crisp texture and subtle sweetness provide the perfect counterpoint to the creamy custard and soft bananas. You will need approximately 2-3 sleeves of vanilla wafers, depending on the size of your baking dish and how generously you layer them. Some recipes call for crushing some of the wafers to create a base layer, while others prefer whole wafers for distinct texture. For this recipe, we will be using whole wafers for a satisfying crunch.
Now, for the pièce de résistance: the homemade whipped cream topping. This elevates your banana pudding from delicious to divine. Forget the pre-made aerosol cans; freshly whipped cream is incomparable in its lightness, flavor, and texture. You will need heavy whipping cream (at least 35% fat content is essential for successful whipping), powdered sugar (also known as confectioners’ sugar), and a touch of pure vanilla extract. Ensure your heavy cream is very cold. Cold cream whips up more easily and to a stiffer consistency. Chill your mixing bowl and whisk attachment (if using a stand mixer) in the freezer for about 15-20 minutes prior to whipping. This creates a colder environment and helps the cream reach its peak.
In the chilled bowl, pour 2 cups of very cold heavy whipping cream. Begin whipping on medium speed. As the cream starts to thicken slightly, gradually add ¼ to ½ cup of powdered sugar, depending on your desired sweetness. Continue whipping. The cream will go through several stages: foamy, soft peaks, medium peaks, and finally, stiff peaks. For a stable whipped cream topping that holds its shape without being dry or grainy, you want to stop when you reach stiff peaks. This means that when you lift the whisk, the cream stands up straight without drooping. Be careful not to overbeat, as this will result in a grainy texture and eventually turn the cream into butter. Once stiff peaks are achieved, gently fold in 1 teaspoon of pure vanilla extract. Taste and adjust sweetness if necessary, but do so sparingly, as the custard is already sweet.
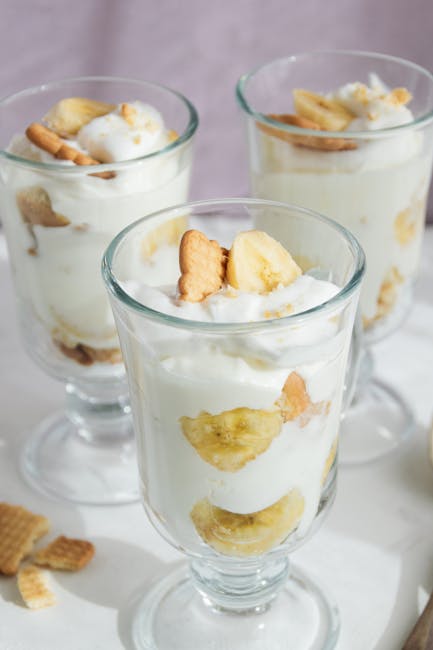
Assembly is where all your hard work comes together. Begin by arranging a layer of vanilla wafers on the bottom of your serving dish. This can be a 9×13 inch baking dish, individual ramekins, or a trifle bowl for a visually stunning presentation. Pour about half of the chilled custard evenly over the layer of wafers. Then, arrange a layer of sliced bananas over the custard. You can be as generous or as sparse with the bananas as you like. Add another layer of vanilla wafers, followed by the remaining custard, and finally, another layer of sliced bananas. For a truly decadent experience, you can add a final sprinkle of crushed vanilla wafers on top. Cover the assembled pudding with plastic wrap and refrigerate for at least 4-6 hours, or preferably overnight. This allows the wafers to soften slightly, absorbing the custard and becoming delightfully cake-like, while the flavors fully meld.
Just before serving, generously top the chilled banana pudding with your freshly whipped cream. You can pipe it on for an elegant finish or simply spread it with a spatula. Garnish with a few extra banana slices or a sprinkle of crushed vanilla wafers if desired.
Troubleshooting common banana pudding pitfalls is essential for guaranteed success. If your custard is lumpy, it likely wasn’t stirred constantly enough during cooking, or the egg yolks weren’t tempered properly. Straining the custard through a fine-mesh sieve is a lifesaver in such situations. If your custard is too thin, it may not have been cooked long enough to allow the cornstarch to fully thicken. In this case, you can return it to the heat with a slurry of cornstarch and a little milk (1 tablespoon cornstarch dissolved in 2 tablespoons cold milk) and whisk until thickened. Be cautious not to overcook at this stage. If your whipped cream isn’t whipping, ensure your cream is cold enough and your equipment is chilled. Avoid using half-and-half or milk; only heavy whipping cream will suffice. If your bananas brown too quickly, assemble the pudding closer to serving time or toss them with a tiny bit of lemon juice.
Variations on this classic recipe can add exciting new dimensions. For a chocolate lover’s twist, fold in a few tablespoons of cocoa powder into the dry ingredients for the custard, or add chocolate chips to the assembled pudding. A hint of rum or bourbon in the custard can add a sophisticated depth of flavor. For a lighter, more summery version, incorporate fresh berries alongside the bananas. You can also experiment with different cookie bases, such as graham crackers or shortbread, although vanilla wafers remain the traditional and arguably best choice for their ability to absorb the custard without becoming overly soggy.
The SEO benefits of this comprehensive guide stem from its detailed keywords, clear structure, and informative content. Terms like "homemade banana pudding," "whipped cream topping," "from scratch custard," "easy banana pudding recipe," and "best banana pudding" are strategically integrated throughout. The step-by-step instructions cater to users searching for practical guidance, while the troubleshooting and variations sections provide added value and address potential user queries. The emphasis on quality ingredients and specific techniques like tempering and proper whipping of cream appeals to those seeking a superior dessert experience. By providing a thorough and user-friendly resource, this article aims to rank highly for relevant search terms, attracting a broad audience interested in mastering this timeless dessert. The focus on homemade elements directly addresses a common search intent for individuals looking to avoid pre-made mixes and achieve authentic, delicious results. The detailed explanation of each step, from custard making to whipped cream preparation, ensures that users have all the information they need to successfully recreate this classic dish, making it a valuable and authoritative resource for banana pudding enthusiasts.