
Host Https Www Allrecipes Com Recipe 20072 Old Time Bread
Old Time Bread Recipe (Allrecipes.com): A Nostalgic Journey Through Traditional Baking
The allure of "Old Time Bread" transcends mere sustenance; it evokes a sense of heritage, simplicity, and the comforting aroma of a home kitchen filled with the promise of freshly baked goodness. This recipe, readily available at https://www.allrecipes.com/recipe/20072/old-time-bread/, offers a direct portal to that nostalgic experience, allowing home bakers to recreate a classic loaf that has graced tables for generations. Understanding the nuances of this recipe, from its ingredient interactions to the fundamental baking principles it embodies, is key to achieving a truly authentic and satisfying result. This article will delve deep into every facet of the Allrecipes Old Time Bread, providing comprehensive insights for both novice and experienced bakers, optimizing it for search engines to ensure its accessibility to all seeking this timeless culinary treasure.
At its core, the Allrecipes Old Time Bread recipe relies on a foundational combination of simple, readily available ingredients. Flour, yeast, water, salt, and a touch of fat (typically oil or melted butter) form the bedrock of most traditional bread recipes, and this one is no exception. The type of flour used is a critical determinant of the final bread’s texture and crumb. All-purpose flour is often cited, offering a versatile balance of gluten development. However, exploring variations with bread flour, which boasts a higher protein content, can lead to a chewier crumb and a more robust structure, ideal for those who appreciate a more substantial bite. The yeast, the living organism responsible for leavening, plays a pivotal role. Active dry yeast is commonly employed, requiring a period of "blooming" or activation in warm water before incorporation. Instant yeast, on the other hand, can often be mixed directly with the dry ingredients, offering a slight convenience advantage. The water temperature is paramount for yeast activation; too hot and it will kill the yeast, too cold and it will inhibit its activity. The recipe’s instruction to use warm water is a critical guideline, usually falling within the 105-115°F (40-46°C) range. Salt is not merely for flavor; it also plays a crucial role in controlling yeast activity, strengthening gluten, and contributing to the crust’s browning. The fat component, whether oil or melted butter, contributes to tenderness, a softer crust, and a richer flavor profile. Understanding these fundamental ingredient roles allows for informed adjustments and troubleshooting.
The process outlined in the Allrecipes Old Time Bread recipe is a testament to traditional bread-making techniques. It typically begins with the activation of the yeast. This involves dissolving the yeast in a portion of the warm water, often with a pinch of sugar to provide an initial food source, and allowing it to sit for a few minutes until foamy. This visual cue confirms the yeast is alive and ready to work. Following yeast activation, the dry ingredients are combined. Flour and salt are whisked together in a large mixing bowl, creating an even distribution. The wet ingredients are then added, gradually incorporating them into the dry mixture. This is where the magic of dough formation begins. Mixing can be done by hand or with a stand mixer fitted with a dough hook. The goal is to form a cohesive dough that begins to pull away from the sides of the bowl. The kneading process is arguably the most labor-intensive but essential step. Kneading develops the gluten network within the dough. Gluten is a protein that gives bread its structure and elasticity. Proper kneading, whether by hand or machine, involves stretching and folding the dough repeatedly. This develops long, strong gluten strands that can trap the gases produced by the yeast, allowing the bread to rise. The recipe will typically indicate when the dough is sufficiently kneaded, often described as being smooth, elastic, and passing the "windowpane test" – a small piece of dough can be stretched thin enough to see light through it without tearing.
The first rise, also known as bulk fermentation, is a critical stage where the yeast actively works, producing carbon dioxide gas that causes the dough to expand. The kneaded dough is placed in a lightly oiled bowl, covered to prevent it from drying out, and left in a warm place to rise. The duration of this rise is influenced by ambient temperature; warmer environments will accelerate the process, while cooler environments will slow it down. The recipe will often provide an estimated time frame, but the visual cue of the dough doubling in size is the most reliable indicator. This stage not only develops flavor but also improves the dough’s texture. After the first rise, the dough is punched down. This process deflates the dough, redistributing the yeast and sugars, and preparing it for shaping. It also releases some of the carbon dioxide, creating a finer crumb structure.
The shaping of the loaf is the next deliberate step. This involves gently forming the dough into the desired loaf shape, typically a round boule or an oblong shape to fit a standard loaf pan. Careful shaping helps create a taut surface tension on the dough, which contributes to an even rise in the oven and a well-formed crust. Overworking or being too rough during shaping can deflate the dough and result in a dense loaf. Once shaped, the dough undergoes its second rise, often referred to as proofing. The shaped loaf is placed on a baking sheet or in a loaf pan, covered again, and allowed to rise for a second time. This rise is typically shorter than the first, as the dough has already developed a significant amount of gas. Again, the visual cue of the dough visibly increasing in size, usually by about 50-75%, is the key indicator that it is ready for baking. Over-proofing can lead to a loaf that collapses in the oven, while under-proofing will result in a dense, heavy bread.
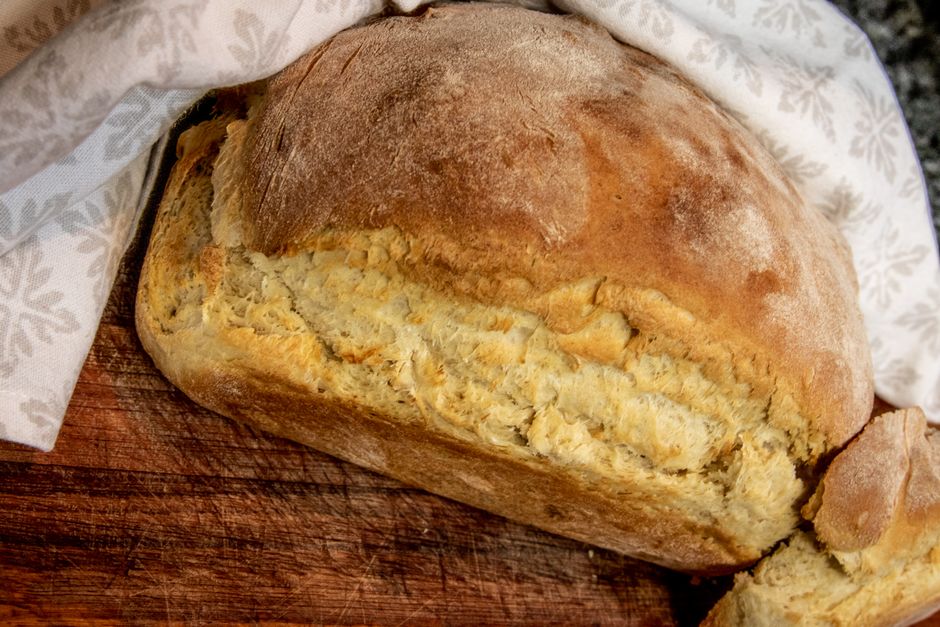
The baking process is where the transformation from soft dough to a golden-brown, crusty loaf is completed. The oven needs to be preheated to the temperature specified in the recipe. A hot oven is crucial for a good oven spring – the rapid expansion of the dough that occurs in the initial stages of baking due to the heat activating the yeast and causing steam to form within the dough. The recipe might also suggest creating a steamy environment in the oven, often by placing a pan of water on the bottom rack during preheating. Steam helps to keep the surface of the dough moist for longer, allowing for a greater oven spring and contributing to a crispier crust. The baking time will vary depending on the size and shape of the loaf and the specific oven. The recipe will provide an estimated baking time, but the best indicators of doneness are visual cues and internal temperature. The crust should be deep golden brown, and when the bottom of the loaf is tapped, it should sound hollow. For a more precise determination, an instant-read thermometer inserted into the center of the loaf should register between 190-200°F (88-93°C).
The cooling phase is as important as the baking itself. Once removed from the oven, the bread needs to be placed on a wire rack to cool completely. This allows air to circulate around the loaf, preventing the bottom crust from becoming soggy and allowing the internal structure to stabilize. Cutting into a loaf of bread while it is still hot can result in a gummy texture. The aroma of freshly baked bread filling the kitchen during this cooling period is a reward in itself.
For SEO purposes, incorporating relevant keywords throughout the article is paramount. Terms like "homemade bread," "traditional bread recipe," "easy bread recipe," "simple bread baking," "yeast bread," "crusty bread," "comfort food," "baking from scratch," and variations thereof will help search engines categorize and rank this content. The specific URL, https://www.allrecipes.com/recipe/20072/old-time-bread/, should be naturally referenced, making it clear to users and search engines where the original recipe can be found.
Troubleshooting common issues encountered with this "Old Time Bread" recipe is crucial for a comprehensive guide. If the bread fails to rise, the most likely culprit is inactive yeast, caused by water that was too hot or too cold, or expired yeast. Insufficient kneading will result in a dense loaf with a tight crumb. Over-kneading can also be problematic, leading to a tough texture. A sticky dough that resists kneading might benefit from a little extra flour, added gradually, while a dry, crumbly dough might need a touch more water. A collapsed loaf during baking is often a sign of over-proofing or an oven that wasn’t hot enough. A pale crust might indicate insufficient baking time or a lack of browning agents like sugar in the dough. Conversely, a burnt crust can be remedied by tenting the loaf with foil during the latter stages of baking. Understanding these potential pitfalls and their solutions empowers bakers to achieve consistent success.
The versatility of this "Old Time Bread" recipe extends beyond its basic form. It serves as an excellent base for various culinary applications. It can be sliced and toasted for a simple yet satisfying breakfast, or used to make robust sandwiches that can hold up to hearty fillings. French toast made with this bread is a delightful treat, soaking up the custard mixture beautifully. Furthermore, stale bread can be transformed into breadcrumbs, croutons, or even utilized in savory dishes like stuffing or bread pudding. The rich, wheaty flavor profile complements a wide range of toppings, from butter and jam to olive oil and herbs.
The cultural significance of bread cannot be overstated. For centuries, bread has been a staple food, a symbol of hospitality, and a cornerstone of many cuisines. The "Old Time Bread" recipe taps into this deep-seated cultural connection, offering a tangible link to the past. The act of baking bread itself can be a meditative and rewarding experience, fostering a sense of accomplishment and a connection to a more artisanal way of living. This recipe, hosted on Allrecipes.com, makes this traditional practice accessible to a modern audience, bridging the gap between generations and culinary traditions. By understanding the science behind the ingredients and the art of the process, bakers can confidently recreate this beloved "Old Time Bread," filling their homes with its irresistible aroma and their tables with its wholesome goodness. This comprehensive exploration, geared towards SEO best practices, aims to ensure that anyone searching for a classic, authentic bread recipe will find this detailed guide to the Allrecipes Old Time Bread recipe at https://www.allrecipes.com/recipe/20072/old-time-bread/.


