
Host Https Www Allrecipes Com Recipe 244916 Effortless Rustic Bread
Effortless Rustic Bread Recipe: A Step-by-Step Guide for Perfect Homemade Loaves
This comprehensive guide delves into the creation of effortless rustic bread, drawing inspiration from the popular recipe found on Allrecipes.com (https://www.allrecipes.com/recipe/244916/effortless-rustic-bread/). This recipe champions simplicity and accessibility, making it an ideal starting point for novice bakers and a satisfying staple for experienced ones. The core philosophy behind this rustic bread is its minimal hands-on time and reliance on patient fermentation to develop a complex flavor and a wonderfully airy crumb. Unlike traditional bread recipes that require constant kneading and shaping, this method utilizes a no-knead technique, which is a significant contributor to its "effortless" moniker. The magic happens through autolyse, a period of rest where flour and water hydrate, allowing gluten to develop naturally without mechanical manipulation. This allows even beginners to achieve bakery-quality results in their own kitchens. The recipe’s success hinges on understanding the interplay of simple ingredients – flour, water, yeast, and salt – and allowing time to perform the heavy lifting. By following these steps meticulously, home bakers can unlock the secrets to consistently delicious, crusty, and tender rustic bread, transforming their kitchens into aromatic havens.
The foundation of this effortless rustic bread lies in its simple ingredient list, which is intentionally curated for accessibility and effectiveness. The recipe typically calls for all-purpose flour, a readily available and forgiving option that works exceptionally well for this style of bread. While some variations might suggest bread flour for a slightly chewier texture, all-purpose flour provides the desired balance of gluten development and tenderness for a rustic loaf. The hydration level, or the ratio of water to flour, is crucial and often falls within a range that encourages the development of a loose, shaggy dough. This high hydration is key to the open crumb structure characteristic of rustic breads. Active dry yeast or instant yeast serves as the leavening agent, responsible for the bread’s rise and airy texture. The choice between active dry and instant yeast usually comes down to personal preference and the specific recipe instructions; instant yeast can often be mixed directly with the dry ingredients, while active dry yeast typically requires activation in warm water. Finally, salt is an indispensable ingredient, not only for flavor enhancement but also for controlling yeast activity and strengthening the gluten network. The precise measurements of these ingredients are vital for achieving the intended texture and flavor profile, so accurate weighing or careful measuring is recommended.
The process begins with the crucial first step: combining the dry ingredients. In a large mixing bowl, the flour and salt are thoroughly whisked together. This ensures an even distribution of salt throughout the flour, preventing pockets of saltiness and promoting uniform gluten development. If using active dry yeast, it should be proofed separately in warm water (around 105-115°F or 40-46°C) with a pinch of sugar until foamy, indicating its viability. If using instant yeast, it can generally be added directly to the dry ingredients. Once the dry ingredients are combined (and the yeast, if using instant, is incorporated), the water is added. The water should be lukewarm, aiming for a similar temperature range as when proofing active dry yeast. The goal at this stage is to create a shaggy, sticky dough. It’s important not to overmix or knead the dough at this point. The dough will appear rough and somewhat uncohesive, which is precisely what is desired. The next step is the autolyse, a resting period that is fundamental to the no-knead method. The bowl should be covered tightly with plastic wrap or a damp kitchen towel to prevent the dough from drying out. This resting period, typically ranging from 30 minutes to 2 hours, allows the flour to fully hydrate and the gluten to begin developing naturally. During this time, the flour particles absorb the water, and enzymes within the flour start to break down starches into sugars, which will later be utilized by the yeast for fermentation. This passive gluten development significantly reduces the need for manual kneading.
Following the autolyse, the dough requires its first fermentation, often referred to as the bulk fermentation. This is the primary rise of the bread, where the yeast gets to work, producing carbon dioxide gas and expanding the dough. After the autolyse period, you’ll notice the dough has become smoother and more cohesive, though it will still be quite sticky. The bowl remains covered, and the dough is left to rise in a warm, draft-free environment. The duration of this bulk fermentation is critical and can vary depending on the ambient temperature of the kitchen. In warmer conditions, it might take as little as 2-4 hours, while in cooler conditions, it could extend to 8-12 hours, or even overnight in the refrigerator for a slower, more flavorful fermentation. A longer, slower fermentation typically results in a more complex flavor profile due to increased enzymatic activity and the development of desirable organic acids. To check for readiness, the dough should have at least doubled in size, appear bubbly, and feel light and airy. A gentle poke with a floured finger should leave an indentation that slowly springs back. This stage is where the magic of natural fermentation truly shines, transforming a simple mixture of ingredients into a living, breathing dough.
After the initial bulk fermentation, the dough is gently turned out onto a lightly floured surface. The key here is to handle the dough with as little manipulation as possible to preserve the air bubbles that have developed. The recipe emphasizes a "no-knead" approach, and this philosophy extends to the shaping stage. Instead of vigorous kneading, the dough is typically folded over itself a few times. This can be done by gently stretching the edges of the dough and folding them towards the center, creating a slightly tighter surface tension. The aim is to create a somewhat round or oblong shape, depending on how the bread will be baked. This folding process helps to further strengthen the gluten structure and create layers within the dough, contributing to a better crumb. Overworking the dough at this stage can deflate the precious air pockets that have formed during fermentation, so a light touch is paramount. Once folded, the dough is usually left to rest for a short period, often 15-20 minutes, to allow the gluten to relax before the final shaping. This brief rest makes the dough more pliable and easier to handle for the final shaping, if any further shaping is required.
The second proofing, or final rise, is crucial for achieving the desired volume and texture before baking. After the initial folds and rest, the dough is carefully transferred to a proofing basket (banneton) or a bowl lined with a floured kitchen towel. The seam side should be placed upwards in the banneton to ensure a smooth, aesthetically pleasing top crust when inverted for baking. The banneton should be lightly floured to prevent sticking. Again, the dough needs to be covered to prevent it from drying out. This second rise typically takes less time than the bulk fermentation, usually around 30-60 minutes, depending on the temperature. The dough should increase in volume by about 50-75% and appear visibly puffy. A gentle poke should leave an indentation that springs back slowly. This final proof allows the yeast to continue producing carbon dioxide, creating the final structure for a light and airy interior. Some recipes might advocate for a cold proof in the refrigerator for several hours or overnight at this stage. This cold fermentation further develops flavor and can make the dough easier to handle and score before baking.
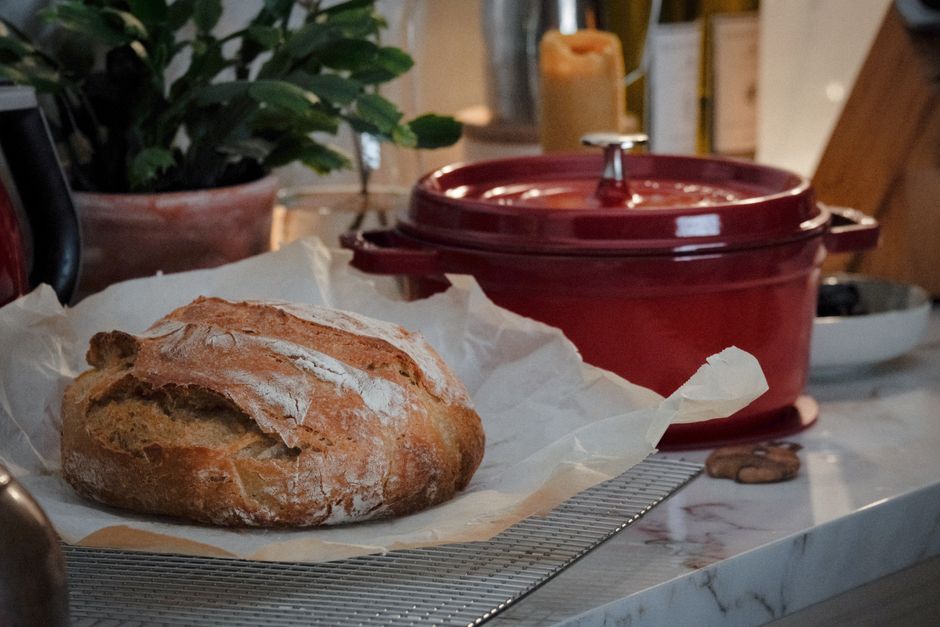
The baking of this effortless rustic bread is where the characteristic crust develops. A preheated oven and a Dutch oven or other heavy, lidded pot are essential for trapping steam, which is vital for achieving a crispy, golden-brown crust and an open crumb. The oven should be preheated to a high temperature, typically between 450-475°F (230-245°C), for at least 30 minutes to ensure the baking vessel is thoroughly heated. Once the dough has completed its second proof, it is carefully inverted from the proofing basket onto a piece of parchment paper. This is done by placing the parchment paper over the opening of the banneton and then flipping the entire assembly. If the dough was proofed in a bowl with a towel, it can be carefully inverted directly onto the parchment. The parchment paper makes it easy to transfer the dough into the hot Dutch oven. For a more artisanal look and to allow for controlled expansion, the dough is often scored with a sharp knife or a lame. A few quick, shallow slashes across the top will allow the bread to expand evenly during baking. The dough, along with the parchment paper, is then carefully lowered into the preheated Dutch oven. The lid of the Dutch oven is secured tightly, creating a steamy environment.
The initial phase of baking occurs with the lid on the Dutch oven. This trapped steam is crucial for the bread to rise maximally and for the crust to remain soft enough to expand. Without sufficient steam, the crust can form too early and too hard, restricting the oven spring and resulting in a denser loaf. This covered baking period typically lasts for about 20-25 minutes. After this initial period, the lid is carefully removed from the Dutch oven. Removing the lid allows the steam to escape, and the heat of the oven can then directly interact with the surface of the bread, promoting browning and the development of a wonderfully crisp crust. The bread continues to bake, uncovered, for another 20-25 minutes, or until it achieves a deep golden-brown color. The internal temperature of the bread should reach around 200-210°F (93-99°C) when tested with an instant-read thermometer, indicating that it is fully baked. The aroma that fills the kitchen during this stage is intoxicating, a testament to the simple yet profound transformation that has occurred.
Once baked to perfection, the rustic bread is carefully removed from the Dutch oven and transferred to a wire cooling rack. It is absolutely essential to allow the bread to cool completely before slicing. This cooling period allows the interior structure of the bread to set and the moisture to redistribute. Slicing the bread while it is still hot can result in a gummy texture and a compressed crumb. The cooling process allows the complex flavors developed during fermentation to fully meld and become more pronounced. This waiting period, though potentially challenging, is a critical step in achieving the best possible texture and flavor from your homemade rustic loaf. The satisfaction of slicing into a perfectly cooled loaf of homemade bread, with its crackling crust and airy interior, is a rewarding experience that makes the entire process worthwhile. The versatility of this bread makes it a perfect accompaniment to soups, stews, salads, or simply enjoyed with butter. Its rustic charm and delicious flavor make it a true crowd-pleaser. This effortless approach to bread making demystifies the process, making it an accessible and enjoyable culinary pursuit for bakers of all skill levels.


