
Prize Winning Baby Back Ribs
Unlock the Secrets to Prize-Winning Baby Back Ribs: A Comprehensive Guide to Perfection
Achieving truly prize-winning baby back ribs is a culinary quest that combines precise technique, quality ingredients, and a deep understanding of the pork rib’s anatomy and cooking dynamics. This article demystifies the process, offering a step-by-step blueprint to create ribs that are fall-off-the-bone tender, packed with flavor, and boast a perfectly rendered, slightly chewy bark. We’ll delve into the crucial stages, from selecting the ideal rack to the final saucing and resting, ensuring every element contributes to a championship-level result.
The foundation of any great rack of ribs lies in the selection of the raw product. For baby back ribs, also known as loin ribs, prioritize racks that are relatively uniform in thickness and size. Look for bright, rosy pink meat with a good amount of marbling. Marbling, the intramuscular fat, is critical for moisture and flavor. Avoid racks that appear pale or dry. The membrane on the bone side is another crucial consideration. This thin, papery layer, often referred to as the silverskin, will become tough and chewy if left on. It must be removed before cooking. To do this effectively, slide a thin, blunt knife (like a butter knife) under a corner of the membrane, lift it slightly, and then grip it with a paper towel. The paper towel provides the necessary traction to peel the membrane away in one piece. If it tears, repeat the process. Properly preparing the membrane is a non-negotiable step for achieving tender, palatable ribs.
The next critical stage is the application of the rub. A prize-winning rib rub is a carefully balanced blend of sweet, savory, and spicy elements. While pre-made rubs can suffice, crafting your own offers unparalleled control over flavor profiles. A foundational rub typically includes brown sugar (for sweetness and bark development), paprika (for color and a mild smoky flavor), chili powder (for heat), garlic powder, onion powder, and black pepper. Salt is paramount, and kosher salt is preferred due to its larger, more easily manageable crystals and its ability to draw out moisture, aiding in bark formation. A common ratio might be 4 parts brown sugar, 2 parts paprika, 1 part chili powder, 1 part garlic powder, 1 part onion powder, and 1 part black pepper, with salt to taste. Some pitmasters incorporate cayenne pepper for extra heat, cumin for earthy notes, or even a touch of ground coffee for depth. The rub should be applied generously, covering all surfaces of the rib rack. Gently press the rub into the meat to ensure adhesion, but avoid aggressively packing it, which can create a dense, gummy layer. Allow the rubbed ribs to rest, ideally uncovered in the refrigerator for at least an hour, or even overnight. This period allows the salt to begin its work, drawing out moisture and then reabsorbing the seasoned liquid, creating a deeper flavor penetration and contributing to a desirable crust.
The cooking method for baby back ribs is where opinions often diverge, but a low-and-slow approach is universally accepted for optimal tenderness. Whether employing a charcoal smoker, a gas grill with smoke tubes, or an oven, the goal is to maintain a consistent temperature between 225°F and 250°F. This slow cooking process allows the connective tissues within the ribs to break down into gelatin, which renders the meat incredibly tender and moist. For smoking, wood selection plays a significant role in flavor. Fruitwoods like apple and cherry impart a mild, sweet smoke that complements pork beautifully. Hickory and mesquite offer a bolder, more robust smoke. A combination of woods can also yield complex flavor profiles. If using a charcoal smoker, start with a well-lit chimney of charcoal and add soaked wood chips or chunks as needed to maintain the desired temperature and smoke level. For gas grills, indirect heat is key, with smoke tubes or a smoker box filled with wood chips placed on the grates away from the ribs. In an oven, a lower temperature of 275°F to 300°F can be used, with wood chips wrapped in foil and poked with holes placed on the bottom rack to generate smoke.
The initial cooking phase, often referred to as the "smoke ring phase," is crucial for infusing the ribs with smoke flavor and beginning the tenderizing process. This typically lasts for 2 to 3 hours. During this time, resist the urge to constantly open the cooker. Each opening releases heat and smoke, prolonging the cooking time and potentially hindering bark development. The ribs should be placed bone-side down initially, allowing the heat and smoke to penetrate from below. Observe the color of the ribs; they should begin to darken and develop a mahogany hue as the rub caramelizes and the smoke adheres to the surface.
Following the initial smoking period, many pitmasters employ a "Texas Crutch" or a braising technique to further enhance tenderness and moisture. This involves wrapping the ribs tightly in heavy-duty aluminum foil, often with a small amount of liquid. This liquid can be apple juice, apple cider vinegar, broth, or even a splash of your favorite barbecue sauce. The foil traps steam, accelerating the tenderizing process and preventing the ribs from drying out. This wrapped stage typically lasts for another 1 to 2 hours, depending on the thickness of the ribs and the desired tenderness. The internal temperature of the ribs should be approaching 190°F to 195°F at this point, though temperature is a guideline, and texture is the ultimate judge.
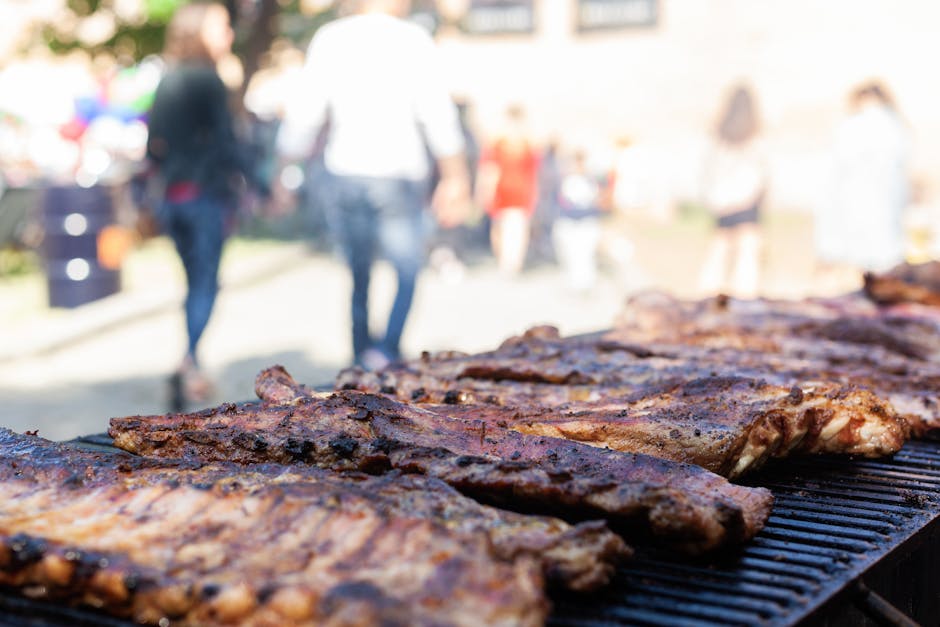
After the wrapped stage, the ribs are unwrapped and returned to the cooker for the final "bark development" phase. This is where the magic of a well-rendered crust, or bark, happens. The ribs should be placed bone-side up during this phase, allowing the sugars in the rub and any residual moisture to caramelize and form that desirable chewy exterior. This is also the opportune time to apply barbecue sauce, if desired. Apply the sauce sparingly initially, allowing it to caramelize onto the ribs. Too much sauce too early can lead to a burnt, gummy finish. A thin layer applied towards the end of this stage is generally preferred. This final phase can take anywhere from 30 minutes to an hour. The ribs are done when they have a beautiful, dark, slightly glistening bark and the meat has pulled back from the ends of the bones, exposing about ¼ to ½ inch of bone. A probe inserted into the thickest part of the meat should encounter very little resistance, and the ribs should bend easily when lifted from one end.
Saucing is a highly personal aspect of barbecue, and for prize-winning ribs, the sauce should complement, not overpower, the inherent flavor of the pork and the smoke. A classic Kansas City-style sauce, characterized by its sweet and tangy tomato base, is a popular choice. However, a Carolina-style vinegar-based mop can also be used during the cooking process or as a finishing glaze. For a competition-ready edge, consider making your own sauce. Key ingredients often include tomato paste or ketchup, apple cider vinegar, brown sugar, molasses, Worcestershire sauce, mustard, and a blend of spices like paprika, garlic powder, and chili powder. The goal is to achieve a balanced flavor profile that enhances the ribs without masking their natural deliciousness. Apply sauce in thin layers during the final stages of cooking, allowing each layer to caramelize and set.
The resting period is as crucial as any cooking step. Once the ribs are removed from the heat, they should be loosely tented with foil and allowed to rest for at least 15 to 20 minutes. This allows the juices within the meat to redistribute, ensuring a more succulent and moist final product. Cutting into ribs too soon will result in a loss of valuable moisture, leading to drier, less flavorful meat. During this rest, the bark will continue to set, and the flavors will meld beautifully.
Presentation is the final consideration for achieving a prize-winning plate. Ribs should be cut between the bones, creating individual portions. For a competition setting, a clean cut that clearly exposes the layers of smoke-infused meat and the caramelized bark is essential. Garnish with a sprinkle of fresh parsley or a drizzle of extra sauce can enhance visual appeal, but the quality of the ribs themselves should be the star.
Mastering baby back ribs is a journey of continuous learning and refinement. Understanding the interplay of temperature, smoke, rub, and time is paramount. Each element contributes to the complex flavor and perfect texture that defines a truly prize-winning rack. By meticulously following these steps, from the initial selection of the meat to the final resting period, you can consistently produce baby back ribs that will impress even the most discerning palate and stand a true chance at the winner’s circle. Remember, patience and attention to detail are your most valuable ingredients in this quest for rib perfection. The reward for this dedication is a culinary triumph that speaks for itself, a testament to your skill and understanding of the art of barbecue.


