
Tag No Knead Bread
The Revolutionary No-Knead Bread: Mastering the Art of Effortless Artisan Loaves
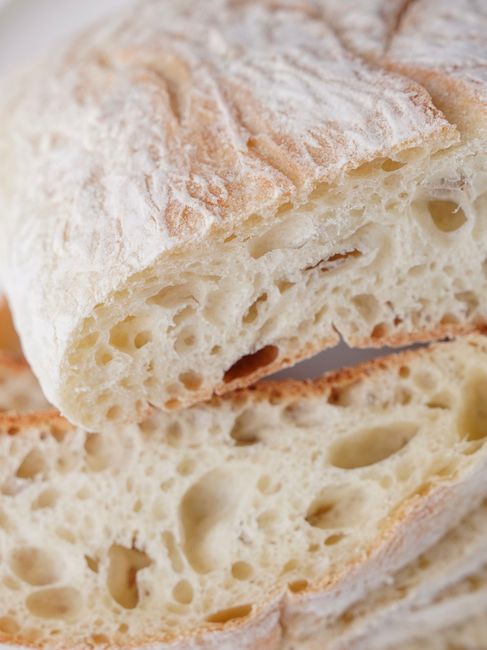
The advent of the no-knead bread method has revolutionized home baking, transforming the perception of artisan bread from an intimidating, labor-intensive pursuit to an accessible and remarkably simple endeavor. At its core, no-knead bread relies on time and high hydration to develop gluten, negating the need for traditional kneading. This technique, popularized by Jim Lahey, involves a minimal mix of ingredients, a long fermentation period, and a high-temperature bake, often in a Dutch oven. The result is a crusty exterior, a chewy, open crumb, and a flavor profile that rivals bakery-quality loaves, all achieved with minimal active involvement from the baker. Understanding the science behind this seemingly magical process is key to consistently producing exceptional bread.
The foundational principle of no-knead bread is the development of gluten through autolysis and a prolonged fermentation. Autolysis, a term borrowed from biology, refers to a process where flour and water rest together. During this resting period, enzymes naturally present in the flour, specifically proteases, begin to break down the protein chains into smaller segments. This process hydrates the flour more thoroughly and initiates the formation of gluten strands, albeit in a very loose and unstructured state. Unlike traditional methods where kneading physically aligns and strengthens these gluten strands through mechanical action, no-knead bread leverages time and the enzymatic activity to achieve a similar, albeit more relaxed, gluten network. The high hydration of the dough (typically 75% to 80% water to flour ratio) is crucial. This increased water content allows for more extensive hydration of the flour particles, facilitating the enzymatic activity and creating a more fluid environment where gluten can form and align with minimal manipulation.
Following the autolysis period, the dough undergoes a long, slow fermentation at room temperature. This extended fermentation is where the magic truly happens. Yeast, a simple fungus, consumes sugars in the flour and produces carbon dioxide gas and alcohol. In a no-knead dough, the high hydration and relaxed gluten network allow these gas bubbles to expand and be trapped effectively. The slow, prolonged activity of the yeast over many hours, often 12 to 18, results in a significant build-up of carbon dioxide. This gas, trapped within the expanding gluten matrix, is what creates the characteristic airy, open crumb of no-knead bread. Furthermore, the extended fermentation also allows for the development of complex flavor compounds. As the yeast and bacteria work over time, they break down starches and proteins into a myriad of esters, aldehydes, and organic acids, contributing to the rich, nuanced taste that is often absent in breads made with rapid yeast activation.
The simplicity of the ingredient list for no-knead bread is another significant advantage. Typically, it comprises only flour, water, yeast, and salt. The specific type of flour used can significantly impact the final texture and flavor. All-purpose flour is a common starting point, offering a good balance of protein content for gluten development. However, bread flour, with its higher protein percentage (around 12-14%), will generally yield a stronger gluten network and a chewier loaf. For those seeking a more rustic flavor and a slightly denser crumb, whole wheat flour can be incorporated, though it’s often best to use it in combination with all-purpose or bread flour to maintain a manageable dough consistency. The yeast used can be either active dry yeast or instant yeast. Instant yeast, which doesn’t require proofing, is often preferred for its convenience and consistent performance in no-knead recipes. Salt is essential not only for flavor but also for controlling yeast activity and strengthening the gluten structure.
The process itself is remarkably straightforward, making it ideal for novice bakers. The initial mixing involves combining flour, water, yeast, and salt until just incorporated. There is no strenuous kneading required. The dough will appear shaggy and wet, which is exactly what is desired. This mixture is then left to rest, covered, at room temperature for a significant period, typically 12 to 18 hours. During this time, the dough will double or even triple in size, becoming visibly bubbly and alive. After the primary fermentation, the dough is gently turned out onto a lightly floured surface. The goal here is minimal degassing. The dough is then shaped into a round or oval loaf with as little manipulation as possible, preserving the precious air bubbles. A second, shorter proofing period, usually 30 minutes to an hour, allows the shaped loaf to relax and gain a little volume before baking.
The baking stage is critical and often employs a Dutch oven or a similar lidded cast-iron pot. Preheating the Dutch oven in a very hot oven (typically 450-475°F or 230-245°C) is paramount. The high heat and the enclosed environment of the Dutch oven create a steamy atmosphere, which is crucial for achieving the signature crusty exterior. The trapped steam prevents the crust from setting too quickly, allowing the loaf to expand fully during the initial phase of baking. This is often referred to as oven spring. After about 20-30 minutes with the lid on, the lid is removed to allow the crust to brown and crisp up for another 15-25 minutes. The removal of the lid also facilitates the evaporation of moisture from the surface, leading to that desired crackly crust.
Troubleshooting common issues is an integral part of mastering any bread-making technique. A common problem is a dense crumb. This can be attributed to several factors: insufficient fermentation time, which means the yeast hasn’t had enough time to produce adequate carbon dioxide; too much handling of the dough during shaping, which deflates the air bubbles; or an oven that isn’t hot enough, leading to poor oven spring. Conversely, a crust that is too thick or too hard might indicate too much time spent baking with the lid off, or an oven that is too hot overall. A pale crust could be the result of insufficient baking time or a lower oven temperature than recommended. Understanding these variables allows for adjustments in future bakes.
Variations on the basic no-knead bread theme are abundant, catering to diverse palates and preferences. Incorporating herbs, seeds, or even cheese directly into the dough during the initial mix can add layers of flavor and texture. For instance, adding a tablespoon of dried rosemary or a generous handful of grated Parmesan cheese can transform a plain loaf into a gourmet delight. Seeds like sesame, poppy, or sunflower can be mixed in or sprinkled on top before baking for added crunch and nutritional value. Another popular variation involves using a sourdough starter in place of commercial yeast. This introduces a more complex tangy flavor and requires a slightly different approach to fermentation times and feeding schedules, but the no-knead principle of long fermentation and minimal handling remains central.
The benefits of no-knead bread extend beyond its delicious results and ease of preparation. It is an economical way to produce high-quality bread at home, significantly cheaper than purchasing artisan loaves from bakeries. The satisfaction of creating something so delicious from such basic ingredients is profoundly rewarding. Furthermore, for individuals with gluten sensitivities, while this is a wheat-based bread, the longer fermentation can potentially make it more digestible for some, though this is not a substitute for medical advice. The method also promotes a more mindful and connected approach to food preparation, encouraging a break from the fast-paced consumption of processed goods.
The environmental impact of this baking method is also noteworthy. By baking at home, individuals reduce their carbon footprint associated with transportation and packaging of commercially produced bread. The primary ingredients – flour and water – are generally sustainably sourced, and the energy consumption of home ovens, while present, can be offset by the avoidance of industrial baking processes. The long fermentation period itself, though requiring ambient temperature, is a passive process that doesn’t demand significant energy input during the bulk of the time.
In conclusion, the no-knead bread method represents a paradigm shift in home baking, demystifying artisan bread and making it accessible to everyone. Its foundation in time-driven gluten development, high hydration, and minimal handling, coupled with a hot, steamy bake, consistently yields loaves with exceptional crust and crumb. By understanding the underlying scientific principles, troubleshooting common issues, and exploring the numerous variations, bakers can embark on a rewarding journey of creating delicious, economical, and satisfying bread with remarkable ease. This method is not merely a recipe; it is an invitation to embrace the art and joy of baking, one effortless loaf at a time.


