
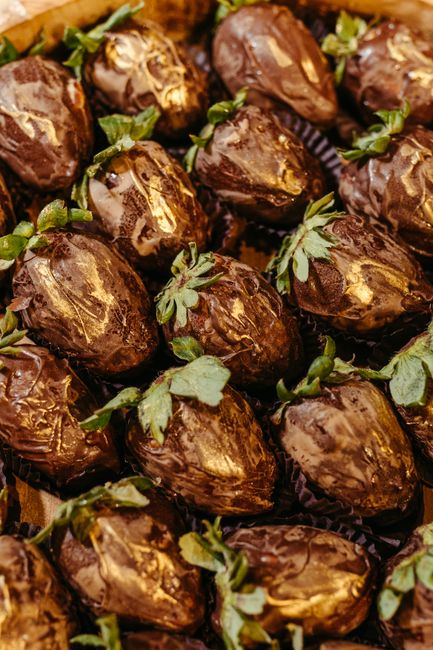
Marbled Chocolate Covered Strawberries
Marbled Chocolate Covered Strawberries: A Culinary Art of Flavor and Aesthetics
Marbled chocolate covered strawberries represent a sophisticated fusion of classic indulgence and artistic presentation, transforming a beloved treat into a visually stunning and multi-layered flavor experience. This technique involves artfully swirling two or more types of melted chocolate together, creating captivating patterns on the surface of ripe, fresh strawberries. The appeal of marbled chocolate covered strawberries lies not only in their exquisite appearance, reminiscent of fine art, but also in the complex interplay of flavors that different chocolate varieties can offer. From the rich bitterness of dark chocolate to the creamy sweetness of milk chocolate and the pure sweetness of white chocolate, the possibilities for flavor combinations are vast, allowing for a personalized and memorable dessert. The process itself, while appearing intricate, is achievable for home bakers with a few key techniques and quality ingredients. This article will delve into the intricacies of creating perfect marbled chocolate covered strawberries, covering ingredient selection, melting techniques, marbling methods, troubleshooting common issues, and serving suggestions. Understanding these elements is crucial for mastering this delightful confection.
The foundation of exceptional marbled chocolate covered strawberries rests on the quality of the ingredients. Primarily, this means selecting the freshest, plumpest, and ripest strawberries. Look for berries that are firm, deeply colored, and free from blemishes or bruising. Washing and thoroughly drying them is paramount; any residual moisture will cause the chocolate to seize, resulting in a clumpy and unworkable texture. For the chocolate, opt for high-quality couverture chocolate chips or bars. Couverture chocolate contains a higher percentage of cocoa butter than compound chocolate, leading to a smoother melt, a glossier finish, and a superior snap when set. The cocoa butter content also makes it more fluid, which is essential for achieving fine marbling effects. A minimum of 50-60% cocoa solids for dark chocolate is recommended for a balanced flavor that won’t overpower the strawberry. Milk chocolate should have at least 30-35% cocoa solids for a rich dairy note without being overly sweet. White chocolate, while technically not chocolate as it contains no cocoa solids, should be of good quality to avoid an artificial taste. The visual contrast is key to effective marbling, so choose chocolates with distinct color profiles. For instance, dark chocolate and white chocolate offer a dramatic contrast, while milk chocolate and white chocolate provide a softer, more elegant swirl.
Properly melting chocolate is a critical step that demands attention to detail to prevent scorching or seizing. The most reliable method for melting chocolate, especially for delicate tasks like marbling, is the double boiler method. This involves placing the chocolate in a heatproof bowl set over a saucepan of simmering water. Crucially, the bottom of the bowl should not touch the water; steam is the heat source. Stir the chocolate gently and continuously with a rubber spatula or silicone whisk. Avoid using metal utensils, as they can introduce moisture. Once the chocolate is mostly melted, remove it from the heat and stir until completely smooth. The residual heat will continue to melt any remaining solid pieces. Alternatively, microwave melting can be used, but it requires extreme caution. Heat the chocolate in short intervals (15-20 seconds), stirring thoroughly between each interval. Overheating in the microwave is very easy and can quickly ruin the chocolate. For marbling, it’s often best to melt your chosen chocolate varieties separately in their own heatproof bowls.
Achieving the signature marbled effect requires a specific technique. Once your different chocolate types are melted and smooth, it’s time to combine them. The simplest and most effective method for marbled chocolate covered strawberries involves drizzling. Dip a portion of the strawberry in one color of melted chocolate, allowing excess to drip off. Immediately, while the first layer is still wet, use a spoon or a piping bag with a fine tip to drizzle thin lines or random swirls of the second (or subsequent) chocolate color over the first. The key is to work quickly before the initial chocolate layer begins to set. The warmth of the first chocolate layer will help the second layer adhere and slightly melt into it, creating the marbled pattern. Another technique is the "swirl and dip." Dip the strawberry partially into one chocolate, then immediately dip it into the second color, creating a layered effect. As you pull the strawberry out, gently twist and swirl it to encourage the colors to blend naturally. For more intricate patterns, use a toothpick or a skewer to gently drag through the wet chocolate, creating delicate swirls and veins. Don’t overwork the chocolate; the beauty of marbling often lies in its organic, imperfect nature.
Dipping and coating the strawberries properly ensures both aesthetic appeal and a good chocolate-to-strawberry ratio. Begin by holding the strawberry by its stem or leaves. Dip it into the melted chocolate, ensuring it’s fully submerged or coated to your desired level. Tilt the strawberry and gently tap it against the side of the bowl to allow excess chocolate to drip back into the bowl. This prevents thick, uneven coatings that can detract from the marbling. If you’re aiming for a more uniform marble, dip the entire strawberry in the base color first, let it set slightly, and then apply the marbling technique. For a more rustic look, partial dips and random drizzles can be very effective. After coating and marbling, place the strawberries on a parchment-lined baking sheet or a silicone mat. This prevents them from sticking and allows for easy removal once set.
Allowing the marbled chocolate covered strawberries to set properly is as important as the marbling process itself. The setting time will depend on the ambient temperature and the type of chocolate used. At room temperature, it can take anywhere from 30 minutes to an hour for the chocolate to harden. For a faster and more consistent set, refrigerate the strawberries. However, avoid prolonged refrigeration, as it can cause condensation to form on the chocolate, dulling its shine and potentially affecting its texture. A quick chill of 10-15 minutes in the refrigerator is usually sufficient. For a truly professional finish, some bakers opt for chilling in the freezer for 5-10 minutes, but again, monitor closely to prevent over-chilling. Once set, the chocolate should have a firm, glossy finish and a satisfying snap when bitten.
Troubleshooting common issues is an essential part of mastering any culinary technique, and marbled chocolate covered strawberries are no exception. The most frequent problem is seized chocolate. This occurs when chocolate comes into contact with even a small amount of water. If your chocolate seizes, it will become thick, grainy, and unworkable. Unfortunately, seized chocolate cannot typically be salvaged. To prevent this, ensure all bowls, utensils, and strawberries are completely dry. Another common issue is dull or spotty chocolate. This can be caused by overheating, improper tempering (though for simple dipping, tempering is less critical than for solid chocolate bars), or the use of low-quality chocolate. Ensure you are using good quality couverture chocolate and melting it gently. If the chocolate is not setting firmly, it might be too warm or not fully hardened. Patience and a cool environment are key. Inconsistent marbling can be due to working too slowly, allowing the base chocolate to set before applying the drizzle, or using chocolate that is too thick. Ensure your chocolate is at the optimal dipping consistency – not too thick, not too thin.
Decorating and enhancing the visual appeal of marbled chocolate covered strawberries can elevate them from delicious to truly show-stopping. Beyond the basic two-chocolate marble, consider adding further decorative elements. Edible glitter or luster dust can be brushed onto the wet chocolate for a subtle sparkle. Tiny edible pearls or sugar crystals can add texture and visual interest. For a more festive touch, consider using candy melts in contrasting colors for more vibrant drizzles or to create intricate patterns with a toothpick. You can also combine marbling with other dipping techniques, such as dipping only half of the strawberry in one color, then marbling the other half. Piping thin lines of contrasting chocolate onto the set marbled surface can create additional layers of design and flavor. Remember to use edible decorations that complement, rather than compete with, the visual harmony of the marbling.
Serving and storage are the final considerations for enjoying these exquisite treats. Marbled chocolate covered strawberries are best served at room temperature, allowing the chocolate to be at its optimal texture and the strawberry’s flavor to be most pronounced. Avoid serving them directly from the refrigerator, as the cold can mute the flavors and create a less pleasing mouthfeel. Store any leftovers in a single layer on a parchment-lined container in a cool, dry place. Avoid stacking them, as the chocolate can smudge. If refrigerating is absolutely necessary, ensure they are in an airtight container to prevent moisture absorption. However, it’s important to note that chocolate covered strawberries are a perishable item and are best consumed within 1-2 days of preparation for optimal freshness and texture. The natural moisture of the strawberry can eventually affect the chocolate’s integrity over longer storage periods.
The versatility of marbled chocolate covered strawberries makes them suitable for a wide range of occasions. They are a popular choice for celebrations such as Valentine’s Day, Mother’s Day, birthdays, and anniversaries, offering a sophisticated and romantic dessert option. Their elegant appearance also makes them ideal for wedding favors, bridal showers, or corporate events where a touch of luxury is desired. For a more casual gathering, they can be a delightful addition to a dessert platter or a potluck. The ability to customize the chocolate flavors and marbling patterns allows for endless creative possibilities, ensuring a unique and personalized treat for any event. Consider the color palette of your event when choosing your chocolate combinations to create a cohesive and visually appealing spread. The inherent beauty and deliciousness of marbled chocolate covered strawberries ensure they will be a memorable and appreciated addition to any culinary presentation.
Beyond the visual and taste appeal, the process of creating marbled chocolate covered strawberries can be a rewarding culinary endeavor. It offers an opportunity to experiment with different chocolate types, flavor pairings, and decorative techniques, allowing for a high degree of personalization. As you become more adept, you can explore more advanced marbling patterns, such as checkerboard effects or intricate swirls achieved with specialized tools. The art of marbling chocolate is a skill that can be honed with practice, and the results are consistently impressive. Each strawberry becomes a miniature work of edible art, a testament to both the baker’s skill and the inherent beauty of the ingredients. The satisfaction derived from presenting and sharing these beautiful and delicious confections is a significant part of their overall appeal, making them a truly special treat.


