
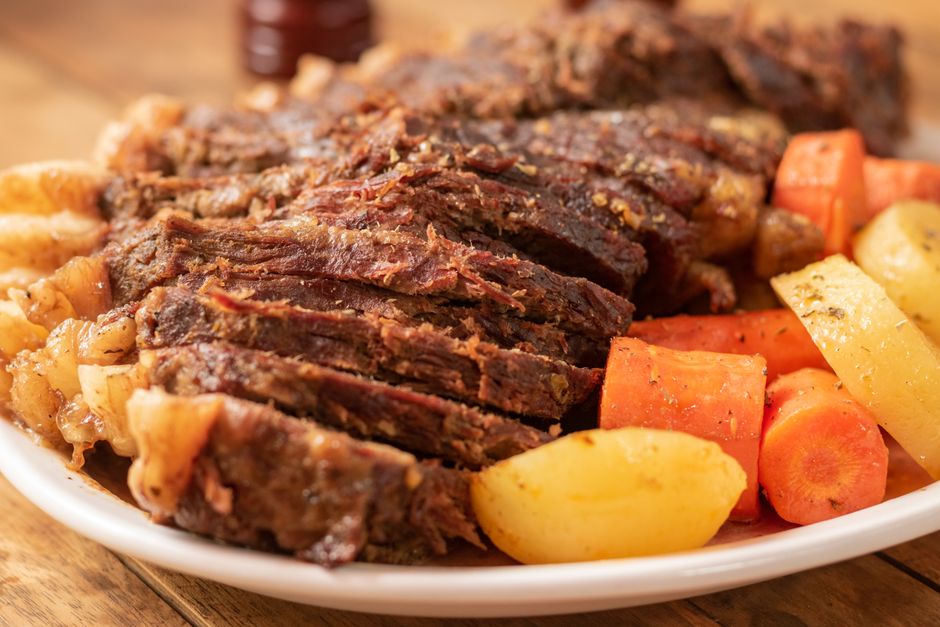
Pot Roast With Vegetables
The Ultimate Guide to Flavorful Pot Roast with Vegetables: A Culinary Cornerstone
Pot roast with vegetables is more than just a meal; it’s a comforting classic, a testament to the power of slow cooking to transform humble ingredients into an incredibly satisfying and deeply flavorful dish. This recipe, at its core, is about coaxing tender, melt-in-your-mouth beef from a tougher cut, infused with the savory essence of aromatics and the sweet earthiness of root vegetables. It’s a dish that evokes warmth, tradition, and the satisfying aroma that fills the house as it simmers. Understanding the principles behind a successful pot roast, from selecting the right cut of meat to mastering the cooking technique, is key to unlocking its full potential. This comprehensive guide will delve into every aspect, ensuring you can confidently create a memorable pot roast that will become a regular in your culinary repertoire.
Selecting the Perfect Cut of Beef for Your Pot Roast
The foundation of an exceptional pot roast lies in the judicious selection of beef. Unlike premium steaks that benefit from quick, high-heat cooking, pot roast thrives on cuts that are rich in connective tissue and fat. These components, when subjected to slow, moist heat, break down into gelatin and render, contributing immense flavor and an unparalleled tender texture. The most common and highly recommended cuts for pot roast are:
-
Chuck Roast: This is arguably the most popular and best choice for pot roast. It’s found in the shoulder area of the cow and is characterized by its marbling (intramuscular fat) and a significant amount of collagen. Cuts like chuck shoulder, chuck eye roast, or top blade roast all fall under the chuck umbrella and are ideal. The marbling ensures moisture and flavor throughout the cooking process, while the collagen breaks down into lusciously tender meat.
-
Rump Roast: Located in the rear of the cow, rump roast is a leaner option than chuck but still suitable for slow cooking. Cuts like the bottom round roast or the top round roast can be used. Because it’s leaner, it’s crucial to ensure adequate liquid and a longer cooking time to prevent it from becoming dry or tough.
-
Brisket: While often associated with barbecue, a portion of the brisket, particularly the "flat cut," can also be used for pot roast. Brisket is known for its distinct layers of fat and muscle. Slow braising will render the fat, tenderize the meat, and create a deeply savory result.
-
Heel of Round: This cut is a bit tougher and less marbled than chuck but can still yield a delicious pot roast if cooked for an extended period with sufficient moisture.
When choosing your cut, look for a piece that is at least 2-3 pounds. The thickness is more important than the exact shape. Good marbling is a significant indicator of a successful pot roast, so don’t shy away from cuts that have visible streaks of fat throughout. A well-marbled piece of chuck roast will almost guarantee a tender and juicy outcome.
The Art of Searing: Building Flavor from the Start
Before the slow braising begins, searing the beef is a critical step that cannot be skipped. This process, known as the Maillard reaction, is responsible for developing a rich, complex brown crust on the exterior of the meat. This crust isn’t just for aesthetics; it’s a powerhouse of flavor that will infuse the entire dish.
To properly sear your pot roast:
-
Pat Dry: Ensure the beef is thoroughly patted dry with paper towels. Moisture on the surface will steam the meat rather than sear it, preventing the formation of that desirable brown crust.
-
Season Generously: Season the beef liberally with salt and freshly ground black pepper on all sides. This not only enhances the beef’s natural flavor but also aids in the browning process.
-
Hot Pan, Hot Oil: Heat a heavy-bottomed pot or Dutch oven over medium-high heat. Add a high-smoke-point oil, such as vegetable oil, canola oil, or avocado oil. You want the oil to be shimmering but not smoking excessively.
-
Sear in Batches: Carefully place the seasoned beef into the hot pan. Do not overcrowd the pan; sear the roast in batches if necessary to ensure each piece makes good contact with the hot surface. Sear for 3-5 minutes per side, until a deep, rich brown crust has formed. This will likely take around 8-10 minutes total for all sides.
-
Don’t Forget the Sides: Remember to sear all sides of the roast, including the edges, for maximum flavor development.
Once seared, remove the beef from the pot and set it aside. The rendered fat and browned bits left in the pot are culinary gold and will be the base for building the braising liquid’s flavor.
Aromatic Foundations: The Flavor Bed
The liquid you choose to braise your pot roast in is paramount to its success. This liquid not only keeps the meat moist but also carries and infuses it with flavor. The first layer of flavor comes from the aromatics that are sautéed in the same pot after the beef has been seared.
The classic pot roast aromatic trifecta consists of:
-
Onions: Yellow or sweet onions are ideal. They provide a foundational sweetness and depth of flavor. Chop them roughly, as they will cook down considerably.
-
Carrots: Sweet and earthy, carrots add a subtle sweetness and vibrant color. Peel and cut them into large chunks.
-
Celery: Celery contributes a savory, slightly herbaceous note that complements the other vegetables and the beef. Chop it into similar-sized pieces as the onions and carrots.
After searing the beef, reduce the heat to medium. Add a tablespoon or two of additional oil if the pot looks dry. Then, add the chopped onions, carrots, and celery to the pot. Sauté for 5-7 minutes, stirring occasionally, until the vegetables have softened and begun to brown slightly. This sautéing process further develops their sweetness and releases their flavors into the pot, forming the flavorful base for the braising liquid.
Building the Braising Liquid: Depth and Complexity
Once the aromatics have softened, it’s time to build the braising liquid. This is where you truly infuse the pot roast with savory goodness.
-
Deglaze the Pot: This is a crucial step to capture all the flavorful browned bits (fond) stuck to the bottom of the pot. Pour in a liquid, typically red wine or beef broth, and use a wooden spoon to scrape up all the browned bits. This adds immense depth of flavor.
-
Red Wine: A dry red wine like Cabernet Sauvignon, Merlot, or Pinot Noir is an excellent choice for deglazing. It adds tannins, acidity, and a rich complexity that pairs beautifully with beef. If you prefer not to use alcohol, beef broth or even water can be used, though the flavor will be less nuanced.
-
Beef Broth/Stock: High-quality beef broth or stock is essential. Low-sodium options are preferable to allow you to control the saltiness of the final dish. Homemade beef stock will elevate the flavor even further.
-
-
Add Liquids and Seasonings: After deglazing, add your primary braising liquid. This could be more beef broth, a combination of broth and water, or even a can of condensed tomato soup for a classic, comforting flavor profile.
-
Tomato Paste: Stir in a tablespoon or two of tomato paste and cook for a minute or two until it darkens slightly. This deepens the tomato flavor and adds umami.
-
Herbs and Spices: Incorporate aromatics like fresh thyme sprigs, rosemary sprigs, bay leaves, and whole peppercorns. A touch of Worcestershire sauce can also add a significant boost of umami.
-
Garlic: Minced garlic can be added along with the other aromatics or stirred in with the braising liquid.
-
The amount of liquid should be sufficient to come about halfway to two-thirds of the way up the sides of the beef. You want the meat to be partially submerged, allowing it to braise in the flavorful liquid.
The Star Players: Root Vegetables for Heartiness
While the beef is the undisputed star, the supporting cast of root vegetables is what transforms a simple braised beef into a complete and comforting meal. These vegetables absorb the savory flavors of the braising liquid, becoming tender and delicious.
The most common and highly recommended vegetables for pot roast include:
-
Potatoes: Yukon Golds or red potatoes are excellent choices. They hold their shape well and become creamy when cooked. Peel them if desired, but leaving the skin on (if thoroughly washed) adds extra nutrients and a slightly rustic texture. Cut them into large, uniform chunks (about 1.5-2 inches) so they cook evenly.
-
Carrots: As mentioned, carrots are often added early with the aromatics. However, adding additional, larger chunks of carrots during the braising stage ensures they retain some texture and don’t become overly mushy.
-
Parsnips: Similar to carrots but with a distinctively sweet and nutty flavor, parsnips are a welcome addition to pot roast. Peel them and cut them into chunks similar to the carrots and potatoes.
-
Turnips or Rutabaga: These can add a slightly peppery or earthy depth. Peel and dice them into bite-sized pieces.
-
Celery Root (Celeriac): If you enjoy a more pronounced celery flavor, celery root is a great option. Peel and dice it.
When to Add the Vegetables:
There are two main approaches to adding vegetables:
-
Add Mid-Cook: The most common and recommended method is to add the heartier root vegetables (potatoes, carrots, parsnips) about 1.5 to 2 hours before the end of the cooking time. This ensures they cook through and become tender without disintegrating. Nestling them around the roast in the braising liquid is the typical approach.
-
Add Towards the End: For a firmer vegetable texture or if using quicker-cooking vegetables, you can add them during the last 30-45 minutes of cooking.
Ensure the vegetables are submerged in the braising liquid as much as possible for even cooking and flavor absorption.
Slow and Low: The Magic of Braising
Braising is the technique that defines pot roast. It’s a combination of searing and simmering, utilizing moist heat over a long period to tenderize tougher cuts of meat.
-
Preheat the Oven: Preheat your oven to a moderate temperature, typically 300-325°F (150-160°C). A lower temperature over a longer period is crucial for tenderizing the meat without drying it out.
-
Transfer to Oven: Once the aromatics are sautéed, the beef is returned to the pot, and the braising liquid is added, cover the pot tightly. This can be done with the lid of your Dutch oven, or if you don’t have one, a tightly fitting lid or heavy-duty aluminum foil.
-
Braising Time: The braising time will vary depending on the size and cut of the beef, but a general guideline is 3-4 hours for a 2-3 pound roast. The goal is for the meat to be fork-tender, meaning it should easily shred with a fork.
-
Checking for Doneness: To check for doneness, carefully remove the pot from the oven. Insert a fork into the thickest part of the roast. If it pulls apart easily with minimal resistance, it’s ready. If it’s still tough, return it to the oven and continue cooking, checking every 30-45 minutes.
-
Adding Vegetables: As mentioned in the previous section, add your prepared root vegetables during the last 1.5 to 2 hours of braising time. Ensure they are submerged in the liquid.
Finishing Touches: Elevating Your Pot Roast
Once the pot roast is fork-tender and the vegetables are cooked through, it’s time for the final flourish that takes the dish from good to exceptional.
-
Rest the Meat: Before serving, carefully remove the pot roast from the braising liquid and place it on a cutting board. Tent it loosely with aluminum foil and let it rest for 10-15 minutes. This resting period allows the juices to redistribute throughout the meat, resulting in a more tender and moist final product.
-
Strain and Thicken the Gravy: While the meat rests, attend to the braising liquid. Carefully strain the liquid into a separate saucepan, discarding the solids (bay leaves, herb stems, etc.). You can then thicken this flavorful liquid to create a rich gravy.
-
Cornstarch Slurry: The quickest way to thicken is to create a slurry by whisking together 1-2 tablespoons of cornstarch with an equal amount of cold water. Bring the strained braising liquid to a simmer in the saucepan and gradually whisk in the cornstarch slurry until the gravy reaches your desired consistency. Cook for another minute to ensure the cornstarch is fully incorporated and the raw starch flavor is gone.
-
Roux: For a more traditional gravy, you can make a roux. In a separate saucepan, melt 2-3 tablespoons of butter over medium heat. Whisk in 2-3 tablespoons of flour and cook, stirring constantly, for 1-2 minutes until it forms a light blonde paste. Gradually whisk in the strained braising liquid until smooth and thickened.
-
-
Season the Gravy: Taste the thickened gravy and adjust seasoning with salt and freshly ground black pepper as needed. You can also add a splash of balsamic vinegar or a dollop of Dijon mustard for extra flavor complexity.
-
Serve: Slice or shred the rested pot roast against the grain. Arrange the tender vegetables on a platter alongside the meat. Spoon generous amounts of the rich, thickened gravy over both the beef and vegetables.
Variations and Tips for Success
While the classic pot roast with carrots and potatoes is beloved, the recipe is incredibly versatile:
- Spice it Up: Add a pinch of red pepper flakes to the braising liquid for a subtle kick.
- Herbal Infusions: Experiment with different fresh herbs like marjoram or savory.
- Umami Boost: A tablespoon of miso paste stirred into the braising liquid adds a deep, savory flavor.
- Creamy Finish: For a richer gravy, swirl in a tablespoon or two of heavy cream at the end.
- Slow Cooker Method: Pot roast is also excellent in a slow cooker. Sear the beef as instructed, then transfer to the slow cooker with the sautéed aromatics and braising liquid. Add vegetables during the last 2-3 hours on high or 4-5 hours on low.
- Pressure Cooker Method: For a significantly reduced cooking time, a pressure cooker is ideal. Sear the beef and sauté aromatics as directed. Deglaze and add braising liquid. Add the beef and vegetables to the pressure cooker and cook on high pressure for 45-60 minutes. Allow natural pressure release for 10 minutes before quick releasing any remaining pressure.
The Enduring Appeal of Pot Roast
Pot roast with vegetables is a dish that embodies comfort, nourishment, and the satisfaction of creating something truly delicious from simple ingredients. Its enduring appeal lies in its adaptability, its ability to be tailored to individual tastes, and the inherent warmth it brings to any table. Mastering this culinary cornerstone will provide you with a reliable and deeply gratifying meal for countless occasions. The process, though requiring time, is relatively simple, allowing for hands-off cooking that yields remarkable results. From the initial sear to the final, glossy gravy, every step contributes to the symphony of flavors that makes pot roast a timeless favorite. It’s a testament to the magic of slow cooking and the profound pleasure of a perfectly executed, deeply satisfying meal.


