
Microwave Corn On The Cob
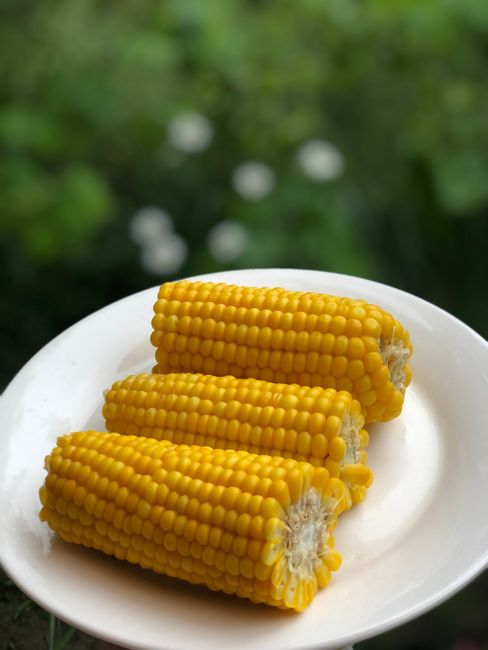
Microwave Corn on the Cob: The Ultimate Guide to Fast, Flavorful Results
Microwave corn on the cob represents a culinary triumph of convenience and speed. In an era where time is a precious commodity, the ability to transform a humble ear of corn into a perfectly cooked, succulent side dish in mere minutes is invaluable. This method bypasses the need for boiling water, preheating ovens, or managing grill temperatures, making it an ideal solution for busy weeknights, impromptu gatherings, or simply satisfying a sudden craving for this seasonal delight. The microwave’s ability to generate steam within the husk creates a moist, tender kernel, locking in natural sweetness and achieving a remarkably satisfying texture that often rivals more traditional cooking methods. Understanding the nuances of this technique, from selecting the best corn to achieving optimal doneness and exploring flavor enhancements, unlocks its full potential. This comprehensive guide delves into every aspect of microwave corn on the cob, providing actionable advice for achieving consistently delicious results and maximizing its appeal for home cooks seeking efficiency without compromising on taste.
The fundamental principle behind microwave corn on the cob lies in the generation of steam. When an intact ear of corn, still enclosed in its husk, is placed in the microwave, the moisture within the kernels and the husk itself begins to heat up. As the water molecules absorb microwave energy, they vibrate rapidly, converting into steam. This trapped steam then envelops the corn kernels, cooking them from the inside out. The husk acts as a natural steaming pouch, preventing the corn from drying out and preserving its inherent moisture and sweetness. The rapid heating process of microwaves accelerates this steaming effect, leading to significantly shorter cooking times compared to boiling or grilling. This method is particularly effective because it minimizes the loss of nutrients and flavor that can sometimes occur with prolonged exposure to high heat or water. The resulting corn is tender, juicy, and retains a vibrant yellow hue, showcasing the effectiveness of this simple yet ingenious cooking technique.
Selecting the freshest, highest-quality corn is paramount for achieving the best results, regardless of the cooking method. For microwave corn on the cob, this rule remains unchanged. Begin by examining the husks. They should be bright green and feel tightly wrapped around the ear, indicating freshness. Avoid ears with dry, brown, or brittle husks, as these often signal older corn that may be starchy and less sweet. Feel the kernels through the husk; they should feel plump and well-formed. A gentle poke through the husk can reveal the tenderness of the kernels – they should yield slightly without feeling mushy. Look for ears with silky tassels that are sticky and brown. While some browning is natural, excessively dry or brittle tassels are a sign of age. The size of the ear is less indicative of quality than the condition of the husk and kernels. It’s also beneficial to purchase corn that is in season, as peak-season corn will naturally be sweeter and more tender. Consider buying from local farmers’ markets or reputable grocery stores that have high turnover, ensuring you’re getting corn at its freshest.
The process of microwaving corn on the cob, even with its inherent simplicity, benefits from attention to detail. The most common and effective method involves microwaving the corn in its husk. This preserves moisture and creates the ideal steaming environment. Before microwaving, it’s crucial to remove any silks that are loosely attached, as they can burn and impart an unpleasant taste. However, leaving the husk intact is key. Place one or two ears of corn directly on the microwave turntable or on a microwave-safe plate. The cooking time will vary depending on the wattage of your microwave and the size of the corn ears. A general guideline for medium-sized ears is 3-5 minutes on high power. It’s advisable to start with the lower end of the time range and add increments of 30 seconds to 1 minute if the corn is not yet tender. To test for doneness, carefully remove the husk (it will be hot) and pierce a kernel with a fork. If it yields easily and is tender, the corn is ready. Overcooking can lead to tough, rubbery kernels, so it’s better to err on the side of slightly undercooked and add more time if needed.
Another popular method, particularly for those who prefer to remove silks beforehand, is to wrap the corn in plastic wrap or parchment paper. This still aims to trap steam and moisture. After shucking the corn and removing all silks, place each ear on a sheet of plastic wrap or parchment paper. Wrap the corn tightly, ensuring no steam can escape. Then, place the wrapped ear directly on the microwave turntable. The cooking time is generally similar to microwaving in the husk, again depending on microwave wattage and corn size, typically ranging from 3-5 minutes on high. This method can be slightly faster as there are fewer layers to penetrate. However, some argue that the husk provides a superior steaming environment and imparts a subtle, earthy flavor. Whichever method you choose, the principle of trapping steam remains constant for optimal results.
For those seeking to elevate their microwave corn on the cob beyond simple seasoning, a world of flavor enhancements awaits. Butter and salt are classic companions, but they can be applied before or after microwaving. Applying butter and salt before microwaving, especially when using the plastic wrap method, allows the flavors to meld directly with the corn during cooking. A generous pat of butter and a good pinch of salt can be rubbed over the shucked corn before wrapping. Alternatively, and perhaps more commonly, butter and salt are added after cooking. Once the corn is removed from the husk and is hot, you can brush it with melted butter and sprinkle with salt. This allows for a more controlled application of seasoning and a more immediate visual appeal.
Beyond the basics, consider experimenting with gourmet butters. Compound butters, infused with herbs like chives, parsley, or cilantro, or spices like chili powder, smoked paprika, or garlic powder, can transform plain corn into a flavorful masterpiece. A dollop of chipotle butter or a smear of rosemary-infused butter can add layers of complexity. Other popular toppings include:
- Cotija Cheese: A salty, crumbly Mexican cheese that pairs beautifully with corn.
- Lime Juice: A squeeze of fresh lime juice adds brightness and acidity, cutting through the richness of the butter.
- Sriracha or Hot Sauce: For those who enjoy a spicy kick.
- Parmesan Cheese: Grated Parmesan adds a nutty, umami flavor.
- Herbs: Freshly chopped cilantro, basil, or dill can add freshness and aroma.
- Spices: A sprinkle of cumin, chili powder, or even a touch of curry powder can offer unique flavor profiles.
- Sour Cream or Greek Yogurt: For a creamy counterpoint, particularly when paired with spicy toppings.
When adding toppings before microwaving, especially with the plastic wrap method, ensure they are distributed evenly. For post-cooking applications, a good basting brush is invaluable for evenly distributing melted butter and melted compound butters. The key is to achieve a balance of flavors that complements, rather than overpowers, the natural sweetness of the corn.
The optimal cooking time for microwave corn on the cob is a critical factor in achieving tender, delicious results. As previously mentioned, this is not a one-size-fits-all scenario. Microwave wattages vary significantly, and the size of the corn ears also plays a role. As a general rule of thumb, for a standard 1000-watt microwave and medium-sized ears of corn, aim for 3-4 minutes per ear on high power. For larger ears or lower-wattage microwaves, you may need to increase the time to 5-6 minutes. Conversely, smaller ears or higher-wattage microwaves might cook perfectly in 2-3 minutes. It is always recommended to start with the lower end of the suggested cooking time and test for doneness. The "shuck and poke" test – carefully peeling back a small section of the husk to reveal a few kernels and then piercing them with a fork – is the most reliable way to determine if the corn is cooked to your liking. The kernels should be tender and yield easily. If they are still firm or resistant, continue microwaving in 30-second to 1-minute increments, retesting each time. Overcooking is a common pitfall that leads to dry and tough corn. Patience and careful observation are your best allies in mastering the timing for your specific microwave.
When microwaving multiple ears of corn simultaneously, consider the arrangement on the turntable. Spreading the ears out evenly and avoiding overcrowding will ensure more uniform cooking. If you are microwaving more than two or three ears, you may need to increase the cooking time slightly to account for the larger volume and the microwave’s energy distribution. It’s also beneficial to rotate the plate midway through the cooking process to further promote even heating, especially if your microwave has a known "hot spot." Remember that the corn will continue to cook for a minute or two after being removed from the microwave due to residual heat, so err on the side of slightly undercooking rather than overcooking.
Troubleshooting common issues can help ensure consistently excellent microwave corn on the cob.
- Dry or Tough Kernels: This is almost always a result of overcooking. The microwave essentially "steams" the corn, and prolonged exposure to the high heat will inevitably lead to moisture loss and toughening. The solution is to reduce cooking time and test for doneness more frequently. If you’ve accidentally overcooked it, there’s little that can be done to reverse the dryness, but serving with ample butter or a sauce can help mask the texture.
- Uneven Cooking: This can occur if the corn is not arranged properly or if the microwave has hot spots. Ensure ears are not overlapping excessively and consider rotating the plate halfway through. If a particular ear is consistently undercooked, you can try microwaving it separately for an additional minute or two.
- Soggy Corn: While unlikely with the husk-on method, if you’ve used too much water in a boiling scenario (not applicable to microwaving but a general corn cooking issue), or if the husk is excessively wet before microwaving, it could lead to a less appealing texture. Ensure the corn is not sitting in standing water before microwaving.
- Burnt Silks: Loose silks can burn and impart a bitter flavor. Thoroughly remove as much loose silk as possible before microwaving.
- Lack of Flavor: This is where seasoning and topping choices come into play. Ensure you are using sufficient butter, salt, or your chosen flavor enhancers. Using fresh, in-season corn will also provide a more naturally sweet and flavorful base.
Microwave corn on the cob is not just a side dish; it can be a versatile ingredient. While its primary use is as a standalone accompaniment to grilled meats, poultry, or seafood, it can also be incorporated into other dishes. The kernels, once cooked, can be easily cut off the cob and added to salads, salsas, or succotash. Imagine a vibrant corn salad with black beans, red onion, cilantro, and a lime vinaigrette, or a fresh salsa perfect for dipping tortilla chips. You can also use the kernels as a topping for tacos, quesadillas, or even as a flavorful addition to a frittata. The speed of microwaving makes it an excellent option for quickly preparing corn for these culinary applications, especially when you need just a small amount. The sweetness of the cooked corn provides a delightful contrast in textures and flavors in various dishes, showcasing its adaptability beyond its traditional role.
The nutritional benefits of corn, even when cooked in the microwave, remain largely intact. Corn is a good source of dietary fiber, which aids digestion and promotes satiety. It also provides essential vitamins and minerals, including vitamin C, B vitamins (such as thiamin and folate), magnesium, and phosphorus. While the addition of butter and salt will impact the overall nutritional profile, the core benefits of the corn itself are preserved by this quick cooking method. The steam-generated cooking environment minimizes the leaching of water-soluble vitamins, which can be a concern with boiling. Therefore, microwave corn on the cob offers a healthy and nutrient-rich addition to your diet, particularly when enjoyed in moderation and complemented by healthier topping choices.
Ultimately, microwave corn on the cob is a testament to the power of simple techniques executed with a touch of understanding. It’s a method that champions speed, minimizes cleanup, and delivers consistently delicious results. From the initial selection of plump, fresh ears to the final flourish of a gourmet butter or a zesty lime wedge, each step contributes to the overall success of this quick and convenient culinary staple. Mastering the cooking times for your specific microwave, experimenting with a diverse range of flavorful toppings, and understanding how to troubleshoot common issues will elevate your microwave corn on the cob from a mere quick fix to a reliable and enjoyable part of your cooking repertoire. Its adaptability for use in other dishes further solidifies its position as a valuable tool for any home cook seeking efficiency without sacrificing flavor. Embrace the simplicity, unlock the flavor, and enjoy the ease of perfectly cooked microwave corn on the cob, anytime.


