
No Knead Big Bubble Focaccia

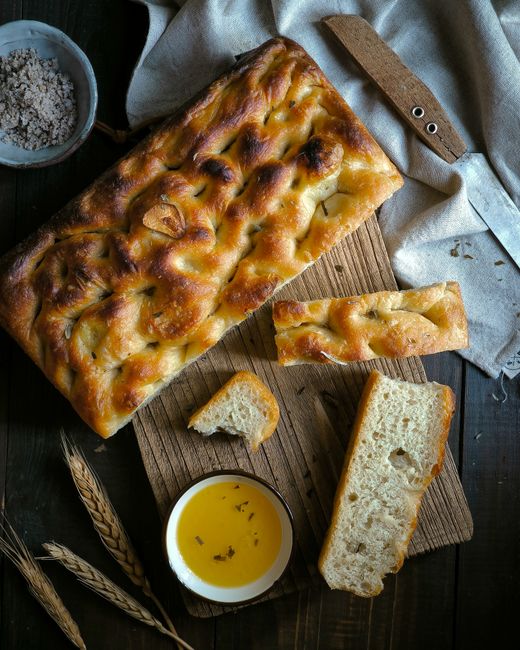
No Knead Big Bubble Focaccia: A Guide to Rustic Italian Bread Perfection
The allure of focaccia lies in its simple elegance: a flatbread, often dimpled and kissed with olive oil, boasting a chewy interior and a gloriously crisp crust. Achieving the coveted "big bubbles" – those airy pockets of dough that make each bite a delightful textural experience – can seem like a culinary Mount Everest for home bakers. However, the no-knead method revolutionizes focaccia production, transforming a potentially laborious process into a forgiving and remarkably straightforward endeavor. This technique relies on time and a high hydration dough to develop gluten structure, eliminating the need for vigorous kneading. The result is a focaccia that is not only accessible to beginners but also consistently impressive, even for seasoned bakers seeking that signature airy crumb.
Understanding the core principles of the no-knead focaccia is paramount to achieving exceptional results. Unlike traditional breadmaking where kneading develops gluten through mechanical action, the no-knead approach leverages autolysis and a prolonged fermentation period. Autolysis, a fancy term for simply mixing flour and water and letting it rest, allows enzymes in the flour to begin breaking down proteins, forming gluten strands without any physical manipulation. This initial hydration is crucial. The high water content of focaccia dough, typically ranging from 75% to 85% of the flour weight, is what contributes to its characteristic soft, pliable texture and its ability to form those impressive bubbles. During the extended fermentation, yeast consumes sugars in the flour, producing carbon dioxide gas. This gas gets trapped within the developing gluten network, creating the airy structure. The lack of kneading also means the gluten strands are less developed and more relaxed, allowing them to expand more readily during baking, further contributing to the large bubble formation.
The ingredients for no-knead big bubble focaccia are refreshingly simple, highlighting the beauty of minimal components. High-quality bread flour is the foundation. Its higher protein content, compared to all-purpose flour, is essential for developing a strong gluten structure capable of trapping the abundant gas produced during fermentation. While some recipes might call for a blend, starting with 100% bread flour ensures optimal results. Instant dry yeast is preferred for its reliability and ease of use; it doesn’t require proofing in water beforehand. Fine sea salt is crucial for flavor and also plays a role in regulating yeast activity. For the liquid, lukewarm water is ideal. The temperature should be comfortable to the touch, around 100-110°F (38-43°C), to activate the yeast without killing it. And, of course, extra virgin olive oil is non-negotiable. It’s used generously in the dough for flavor and tenderness, and even more liberally in the baking pan to create that signature crispy, golden bottom crust. Some variations might include a touch of honey or sugar to provide additional food for the yeast and a subtle sweetness, but these are optional. The focus remains on the purity of the flour, water, yeast, and salt.
The process of making no-knead big bubble focaccia can be broadly divided into several key stages: mixing, bulk fermentation, shaping, proofing, and baking. The initial mixing is deceptively simple. Combine the flour, yeast, and salt in a large bowl. Gradually add the lukewarm water, mixing with a spatula or your hands until just combined and a shaggy dough forms. There should be no dry pockets of flour. The dough will be very wet and sticky – this is exactly what you want. Cover the bowl tightly with plastic wrap or a damp kitchen towel to prevent the dough from drying out.
The bulk fermentation is where the magic truly happens. This is a long, slow rise, typically lasting between 12 to 24 hours, or even longer, depending on the ambient temperature. The dough is left at room temperature for the first few hours, during which you’ll notice it begin to puff up and develop some initial bubbles. Then, for optimal results, the dough is transferred to the refrigerator for an extended cold fermentation. This slow, cold rise further develops flavor through enzymatic activity and allows the gluten to relax and strengthen without over-proofing. During the bulk fermentation, especially the initial room-temperature phase, you might perform a few "stretch and folds." This involves gently lifting and stretching a portion of the dough and folding it over onto itself. This process further develops gluten structure without the intensity of kneading and helps to equalize the temperature throughout the dough. Aim for 2-3 sets of stretch and folds, spaced about 30-45 minutes apart, during the first 2-3 hours of bulk fermentation.
Once the bulk fermentation is complete, the dough should be visibly increased in volume, bubbly, and perhaps even showing signs of air pockets just beneath the surface. The next step is to prepare your baking vessel. A well-seasoned cast-iron skillet, a 9×13 inch baking pan, or a focaccia pan are all excellent choices. Generously coat the bottom and sides of your chosen pan with extra virgin olive oil. This is crucial for achieving that desired crispy, golden bottom and preventing sticking. Gently pour the very wet and sticky dough into the oiled pan. It will not be a neat process, and that’s perfectly fine. The dough will spread and settle on its own.
Resist the urge to poke or deflate the dough excessively. The goal is to preserve those precious air bubbles. Using oiled fingertips, gently spread the dough towards the edges of the pan, filling the corners as much as possible without aggressively pushing out the air. This gentle coaxing is all that’s needed. Now comes the dimpling. Dip your oiled fingertips into the dough and press down firmly, creating deep indentations all over the surface. These dimples are not just for aesthetics; they allow the olive oil and toppings to pool, infusing flavor into the bread. After dimpling, drizzle a generous amount of extra virgin olive oil over the entire surface of the dough, letting it pool in the dimples. This is where the "big bubbles" truly begin to form, as the oil lubricates the surface and prevents it from drying out during the final proof and baking.
The final proof is a relatively short stage, allowing the dough to relax and puff up slightly in its pan before baking. Cover the pan loosely with plastic wrap or a clean kitchen towel and let it rest at room temperature for about 30-60 minutes, or until it looks visibly puffier and the dimples have softened. During this time, preheat your oven to a high temperature, typically between 425°F and 475°F (220°C to 245°C). A hot oven is essential for achieving a rapid rise and a crispy crust.
Baking the no-knead big bubble focaccia is the culmination of the process. Once the oven is preheated and the dough has proofed, it’s time to bake. Place the pan in the hot oven. The baking time will vary depending on your oven and the thickness of your focaccia, but it typically ranges from 20 to 35 minutes. You’re looking for a deeply golden-brown crust, both on the top and the bottom, and a rich, golden hue to the sides. The internal temperature should reach around 200-210°F (93-99°C). As it bakes, you’ll likely see those bubbles expand further, creating a beautifully rustic and inviting bread.
Toppings are where you can truly personalize your focaccia. Classic choices include flaky sea salt and fresh rosemary sprigs pressed into the dimples before baking. Other popular options include thinly sliced garlic, cherry tomatoes, olives, caramelized onions, or even a sprinkle of Parmesan cheese. Whichever toppings you choose, ensure they are distributed evenly. The key is to let the focaccia shine, so don’t overload it. The beauty of this no-knead method is that it provides a fantastic canvas for showcasing simple, high-quality ingredients.
Once baked, remove the focaccia from the oven. Immediately, while still hot, you can brush the top with a little more olive oil for added sheen and flavor, and sprinkle with additional flaky sea salt if desired. For the crispiest crust, carefully slide the focaccia out of the pan and onto a wire rack to cool slightly. This prevents the bottom from becoming steamy and soggy. Allow it to cool for at least 15-20 minutes before slicing and serving. The aroma alone will be a testament to your successful baking.
The success of no-knead big bubble focaccia is directly linked to managing moisture and temperature. The high hydration is critical, but so is preventing the dough from drying out during its long fermentation. Using a tightly sealed bowl or a well-covered pan is essential. The ambient temperature also plays a significant role. In warmer climates or during summer months, the fermentation will proceed more quickly, so you may need to reduce the fermentation time, especially the room-temperature portion. Conversely, in cooler environments, you might need to extend the time to achieve adequate puffiness. Using a kitchen scale for measuring ingredients, particularly flour and water, will provide the most consistent and accurate results, as flour absorption can vary.
Troubleshooting common issues can help refine your focaccia-making journey. If your focaccia lacks bubbles, it could be due to insufficient hydration, under-fermentation, or over-handling the dough after the bulk rise. Ensuring you’re using bread flour and a high water percentage, and allowing ample fermentation time are key. A dough that’s too dry will struggle to form air pockets. If your crust is pale, your oven temperature might be too low, or it may not be preheated sufficiently. A golden-brown crust requires intense heat. If the focaccia is gummy in the center, it may be underbaked. Use a thermometer to check the internal temperature. Sticking to the pan is almost always a sign of insufficient oiling. Be generous with the olive oil in the baking pan.
The versatility of no-knead big bubble focaccia extends beyond a simple side dish. It can be sliced and used as the base for gourmet sandwiches, drizzled with balsamic glaze and served as an appetizer, or enjoyed as is with a good cup of coffee. Its rustic charm makes it perfect for potlucks, picnics, or simply as a comforting homemade bread to share with loved ones. The "big bubble" aspect makes it visually appealing and texturally exciting, elevating it from ordinary to extraordinary. The simplicity of the no-knead method means you can whip up a batch with minimal effort, allowing the dough to do the heavy lifting. This approach democratizes artisanal bread making, making it accessible and rewarding for everyone. The key is patience and a willingness to embrace the inherent stickiness and rustic nature of a high-hydration dough. The payoff is a loaf of bread that is both visually stunning and incredibly delicious, embodying the rustic soul of Italian baking.


