
Simple Beef Pot Roast
The Ultimate Guide to Simple Beef Pot Roast: A Hearty and Flavorful Meal
The appeal of a classic beef pot roast lies in its comforting simplicity and profoundly satisfying flavor. It’s a dish that evokes a sense of home, tradition, and unpretentious culinary excellence. At its core, pot roast is about taking a tougher, more economical cut of beef and transforming it through slow, moist cooking into a fork-tender masterpiece, infused with the savory essence of vegetables and broth. This article will provide a comprehensive, SEO-friendly guide to creating a perfect, simple beef pot roast, covering everything from selecting the right cut of meat to achieving that melt-in-your-mouth texture and maximizing flavor. We’ll delve into the science behind slow cooking, offer variations and tips for success, and explore why this dish remains a beloved staple in kitchens worldwide.
Choosing the right cut of beef is paramount for a successful pot roast. The goal is to select a cut that benefits from low and slow cooking, breaking down connective tissues and rendering the meat incredibly tender and juicy. Ideal cuts typically come from the tougher sections of the cow, areas that receive a lot of work. These include the chuck roast (also known as chuck shoulder roast, chuck eye roast, or blade roast), the brisket flat cut, and the round roast (bottom round roast or rump roast). Chuck roast is widely considered the gold standard for pot roast due to its excellent marbling of fat and connective tissue, which melts during the cooking process, contributing immense flavor and moisture. Brisket, while also excellent, can sometimes require slightly longer cooking times and is often associated with barbecue. Round roasts are leaner, and while they can produce a good pot roast, they are more prone to drying out if not cooked carefully. For beginners, the chuck roast is the most forgiving and consistently yields superior results. When purchasing, look for a roast that is at least 2-3 pounds, with good marbling visible throughout the meat. A well-marbled roast will ensure tenderness and a richer flavor. The color of the meat should be a vibrant red, indicating freshness. Avoid cuts that appear dull or grayish.
The searing process is a crucial step that cannot be overlooked. It’s not just about browning the meat; it’s about developing a deep, complex flavor profile through the Maillard reaction. This chemical reaction occurs when amino acids and reducing sugars in the meat are heated, creating hundreds of new flavor compounds. To achieve optimal searing, heat a generous amount of high-smoke-point oil, such as vegetable or canola oil, in a heavy-bottomed pot or Dutch oven over medium-high heat. Ensure the pot is sufficiently hot before adding the beef. Pat the beef dry thoroughly with paper towels; moisture is the enemy of searing, as it will steam the meat rather than brown it. Season the roast generously on all sides with salt and freshly ground black pepper. Place the roast in the hot oil and sear it for 3-5 minutes per side, until a rich, dark brown crust has formed. Don’t overcrowd the pot; if necessary, sear the roast in batches to ensure each piece gets direct contact with the hot surface. This browning not only enhances the visual appeal of the finished dish but also lays the foundation for an incredibly flavorful gravy. After searing, remove the roast from the pot and set it aside.
Aromatics and vegetables form the flavor base of any good pot roast. These ingredients, often referred to as the "mirepoix" (though typically a mix of onion, celery, and carrot), release their sweet and savory juices as they cook, infusing the braising liquid and the meat with incredible depth. After searing the roast, drain off most of the excess fat from the pot, leaving about 1-2 tablespoons. Add chopped yellow onions, carrots, and celery to the pot. The classic ratio is roughly two parts onion to one part carrot and one part celery, but feel free to adjust based on your preference. Cook these vegetables over medium heat, stirring occasionally, until they begin to soften and lightly brown, about 5-7 minutes. This sautéing process further develops their sweetness and intensifies their flavor. You can also add other aromatic vegetables like garlic cloves (minced or whole), or even leeks, for added complexity.
Deglazing the pot is another vital technique for capturing all the delicious browned bits (fond) left behind from searing the beef and sautéing the vegetables. Once the aromatics are softened, pour in a liquid – commonly red wine, beef broth, or even water – and use a wooden spoon to scrape up all the browned bits from the bottom of the pot. This liquid will become a key component of your braising liquid, contributing significant flavor to the final dish. Red wine, such as Cabernet Sauvignon, Merlot, or Pinot Noir, adds a wonderful depth and acidity that complements the richness of the beef. If you prefer not to use alcohol, a good quality beef broth or even a dry white wine can be used. Allow the liquid to simmer and reduce slightly, concentrating its flavors.
The braising liquid is the engine that drives the pot roast’s transformation. This is where the magic of slow, moist cooking truly takes hold. The liquid not only keeps the meat moist but also acts as a carrier for flavors, infusing the entire roast. After deglazing, add enough liquid to come about halfway to two-thirds of the way up the sides of the roast. This typically involves a combination of beef broth, and if you used wine for deglazing, you’ll want to supplement it with more broth. For an even richer flavor, consider using a low-sodium beef broth to control the saltiness. Other additions to the braising liquid can include Worcestershire sauce, soy sauce (for umami), fresh herbs like thyme, rosemary, or bay leaves, and a pinch of sugar to balance the acidity. Bring the liquid to a gentle simmer.
Transferring the pot roast to the oven for slow cooking is the hallmark of this dish. Preheat your oven to a moderate temperature, typically between 300°F and 325°F (150°C to 160°C). Carefully place the seared roast back into the Dutch oven, nestled among the sautéed vegetables. Pour the braising liquid over and around the roast. Ensure the liquid level is adequate to keep the meat partially submerged. Cover the Dutch oven tightly with its lid. The lid is essential for trapping steam, which is crucial for the moist cooking environment. If your Dutch oven doesn’t have a tight-fitting lid, you can improvise by covering the pot tightly with heavy-duty aluminum foil before placing the lid on top. This creates a steamy, oven-baked environment that will tenderize the beef without drying it out.
The cooking time for a pot roast varies depending on the size and thickness of the roast, as well as the oven temperature. As a general guideline, plan for approximately 1.5 to 2 hours per pound of beef. For a 3-pound chuck roast, this could mean cooking for 4.5 to 6 hours. The key indicator of doneness is not time, but rather tenderness. The meat should be fork-tender, meaning a fork can easily pierce and shred it with minimal resistance. To check for doneness, carefully remove the Dutch oven from the oven (use oven mitts!), remove the lid, and insert a fork into the thickest part of the roast. If it pulls apart easily, it’s ready. If it feels firm or requires significant force, continue cooking, checking every 30-60 minutes. Resist the urge to rush the process; patience is rewarded with incredibly tender results.
While the roast is braising, the vegetables that were added at the beginning will soften and absorb the flavors of the braising liquid. However, for a more substantial and satisfying meal, many people choose to add additional root vegetables during the last hour or so of cooking. Common additions include potatoes (cut into large chunks), parsnips, turnips, or sweet potatoes. These vegetables will cook through in the braising liquid, becoming tender and flavorful. Ensure the vegetables are cut into similar sizes to ensure even cooking. You can place them around the roast in the Dutch oven.
Once the pot roast is perfectly tender, it’s time to finish the dish. Carefully remove the roast from the Dutch oven and place it on a clean cutting board or serving platter. Tent it loosely with aluminum foil and let it rest for at least 15-20 minutes. This resting period allows the juices to redistribute throughout the meat, resulting in a more tender and moist final product. While the roast is resting, you can prepare the gravy from the remaining braising liquid and vegetables.
To make the gravy, strain the braising liquid from the Dutch oven into a saucepan or a clean bowl, separating the liquid from the cooked vegetables. You can either discard the vegetables or reserve them to serve alongside the pot roast. Skim off any excess fat from the surface of the liquid using a spoon or a fat separator. Bring the strained liquid to a simmer over medium heat. In a small bowl, whisk together a slurry of 2-3 tablespoons of cornstarch or flour with an equal amount of cold water or broth. Gradually whisk this slurry into the simmering liquid until the gravy thickens to your desired consistency. Season the gravy with salt and pepper to taste. You can also add a splash of Worcestershire sauce or a pinch of dried herbs for extra flavor.
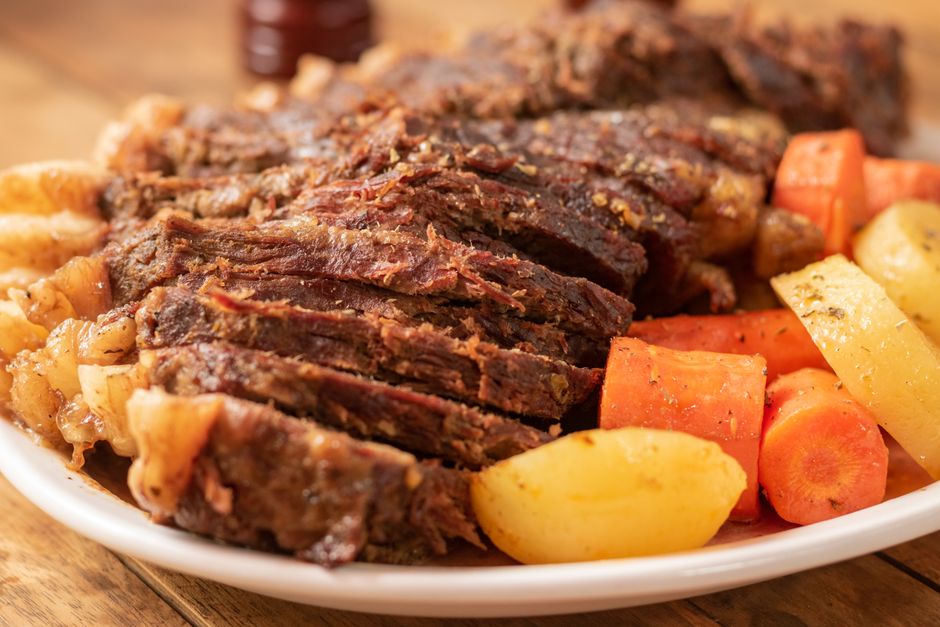
Serving a simple beef pot roast is an exercise in rustic elegance. Slice or shred the rested pot roast against the grain for maximum tenderness. Arrange the slices on a platter or individual plates. Spoon generous amounts of the rich, flavorful gravy over the meat. Serve with the tender braised vegetables (potatoes, carrots, celery) from the pot, or alongside mashed potatoes, egg noodles, or crusty bread to soak up all that delicious gravy. A simple side salad or steamed green beans can provide a fresh counterpoint to the richness of the meal. The beauty of pot roast is its versatility; it pairs well with a wide array of accompaniments.
For those seeking to elevate their pot roast experience or cater to specific dietary needs, several variations and tips can be employed. Consider adding a tablespoon of tomato paste to the sautéed aromatics for an extra layer of depth and richness. Incorporating whole garlic cloves or even a few sprigs of fresh rosemary and thyme tied together with kitchen twine can impart subtle herbal notes. For a spicier kick, add a pinch of red pepper flakes. If you find your braising liquid has reduced too much during cooking, you can always top it up with more beef broth. To ensure consistently tender results, using an instant-read thermometer is invaluable. Aim for an internal temperature of around 200°F to 205°F (93°C to 96°C) for optimal fork-tenderness. For meal prepping or busy weeknights, a slow cooker is an excellent alternative to oven braising. Follow the same searing and sautéing steps, then place the seared roast, sautéed aromatics, and braising liquid in the slow cooker. Cook on low for 8-10 hours or on high for 4-6 hours, until tender.
The nutritional benefits of a simple beef pot roast, when prepared thoughtfully, are noteworthy. Beef is an excellent source of high-quality protein, essential for muscle repair and growth, as well as iron, crucial for oxygen transport in the blood. The vegetables contribute vitamins, minerals, and fiber. While it’s a rich dish, by trimming excess fat from the beef before cooking and skimming fat from the gravy, you can create a more balanced meal. The slow cooking process also makes the nutrients in the beef and vegetables more readily available for digestion.
In conclusion, mastering the simple beef pot roast is a culinary achievement that offers immense satisfaction. From the careful selection of the cut of beef and the meticulous searing process to the slow, patient braising and the rich, savory gravy, each step contributes to a dish that is both comforting and profoundly flavorful. This timeless recipe, adaptable and forgiving, stands as a testament to the power of simple ingredients and traditional cooking techniques to create a truly memorable meal. It’s a dish that nourishes the body and soul, a testament to the enduring appeal of home-cooked food. Understanding the principles behind its preparation, from the Maillard reaction to the science of collagen breakdown through moist heat, empowers home cooks to consistently produce a fork-tender, deeply flavorful beef pot roast that will be a cherished part of their culinary repertoire for years to come.


