
Simple Creme Brulee Dessert
The Ultimate Guide to Simple Crème Brûlée: Mastering the Classic French Dessert
Crème brûlée, translating literally to "burnt cream," stands as a testament to the power of elegant simplicity in the culinary world. This beloved French dessert, characterized by its rich, velvety custard base and the iconic, crackly caramelized sugar topping, offers a sophisticated yet surprisingly accessible indulgence. While its restaurant presentation often evokes an air of daunting complexity, the reality is that a truly exceptional crème brûlée is well within the reach of the home cook. This comprehensive guide will demystify the process, breaking down each step, offering expert tips, and ensuring you can consistently achieve a flawless, restaurant-quality dessert that will impress even the most discerning palates. We will delve into the fundamental ingredients, the precise techniques, and the crucial considerations for achieving that perfect, shatteringly crisp caramelized crust.
The foundation of any great crème brûlée lies in its deceptively simple ingredient list. At its core, the dessert is a rich custard, typically composed of just four essential components: heavy cream, egg yolks, sugar, and vanilla. The quality of these ingredients directly impacts the final outcome. Opt for the highest fat content heavy cream available (at least 35% butterfat). This fat content is crucial for achieving that luxurious, silky texture that defines a perfect crème brûlée. Lower fat creams will result in a thinner, less satisfying custard. The egg yolks are the emulsifiers and thickeners. They provide the richness and contribute to the custard’s smooth consistency. While some recipes might call for whole eggs, using only yolks yields a more decadent and less eggy flavor profile. The sugar serves multiple purposes: it sweetens the custard and, most importantly, forms the signature burnt sugar topping. Use granulated white sugar for the custard base, ensuring it dissolves completely. For the brûlée topping, a finer granulation sugar, such as superfine or caster sugar, is often preferred as it caramelizes more evenly. Finally, vanilla is the aromatic backbone of crème brûlée. While artificial vanilla extract can be used in a pinch, pure vanilla extract or, even better, a vanilla bean, will impart a far more complex and authentic flavor. If using a vanilla bean, split it lengthwise and scrape out the tiny seeds, infusing them directly into the cream for an unparalleled aroma and taste.
The process of creating a perfect crème brûlée begins with infusing the cream. In a medium saucepan, combine the heavy cream with about half of the granulated sugar and the vanilla (either extract or scraped seeds from a vanilla bean). Gently heat this mixture over medium-low heat. The goal is not to boil the cream, but to warm it thoroughly and allow the vanilla flavor to infuse. Stir occasionally to prevent a skin from forming on the surface and to ensure the sugar dissolves. If using a vanilla bean, allow it to steep in the warm cream for at least 15-20 minutes off the heat, or even longer for a more intense flavor. This slow infusion process is key to extracting the maximum aromatic compounds from the vanilla, setting the stage for a truly exceptional dessert. Once infused, remove any vanilla bean pod remnants.
While the cream is infusing, prepare the egg yolk mixture. In a separate bowl, whisk together the egg yolks and the remaining granulated sugar until the mixture is pale yellow and slightly thickened. This process is often referred to as "ribbon stage" when, upon lifting the whisk, the mixture falls back into the bowl in thick, unbroken ribbons that briefly hold their shape. Be careful not to over-whisk, as this can incorporate too much air, which can lead to bubbles in the custard and a less smooth texture. This step is crucial for incorporating enough sugar to stabilize the yolks and contribute to the final caramelization.
The tempering of the eggs is perhaps the most critical step in achieving a smooth, lump-free custard. This involves gradually introducing the warm cream mixture into the egg yolk mixture to gently raise the temperature of the yolks without scrambling them. Begin by adding just a small ladleful of the warm cream to the egg yolks, whisking vigorously as you pour. Continue adding the warm cream in small increments, whisking constantly, until about half of the cream has been incorporated. This gradual warming is known as tempering and prevents the eggs from cooking too quickly and forming an unpleasant texture. Once tempered, pour the entire egg yolk and cream mixture back into the saucepan with the remaining cream.
Next, cook the custard gently. Return the saucepan to low heat. Stir the custard constantly with a wooden spoon or a heatproof spatula. The key here is patience and a very low heat. You are looking for the custard to thicken enough to coat the back of the spoon, leaving a clear trail when you draw your finger through it. This usually takes about 8-10 minutes. Do not let the custard boil, as boiling will cause the eggs to curdle, resulting in a grainy texture. A digital thermometer is a valuable tool here; the custard is ready when it reaches a temperature of 170-175°F (77-79°C). Overcooking is a common pitfall, so err on the side of caution and remove the custard from the heat as soon as it reaches the desired consistency.
Straining the custard is an essential step that guarantees a silken texture. Once cooked, pour the custard through a fine-mesh sieve into a clean bowl or directly into your ramekins. This removes any potential bits of cooked egg that may have formed, as well as any residual vanilla bean fragments or chalazae (the white, stringy bits attached to egg yolks). Straining ensures that the final crème brûlée is exceptionally smooth and free of any imperfections. This is a non-negotiable step for achieving that signature luxurious mouthfeel.
Preparing the ramekins and water bath is vital for even cooking. Preheat your oven to 300°F (150°C). Select shallow, oven-safe ramekins, ideally around 4-6 ounces in capacity. Pour the strained custard into the prepared ramekins, filling them almost to the top. Place the filled ramekins into a larger baking dish. Carefully pour hot water into the baking dish, creating a water bath (bain-marie). The water should come about halfway up the sides of the ramekins. This water bath provides a gentle, moist environment for the custards to bake, ensuring they cook evenly and prevent the edges from overcooking before the center is set. The gentle heat of the water bath promotes a slow, controlled cooking process, essential for that perfect custard consistency.
Baking the crème brûlée requires careful monitoring. Place the baking dish with the ramekins and water bath into the preheated oven. Bake for approximately 30-40 minutes, or until the custards are mostly set but still have a slight wobble in the center. The edges should be firm, while the center should jiggle like jelly when gently shaken. Overbaking will result in a firmer, more rubbery custard, so it’s better to slightly underbake and let the residual heat finish the cooking process. Once baked, carefully remove the baking dish from the oven. Allow the ramekins to cool in the water bath for about 15-20 minutes. Then, remove the ramekins from the water bath and place them on a wire rack to cool completely to room temperature.
Chilling is a crucial stage for setting the custard. Once the custards have cooled to room temperature, cover each ramekin tightly with plastic wrap, ensuring the plastic wrap doesn’t touch the surface of the custard. Refrigerate for at least 4 hours, and preferably overnight. This chilling period allows the custard to fully set and develop its creamy texture. It also ensures the custard is cold, which is ideal for the subsequent caramelization step. Do not attempt to caramelize a warm custard, as the sugar will not form a crisp, brittle layer.
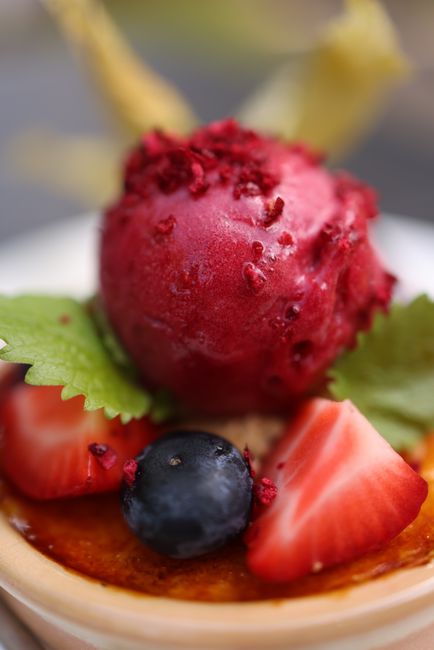
The crowning glory: caramelization. This is the moment that transforms a simple custard into a spectacular crème brûlée. Just before serving, uncover the chilled custards. Sprinkle an even, thin layer of superfine sugar (or granulated sugar) over the surface of each custard. Aim for a layer just thick enough to cover the entire surface without being overly thick, which can lead to bitterness. A kitchen torch is the preferred tool for achieving a perfect caramelization. Hold the torch a few inches above the sugar and move it in a circular motion, applying direct heat. The sugar will begin to melt, bubble, and eventually turn a rich amber color. Rotate the ramekin as you torch to ensure even caramelization. The goal is to create a thin, glass-like shell that shatters when tapped. If you don’t have a torch, you can carefully caramelize the sugar under a hot broiler. Place the ramekins on a baking sheet and position them a few inches from the broiler. Watch them constantly, as they can burn very quickly. Rotate the ramekins to ensure even browning. Once the sugar is caramelized, allow the crème brûlée to sit for a minute or two for the sugar to harden completely before serving.
Troubleshooting common issues ensures a consistent and delicious outcome. If your custard is grainy, it’s likely due to overcooking or not straining it thoroughly. If it’s too liquidy, it may have been underbaked or the cream had too low a fat content. A cracked topping can occur if the sugar layer was too thick or if it was torched unevenly. Bitter caramelization often results from burning the sugar for too long. The ideal crème brûlée has a smooth, creamy custard that gives way to a satisfying crack as you break through the brittle, caramelized sugar shell. Mastering these techniques will allow you to consistently produce this exquisite dessert.
Variations on a classic theme offer exciting possibilities for personalization. While vanilla is the undisputed king, other flavorings can elevate your crème brûlée. Consider infusing the cream with citrus zest (lemon or orange), a cinnamon stick, or even a few cardamom pods for a warming spice. A touch of espresso powder dissolved in the cream can create a delightful coffee-flavored crème brûlée. For a truly decadent twist, fold in a tablespoon of finely chopped dark chocolate into the custard after straining, creating a rich chocolate crème brûlée. The possibilities are truly endless, allowing you to tailor this classic dessert to your specific preferences and dietary needs.
Serving crème brûlée immediately after torching is paramount to experiencing the full effect of the crisp sugar topping. The contrast between the warm, brittle caramel and the cool, creamy custard is a hallmark of this dessert. Presenting the ramekins on small plates with a spoon for breaking through the caramelized shell creates an engaging and delightful dining experience. The visual appeal, with the golden-brown, glistening sugar surface, is as enticing as the flavor itself.
In conclusion, simple crème brûlée is a deceptively straightforward dessert that rewards careful attention to detail. By understanding the role of each ingredient, mastering the techniques of tempering, slow cooking, and proper chilling, and practicing the art of caramelization, you can consistently create a dessert that is both elegant and incredibly satisfying. This guide has provided the foundational knowledge and actionable steps to achieve this. Embrace the simplicity, savor the process, and delight in the exquisite pleasure of your own homemade, perfect crème brûlée. The mastery of this iconic dessert is not an elusive dream but an achievable reality for any home cook willing to invest a little time and care.


