
The Best Roasted Chicken
The Ultimate Guide to Perfectly Roasted Chicken: Crispy Skin, Juicy Meat, Unforgettable Flavor
Achieving a truly spectacular roasted chicken is a culinary goal attainable by any home cook with a clear understanding of fundamental techniques and a few key ingredients. The allure of a golden-brown, crackling skin encasing moist, tender meat is undeniable, and this guide will provide the comprehensive knowledge necessary to consistently produce such a masterpiece. This isn’t about complicated recipes with obscure components; it’s about mastering the art of roasting a chicken by focusing on temperature control, proper seasoning, and strategic preparation. We will delve into the factors that contribute to both crispy skin and succulent meat, explore essential seasoning blends, and discuss crucial cooking parameters that differentiate a good roasted chicken from an exceptional one. Understanding the anatomy of the chicken and how different parts cook will also be addressed to ensure an even and delicious result every time.
Selecting the right chicken is the foundational step toward a successful roast. For optimal results, opt for a whole chicken that is fresh, not previously frozen. Frozen chickens, while convenient, can sometimes suffer from a less desirable texture due to ice crystal formation. Look for a chicken with plump breasts and thighs, and skin that is taut and free of blemishes. The size of the chicken is also a consideration, with 3 to 4 pounds being a common and manageable size for most home ovens. This weight range ensures that the chicken cooks evenly without drying out the breast meat before the thighs are fully cooked. Consider the origin and breed if possible; free-range or pastured chickens often have a richer flavor and firmer texture due to their more active lifestyles and varied diets. However, for most purposes, a good quality conventional chicken will yield excellent results when prepared correctly. The fat distribution within the chicken is also important; chickens with a slightly higher fat content tend to produce more flavorful and moist meat.
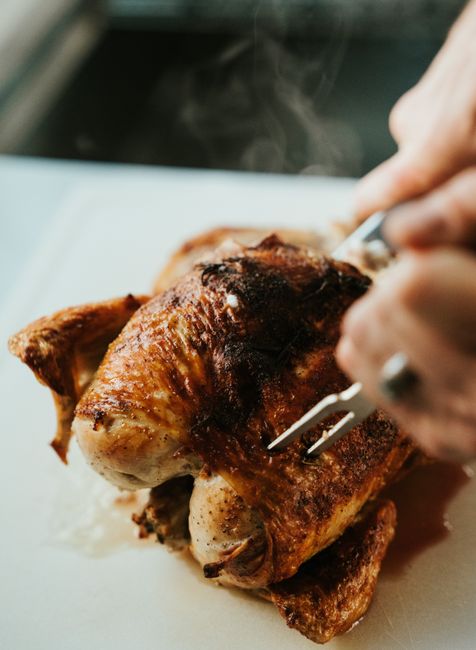
Preparation is paramount for a superior roasted chicken. Begin by thoroughly patting the chicken dry, both inside and out, with paper towels. This seemingly simple step is critical for achieving that coveted crispy skin. Moisture on the skin impedes browning and steaming, resulting in a rubbery texture. A dry surface allows the skin to caramelize and crisp up effectively. Once dried, it’s time to season. Generosity is key here. A good quality salt, such as kosher salt or sea salt, is essential for both flavor and drawing out moisture from the skin. Rub the salt liberally all over the chicken, ensuring it gets into every crevice and under the skin where possible. Black pepper is the natural companion to salt, freshly ground for the most potent aroma. Beyond the basic salt and pepper, explore aromatics. Loosely tucking aromatic ingredients inside the cavity of the chicken infuses the meat with subtle yet delicious flavors as it roasts. Common and highly effective choices include halved lemons, whole garlic cloves (smashed slightly), fresh sprigs of rosemary, thyme, and sage. These herbs release their essential oils into the cavity, perfuming the chicken from within.
The technique of "butterflying" or "spatchcocking" the chicken is a game-changer for even cooking and crispy skin. This involves removing the backbone of the chicken and flattening it out. To do this, place the chicken breast-side down on a sturdy cutting board. Using sharp kitchen shears or poultry shears, cut along both sides of the backbone, removing it entirely. You can reserve the backbone for making stock. Once the backbone is removed, flip the chicken over and press down firmly on the breastbone to flatten the bird. This exposes more surface area to the heat of the oven, promoting faster and more even cooking. The legs and thighs, which take longer to cook than the breasts, are now on the same plane as the breast meat, ensuring they all reach their optimal temperature simultaneously. This method also allows the skin to be more exposed to direct heat, leading to superior crispiness.
Seasoning the chicken under the skin is a crucial technique for maximizing flavor and ensuring moist meat. Gently separate the skin from the breast and thigh meat using your fingers or the back of a spoon. Be careful not to tear the skin. Once a pocket is created, you can rub softened butter, a mixture of herbs and butter, or even a spice rub directly onto the meat. This directly seasons the flesh and also helps to keep the breast meat moist during cooking. If using butter, consider infusing it with garlic, herbs like parsley, thyme, or rosemary, or even lemon zest for an extra layer of flavor. This butter melts and bastes the meat from within as it cooks, contributing to both tenderness and taste.
The choice of cooking fat plays a significant role in the final flavor and texture of roasted chicken. While butter is popular for its flavor and browning capabilities, a neutral oil with a high smoke point, such as canola, grapeseed, or avocado oil, can also be used. A combination of both butter and oil is often ideal. The oil helps to prevent the butter from burning, while the butter contributes its rich flavor and aids in achieving a beautiful golden-brown crust. Rub this fat mixture all over the exterior of the chicken, ensuring complete coverage. This fat layer will help the skin crisp up beautifully and prevent it from drying out. Don’t forget to season the outside of the chicken again with salt and pepper after applying the fat.
Achieving the perfect internal temperature is the most critical aspect of roasting chicken. For safety and optimal texture, the chicken should reach an internal temperature of 165°F (74°C) in the thickest part of the thigh, without touching the bone. A reliable instant-read meat thermometer is an indispensable tool for this. Overcooking chicken leads to dry, tough meat, while undercooking poses a food safety risk. The breast meat will typically reach its target temperature slightly before the thighs. With a spatchcocked chicken, the cooking time will be significantly reduced, and the temperature will likely equalize more rapidly throughout the bird. For a whole, untrussed chicken, the cooking time will vary based on its size, typically around 18-22 minutes per pound. However, relying solely on time is a mistake; always use a thermometer.
Preheating your oven to the correct temperature is a non-negotiable step. A hot oven is essential for achieving a crispy skin and an evenly cooked interior. Most recipes call for an oven temperature between 400°F and 450°F (200°C to 230°C). For the first 15-20 minutes of roasting, a higher temperature can help kickstart the browning process and crisp up the skin. After this initial blast of heat, you can reduce the oven temperature slightly to ensure the chicken cooks through without burning. Alternatively, some chefs advocate for a consistent high heat throughout the entire cooking process, especially for spatchcocked chickens, provided you monitor closely for burning. The ideal approach often depends on your oven’s calibration and your personal preference for skin crispiness.
Resting the chicken after roasting is as crucial as the cooking itself. Once the chicken reaches its target temperature, remove it from the oven and transfer it to a cutting board. Tent it loosely with aluminum foil and allow it to rest for at least 10-15 minutes, and ideally 20 minutes for a larger bird. During cooking, the muscle fibers in the chicken tighten, pushing the juices toward the center. Resting allows these juices to redistribute throughout the meat, resulting in a more tender and succulent final product. Cutting into the chicken too soon will cause these precious juices to escape onto the cutting board, leading to drier meat. This resting period also allows the skin to continue to crisp up as the chicken cools slightly.
Building a flavorful foundation beneath the chicken can elevate your roasted bird to new heights. Place aromatics like roughly chopped onions, carrots, and celery (mirepoix) on the bottom of the roasting pan. You can also add additional sprigs of herbs or garlic cloves to this bed. These vegetables will absorb the flavorful drippings from the chicken as it roasts, becoming tender and delicious. They also act as a natural rack, lifting the chicken slightly off the direct heat of the pan, promoting better air circulation and preventing the bottom skin from becoming soggy. The rendered fat and juices that collect in the pan beneath the chicken can be used to create a luscious pan sauce, further enhancing the meal.
Understanding temperature zones within the oven is also important. Oven thermostats can be notoriously inaccurate. Consider using an oven thermometer to verify the actual temperature. If your oven tends to run hot or cold, adjust your cooking temperature accordingly. Rotating the chicken during cooking can also help ensure even browning, especially in ovens with uneven heating. If one side is browning faster than the other, you can turn the chicken to promote more uniform color development. For spatchcocked chickens, this is less of an issue due to the flattened configuration.
Experimenting with different seasoning blends can lead to unique and delicious flavor profiles. Beyond salt and pepper, consider paprika (sweet or smoked), garlic powder, onion powder, cumin, coriander, or even a touch of chili powder for a subtle kick. A classic herb blend often includes rosemary, thyme, and sage. For a more Mediterranean flair, incorporate oregano and lemon zest. A good quality spice rub, applied under the skin and over the exterior, can impart deep and complex flavors. Ensure that any rubs containing sugar are used with caution at high temperatures, as sugar can burn quickly.
The cooking vessel matters. A sturdy roasting pan is ideal. Cast iron skillets are excellent for roasting smaller chickens or even spatchcocked halves, as they provide excellent heat retention and can go from oven to stovetop for sauce making. A heavy-duty baking sheet lined with parchment paper can also work for spatchcocked chicken, though a pan with a rack is generally preferred for whole chickens to allow for better air circulation. Ensure the pan is large enough to accommodate the chicken without crowding, which can impede browning.
Troubleshooting is a part of the learning process. If your chicken skin isn’t crisping, it’s likely due to insufficient drying, a low oven temperature, or not enough fat. If the breast meat is dry, it was likely overcooked or the thighs were not yet cooked through, indicating an uneven cooking scenario. Using a thermometer and the spatchcocking method are the best defenses against these issues. If the chicken is browning too quickly on the outside but not cooked through, you can loosely tent it with aluminum foil to protect the browning areas while the interior continues to cook.
For an even richer flavor, consider dry brining the chicken. This involves generously salting the chicken and leaving it uncovered in the refrigerator for at least 12 hours, or up to 48 hours. The salt draws out moisture from the skin, which then gets reabsorbed, seasoning the meat and further crisping the skin. After dry brining, pat the chicken dry again, apply fat and other seasonings, and roast as usual. This method significantly enhances flavor and texture.
Ultimately, the pursuit of the perfect roasted chicken is a journey of refinement. Each roast offers an opportunity to learn and adjust. By understanding the principles of drying, seasoning, temperature control, and resting, you will consistently produce a roasted chicken that is both visually stunning and incredibly delicious. This guide provides the essential framework; your creativity and continued practice will unlock its full potential.


