
Whole Chicken In A Pan
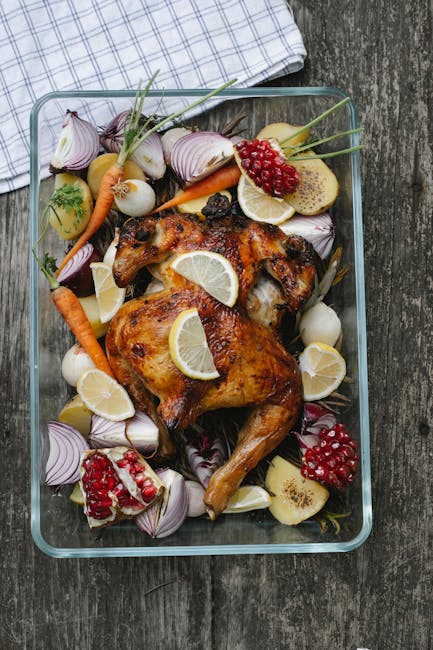
Whole Chicken in a Pan: A Culinary Cornerstone for Flavor and Simplicity
The pursuit of a perfectly cooked, incredibly flavorful whole chicken often conjures images of complex roasting techniques, lengthy marinating times, and precise temperature monitoring. However, the often-underestimated power of a simple pan lies at the heart of achieving this culinary ideal. Cooking a whole chicken in a pan, a method that has graced kitchens for generations, offers an unparalleled balance of accessibility, speed, and profound depth of flavor. This technique leverages the direct heat of the stovetop to create a beautifully rendered, crispy skin, while simultaneously allowing the chicken to baste itself in its own succulent juices, resulting in impossibly tender and moist meat. Beyond the immediate gratification of a delicious meal, the pan-roasted whole chicken serves as a versatile foundation for countless culinary explorations, from elegant Sunday dinners to the backbone of weeknight comfort food. Understanding the nuances of this seemingly straightforward method unlocks a world of flavor and simplifies the art of preparing poultry to a degree that is both impressive and surprisingly achievable for home cooks of all skill levels. This comprehensive guide will delve into every aspect of mastering the whole chicken in a pan, ensuring optimal results and empowering you to create this culinary cornerstone with confidence and consistent success.
The fundamental appeal of cooking a whole chicken in a pan lies in its inherent simplicity and the resulting flavor profile. Unlike oven roasting, which relies on ambient heat circulation, pan-cooking utilizes direct heat from the stovetop, creating a more intense and immediate searing action. This initial searing is critical for developing the Maillard reaction, the complex chemical process responsible for the browning and characteristic savory notes of cooked meat. As the chicken cooks, its rendered fat and juices collect at the bottom of the pan. This creates a self-basting environment, where the chicken continuously bathes in its own flavorful liquid, preventing dryness and infusing the meat with moisture and richness. The crispy skin, a hallmark of well-prepared chicken, is also a direct consequence of this direct heat application, often achieved through strategic placement and intermittent attention. Furthermore, the pan provides a contained environment, minimizing mess and cleanup compared to more elaborate roasting methods. This efficiency makes it an ideal choice for busy weeknights when a satisfying and impressive meal is desired without extensive preparation or extensive kitchen cleanup. The versatility of the pan-roasted whole chicken extends beyond its cooking method; it’s a blank canvas for a myriad of flavor combinations, adaptable to various culinary styles and dietary preferences.
Selecting the right chicken is paramount for achieving optimal results. For a whole chicken in a pan, opt for a bird that is typically between 3 to 4 pounds. This size ensures that the chicken fits comfortably in most standard skillets and cooks through evenly without drying out. A smaller bird will cook more quickly and may be prone to overcooking, while a significantly larger bird might require a more extensive cooking time, potentially leading to uneven cooking or a burnt exterior before the interior is fully cooked. Look for chickens that are labeled as "free-range" or "pasture-raised" if possible. These chickens often have a more robust flavor and a firmer texture due to their increased activity and natural diet. The quality of the chicken directly impacts the final taste and texture of the dish. For a truly superior outcome, consider sourcing a high-quality organic or heritage breed chicken. While these may come with a higher price tag, the discernible difference in flavor and succulence is often well worth the investment. Freshness is also key. Ensure the chicken is not past its "best by" date and has a firm texture and a clean, neutral aroma. Upon visual inspection, the skin should be taut and free of any discoloration or excessive moisture. Proper storage in the refrigerator at or below 40°F (4°C) is essential to maintain freshness and prevent bacterial growth before cooking.
The choice of pan significantly influences the success of your whole chicken. The ideal pan for cooking a whole chicken is a heavy-bottomed, oven-safe skillet. Cast iron skillets are the undisputed champions in this category. Their exceptional heat retention and distribution properties ensure even cooking and create a superior sear on the chicken skin. The dense material of cast iron also helps to build up a natural non-stick surface over time with proper seasoning, further enhancing the ease of cooking and cleanup. A well-seasoned cast iron skillet will provide a consistently crispy skin and prevent the chicken from sticking. Enameled cast iron skillets are another excellent option, offering the same heat retention benefits as traditional cast iron but with a smoother, non-reactive surface that is easier to clean and does not require seasoning. Stainless steel skillets with a thick, layered base (often referred to as clad stainless steel) can also be effective. These pans offer good heat conductivity and durability, though they may not achieve the same level of deep, even searing as cast iron. Avoid thin, flimsy pans or non-stick pans that are not oven-safe, as these will not provide adequate heat distribution, can warp under direct heat, and may not withstand the oven temperatures required for finishing the cooking process. The size of the pan is also crucial; it should be large enough to comfortably accommodate the whole chicken without overcrowding, allowing for proper heat circulation around the bird. A 10-inch or 12-inch skillet is generally suitable for a 3-4 pound chicken.
Preparing the whole chicken is a critical step that directly impacts both flavor and cooking efficiency. Begin by thoroughly patting the chicken dry, both inside and out, with paper towels. This step is non-negotiable. Moisture on the skin is the enemy of crispiness, as it will steam rather than sear, hindering the development of that desirable golden-brown, crunchy exterior. Once dried, generously season the chicken. A simple yet effective seasoning is a liberal application of kosher salt and freshly ground black pepper, ensuring it gets into every crevice, including the cavity. The salt not only enhances the flavor but also draws out moisture from the skin, contributing to its crispiness. For added flavor, consider incorporating other seasonings. Garlic powder, onion powder, paprika (for color and subtle smokiness), and dried herbs like thyme, rosemary, or sage are excellent choices. You can create a flavorful rub by combining these spices. Gently loosen the skin from the breast and thigh meat using your fingers or the handle of a spoon. This creates a pocket where you can insert butter or a mixture of butter and herbs. The butter will melt during cooking, basting the meat directly and infusing it with rich flavor. Tying the legs of the chicken together with kitchen twine is a common practice, often referred to as trussing. Trussing helps the chicken cook more evenly by keeping the limbs close to the body and prevents the wing tips from burning. It also creates a more compact and aesthetically pleasing presentation. If you don’t have kitchen twine, you can often secure the legs by tucking them under the body or using toothpicks. Finally, ensure the cavity of the chicken is free of any giblets or the neck; these can be reserved for making stock or gravy.
The searing process is where the magic of pan-roasting begins. Place your chosen skillet over medium-high heat and add a tablespoon or two of high-smoke-point oil, such as canola, grapeseed, or avocado oil. Once the oil is shimmering and almost smoking, carefully place the prepared whole chicken, breast-side down, into the hot pan. Allow the chicken to sear undisturbed for approximately 5 to 7 minutes, or until a deep golden-brown crust forms. This initial sear is crucial for developing flavor and texture. Resist the urge to move or stir the chicken during this phase, as this will prevent proper browning. After the initial sear, carefully flip the chicken using tongs or two spatulas to sear the other side. Sear the underside for another 3 to 5 minutes. Now, position the chicken on its side to sear the remaining exposed areas, ensuring even browning on all surfaces. This multi-directional searing is vital for achieving a uniformly crispy skin all over the bird. Once all sides have been adequately seared, you can add aromatics to the pan. This is an optional but highly recommended step that elevates the flavor profile significantly. Consider adding halved onions, quartered garlic cloves, sprigs of fresh rosemary or thyme, or even lemon wedges to the pan around the chicken. These aromatics will release their fragrances and flavors into the rendered chicken drippings, creating a delicious foundation for a pan sauce or simply infusing the chicken with added depth.
After searing, the chicken is typically transferred to the oven to finish cooking. Preheat your oven to 400°F (200°C). Carefully transfer the oven-safe skillet containing the seared chicken into the preheated oven. The oven provides a consistent, even heat that allows the chicken to cook through without burning the exterior. The cooking time will vary depending on the size of the chicken and your oven, but a general guideline is approximately 18 to 20 minutes per pound. For a 3-4 pound chicken, this typically translates to 50 to 70 minutes of oven time. Periodically basting the chicken with the pan juices during the oven cooking process is highly recommended. Use a spoon or baster to scoop up the rendered fat and juices from the bottom of the pan and drizzle them over the chicken. This not only adds moisture and flavor but also helps to achieve an even crispier skin. A meat thermometer is your best friend for ensuring the chicken is cooked to perfection. Insert the thermometer into the thickest part of the thigh, avoiding the bone. The chicken is done when the internal temperature reaches 165°F (74°C). The juices should run clear when the thigh is pierced with a fork or knife. Once the chicken reaches the desired internal temperature, remove the skillet from the oven.
The resting period is a critical, often overlooked, step in achieving a truly succulent and flavorful whole chicken. Once removed from the oven, allow the chicken to rest in the pan for at least 10 to 15 minutes before carving. This resting time allows the juices to redistribute throughout the meat. If you carve the chicken immediately after cooking, those precious juices will run out onto the cutting board, resulting in dry meat. Tent the chicken loosely with aluminum foil to keep it warm during this resting period. While the chicken is resting, you can utilize the flavorful pan drippings to create a simple yet elegant pan sauce. Deglaze the pan by placing it back on the stovetop over medium heat. Add a splash of chicken broth, white wine, or even water to the hot pan and scrape up any browned bits stuck to the bottom. Simmer this liquid for a few minutes to reduce and concentrate the flavors. You can further enhance the sauce by whisking in a tablespoon of butter for richness or a touch of fresh herbs. Strain the sauce through a fine-mesh sieve to remove any solids. This quick pan sauce adds an extra layer of deliciousness to your whole chicken, elevating the entire meal.
Carving the chicken, once rested, is a straightforward process. Use a sharp carving knife and fork. Start by removing the legs and thighs. To do this, make a cut down along the thigh, then twist the leg away from the body and cut through the joint. Separate the thigh from the drumstick by cutting through the joint between them. Next, carve the breast meat. Make a long, downward cut along the breastbone to separate the breast from the rib cage. Then, slice the breast meat thinly against the grain. The wings can be detached by cutting through the joint. Arrange the carved chicken on a platter, and serve immediately with your pan sauce and desired side dishes. The inherent simplicity of pan-roasting a whole chicken makes it a perfect centerpiece for a variety of occasions. It pairs beautifully with roasted vegetables such as potatoes, carrots, and Brussels sprouts, or a simple green salad. The leftovers are equally versatile, perfect for chicken salad sandwiches, quick quesadillas, or adding to soups and stews. The ability to achieve such remarkable flavor and texture with minimal fuss solidifies the whole chicken in a pan as a true culinary workhorse, deserving of a prominent place in any home cook’s repertoire. Mastering this technique not only provides a delicious meal but also instills confidence and culinary prowess.


