
Sunday Afternoon Slow Cooked Spare Ribs
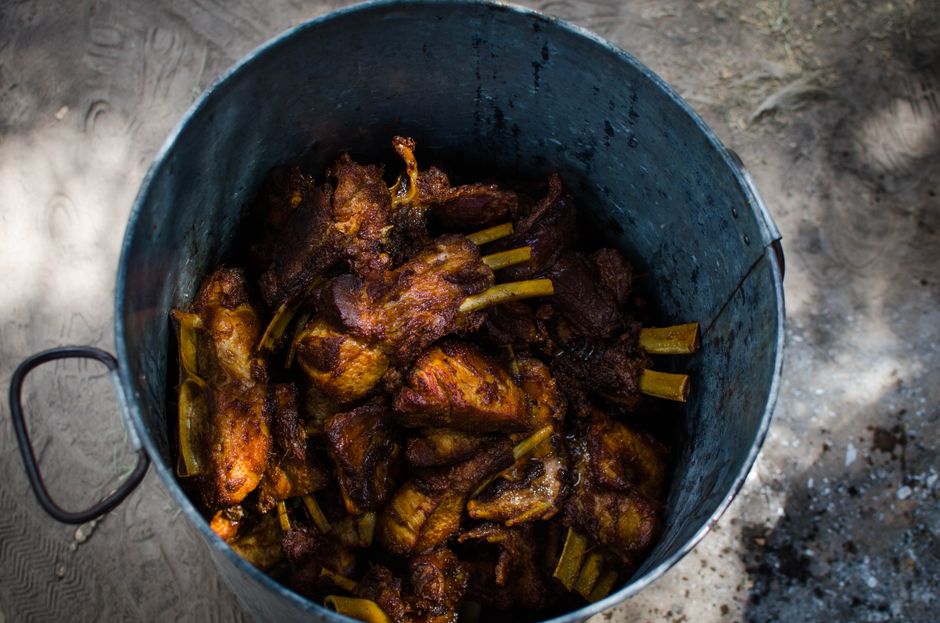
Sunday Afternoon Slow Cooked Spare Ribs: The Ultimate Guide to Tender, Flavorful Perfection
Achieving impossibly tender, fall-off-the-bone spare ribs on a Sunday afternoon is a culinary triumph accessible to any home cook willing to embrace the magic of low and slow cooking. This isn’t about a quick weeknight meal; it’s about dedicating a portion of your weekend to crafting a centerpiece that will impress family and friends, all while filling your home with an irresistible aroma. The key to mastering this dish lies in understanding the science behind breaking down the connective tissues in spare ribs and allowing time and gentle heat to work their transformative wonders. Forget dry, tough, or bland ribs; this guide will equip you with the knowledge and techniques to create succulent, deeply flavorful spare ribs that are worth every moment of anticipation.
The foundation of exceptional slow-cooked spare ribs begins with selecting the right cut. For this particular preparation, we are focusing on genuine spare ribs, not their leaner, more uniform counterpart, baby back ribs. Spare ribs are characterized by their larger size, higher fat content, and the presence of the skirt (diaphragm muscle), which contributes significantly to their rich flavor and unctuous texture when cooked properly. When purchasing, look for racks that are relatively uniform in thickness, with a good marbling of fat throughout the meat. Avoid ribs that appear overly lean, as the fat is crucial for moisture retention and flavor development during the long cooking process. Inspect the underside of the rack for a thin, papery membrane. This membrane is tough and can prevent marinades and rubs from penetrating the meat. It’s essential to remove this membrane before proceeding with any seasoning. To do so, slide a butter knife or a thin, blunt object under the membrane at one end of the rack. Once lifted, grip the edge of the membrane with a paper towel (for better traction) and carefully peel it away from the bone. This might require a bit of patience, but the effort is well worth the improved texture and flavor absorption.
Once the membrane is removed, the next critical step is seasoning. A well-executed rub is the backbone of flavorful spare ribs. While commercial rubs are convenient, crafting your own allows for complete control over the flavor profile. A balanced rub typically includes a combination of sweet, salty, spicy, and savory elements. Common base ingredients include brown sugar (for caramelization and a hint of sweetness), paprika (for color and mild smoky notes), salt (to draw out moisture and enhance flavor), and black pepper (for a touch of heat). From there, you can customize. For a classic BBQ flavor, consider adding garlic powder, onion powder, and a touch of cayenne pepper for heat. Smoked paprika can introduce a deeper, more authentic smoky dimension. For a sweeter profile, increase the brown sugar or add a pinch of cinnamon. For a spicier kick, incorporate chili powder or chipotle powder. The ratio of these ingredients is also important. A good starting point for a pound of ribs is roughly 2 tablespoons of rub. Whichever blend you choose, apply it generously to all surfaces of the ribs, ensuring they are thoroughly coated. Gently pat the rub into the meat to ensure adhesion. Allow the seasoned ribs to sit at room temperature for at least 30 minutes, or ideally, refrigerate them for a few hours or even overnight. This resting period allows the salt to begin its work of breaking down proteins and tenderizing the meat, while the other spices infuse into the flesh.
The cooking method is paramount for achieving tender, slow-cooked spare ribs. While oven braising is an option, for optimal results and that coveted smoky flavor, a smoker or a grill set up for indirect heat is highly recommended. If using a smoker, preheat it to a temperature between 225°F and 250°F (107°C to 121°C). Maintain this temperature consistently throughout the cooking process. The low, steady heat is what allows the connective tissues in the ribs to break down into gelatin, which in turn bastes the meat and creates that signature melt-in-your-mouth texture. Wood choice plays a significant role in the final flavor. Hickory is a classic for pork, imparting a robust, smoky taste. Mesquite offers a more intense, earthy smoke, while fruitwoods like apple or cherry provide a milder, sweeter smokiness. Experiment with different wood types to discover your preferred flavor profile.
For those without a dedicated smoker, a grill can be effectively converted into a makeshift smoker. On a charcoal grill, arrange the coals to one side of the grill, creating a direct heat zone and an indirect heat zone. Place soaked wood chips (soaked in water for at least 30 minutes to produce smoke rather than flame) directly on the coals or in a smoker box. On a gas grill, light one or two burners, leaving the others off. Place wood chips in a foil packet with holes poked in it over the lit burners. Close the lid and allow the grill to preheat to the target temperature range of 225°F to 250°F.
Once your cooking environment is ready, place the seasoned ribs directly on the indirect heat side of the grill or in the smoker. The goal is to expose the ribs to smoke and gentle heat without direct flame, which would burn the meat. Close the lid and allow the ribs to cook for approximately 3 to 4 hours, or until the meat begins to pull back from the ends of the bones and a slight wrinkling of the surface is visible. During this initial stage, resist the urge to open the lid too frequently. Each time the lid is lifted, heat and smoke escape, prolonging the cooking time.
After this initial smoking period, it’s time to introduce moisture and accelerate the tenderizing process. This is often referred to as the "Texas Crutch" when wrapping in foil, or simply braising when using other liquids. For an incredibly tender result, wrap the ribs tightly in heavy-duty aluminum foil. You can add a splash of liquid to the foil packet before sealing. Apple cider vinegar, beer, or even a bit of your favorite BBQ sauce can contribute additional moisture and flavor. Place the foiled ribs back on the indirect heat of your smoker or grill. Continue cooking for another 1 to 2 hours, or until a meat thermometer inserted into the thickest part of the meat (avoiding bone) registers an internal temperature of around 195°F to 205°F (90°C to 96°C). Another indicator of doneness is the "bend test": pick up a rack of ribs and gently bend it. If the meat cracks and reveals the bone but doesn’t fall off, they are likely perfectly tender.
The final stage involves saucing and a brief return to heat to set the sauce. Once the ribs have reached their desired tenderness, carefully remove them from the foil. Drain any excess liquid from the foil packet if you prefer a less saucy finish, or reserve it for another use. Brush your favorite BBQ sauce generously over both sides of the ribs. Return the sauced ribs to the indirect heat of the smoker or grill, uncovered, for another 15 to 30 minutes. This allows the sauce to caramelize and adhere to the ribs, creating a beautiful glossy finish. Monitor them closely during this phase to prevent the sauce from burning.
For those opting for an oven-only method, the process is similar but lacks the smoky element. Preheat your oven to 300°F (150°C). Season the ribs as described previously and place them on a baking sheet lined with parchment paper or foil. Cover the baking sheet tightly with foil. Bake for 2.5 to 3 hours. Then, remove the foil, brush with BBQ sauce, and return to the oven uncovered for another 30 minutes to allow the sauce to set. While this method yields tender ribs, it won’t replicate the complex smoky flavor achieved through smoking or grilling.
Serving your slow-cooked spare ribs is the culmination of your efforts. Allow the ribs to rest for at least 10 to 15 minutes after removing them from the heat. This resting period is crucial for allowing the juices to redistribute throughout the meat, resulting in a more moist and flavorful final product. Slice the ribs into individual portions along the bone lines. Serve them hot, with extra BBQ sauce on the side for those who desire more. Classic accompaniments include coleslaw, potato salad, cornbread, and baked beans, all of which complement the rich, savory flavors of the ribs perfectly.
The versatility of slow-cooked spare ribs extends beyond a simple platter. Leftovers can be shredded and used in sandwiches, tacos, or incorporated into hearty stews. The bone marrow, often overlooked, is packed with flavor and can be a delicious addition to gravies or stocks. Mastering the art of slow-cooked spare ribs is an investment in weekend culinary pleasure, a guaranteed crowd-pleaser, and a testament to the power of patience and low, slow heat in transforming simple ingredients into something truly extraordinary. The dedication of a Sunday afternoon to this process yields rewards that extend far beyond the plate, creating lasting memories and satisfied appetites.


