Home Fried Breakfast Potatoes
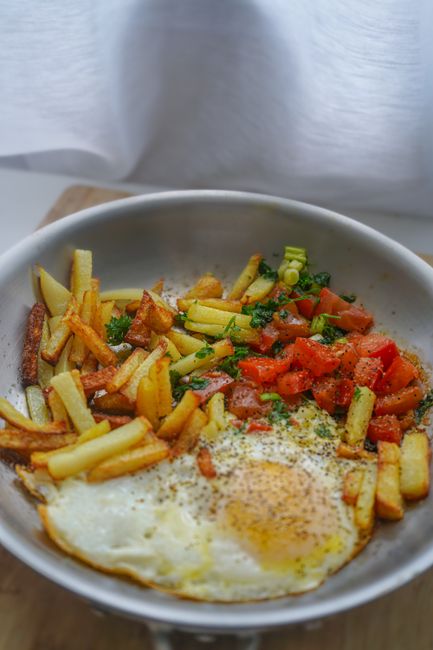
The Ultimate Guide to Perfect Home-Fried Breakfast Potatoes: Crispy, Fluffy, and Flavorful Every Time
Mastering home-fried breakfast potatoes is a culinary rite of passage. The pursuit of that ideal balance – a shatteringly crisp exterior giving way to a tender, fluffy interior, infused with savory goodness – is a common breakfast ambition. This comprehensive guide will demystify the process, offering a deep dive into the science and art of achieving restaurant-quality fried potatoes in your own kitchen, transforming humble spuds into the star of your morning meal. We’ll explore everything from potato selection and preparation techniques to cooking methods and flavor enhancements, ensuring your fried potatoes are consistently delicious.
Choosing the right potato is paramount. Starchy potatoes, like Russets (also known as Idaho potatoes), are generally considered the gold standard for frying due to their high starch content and lower moisture. This composition allows them to absorb less oil and develop a wonderfully fluffy interior when cooked. Yukon Golds offer a good balance, providing some starchiness for fluffiness with a slightly creamier texture than Russets. Red potatoes and fingerlings, with their waxy nature and higher moisture content, tend to hold their shape better but can result in a less fluffy interior and a slightly less crispy exterior. For maximum crispiness, Russets are the undisputed champion. Their dry, starchy flesh crisps up beautifully without becoming greasy, forming that coveted golden-brown crust. However, if you prefer a slightly more robust potato flavor and a chewier texture alongside the crisp, a mix of Russets and Yukon Golds can be an excellent choice. Experimentation is key to discovering your personal potato preference for frying. Consider the desired outcome: ultimate fluffiness and crispness lean towards Russets, while a slightly firmer texture with good flavor might point to Yukon Golds.
Proper potato preparation is a critical, yet often overlooked, step in achieving superior fried potatoes. The first hurdle is peeling. While some prefer skin-on potatoes for added texture and visual appeal, peeling is generally recommended for classic home-fried potatoes to ensure even cooking and a more consistent texture. Use a sharp vegetable peeler and work carefully to remove the skin in thin strips, minimizing waste. Once peeled, the method of cutting significantly impacts the final texture. For optimal frying, aim for uniform pieces. Common cuts include cubes, wedges, or slices. Cubes, roughly ½-inch to ¾-inch in size, offer a good surface area for crisping and a satisfying bite. Wedges, cut lengthwise, provide a more substantial potato experience and can achieve excellent crispness. Slices, particularly if not too thin, also work well but can sometimes become a bit too delicate and prone to breaking apart if handled too roughly during cooking. Regardless of the cut, ensuring consistency in size is crucial. Unevenly cut potatoes will cook at different rates, leading to some being perfectly done while others are undercooked or burnt. A sharp chef’s knife or a mandoline (with extreme caution) can help achieve uniformity.
Rinsing and soaking potatoes is a non-negotiable step for achieving that coveted crispiness. After cutting, the potatoes will release starch. If this starch isn’t removed, it will act as a binder, creating a gummy, less crispy texture. Place the cut potatoes in a bowl and cover them with cold water. Let them soak for at least 30 minutes, or ideally for several hours, or even overnight in the refrigerator. This process leaches out excess surface starch. For an even more profound starch removal, you can gently agitate the potatoes in the water. You’ll notice the water becoming cloudy as the starch is released. Drain the potatoes thoroughly and repeat the rinsing process with fresh cold water until the water runs clear. This might take a few rinses, depending on the potato type and how long they were cut.
The drying stage is just as important as the soaking. Excess moisture is the enemy of crispiness; it leads to steaming rather than frying. After draining the potatoes from their final rinse, spread them out in a single layer on a clean kitchen towel or paper towels. Gently pat them dry, ensuring no visible moisture remains. You can even let them air dry for an additional 15-20 minutes if time permits. The drier the potatoes are before they hit the hot oil, the crispier they will become. This step is often underestimated but has a significant impact on the final texture. Think of it as preparing them for their deep-fry baptism; they need to be ready to embrace the heat.
The choice of cooking fat is critical to both flavor and frying performance. For home-fried breakfast potatoes, several fats are excellent options. Rendered bacon fat is a classic and imparts an unparalleled savory, smoky flavor that elevates the potatoes to new heights. If you don’t have bacon fat, good quality lard is another traditional and highly effective choice, offering a clean, rich flavor and a high smoke point. Neutral vegetable oils like canola, sunflower, or grapeseed oil are also excellent choices. They have a high smoke point, meaning they can reach high temperatures without burning, and they won’t impart their own flavor, allowing the potato to shine. Olive oil, particularly extra virgin olive oil, is generally not recommended for high-heat frying due to its lower smoke point and distinct flavor profile, which can become bitter when overheated. A blend of fats can also be beneficial. For instance, using a combination of oil and bacon fat can provide both excellent frying characteristics and a desirable flavor infusion. The amount of fat is also important; you want enough to generously coat the potatoes and allow them to sizzle without overcrowding the pan. Aim for at least ¼-inch to ½-inch of fat in your pan.
The cooking process itself requires attention to heat management and technique. For achieving crispy exteriors and fluffy interiors, a two-stage cooking method is often the most effective, especially for larger cuts or when aiming for ultimate crispness. This method involves par-cooking the potatoes before the final crisping stage.
Stage 1: Par-cooking (Boiling or Steaming). Before frying, you can par-cook your potatoes to ensure they are tender on the inside. This can be done by boiling them in lightly salted water for about 5-7 minutes, or until they are fork-tender but not mushy. Alternatively, steaming them for about 10-15 minutes achieves a similar result with less risk of waterlogging. Drain them thoroughly and allow them to cool slightly and dry again for a few minutes before proceeding to frying. This par-cooking step ensures the interior is cooked through before the exterior crisps up, preventing raw potato in the center of a perfectly browned exterior.
Stage 2: Frying. Heat your chosen fat in a large, heavy-bottomed skillet (cast iron is ideal for even heat distribution) over medium-high heat. You’re looking for a temperature of around 350-375°F (175-190°C). A good test is to drop a small piece of potato into the hot fat; it should sizzle immediately and start to bubble. Carefully add the par-cooked and dried potatoes to the hot fat in a single layer. Avoid overcrowding the pan, as this will lower the oil temperature and lead to steaming, resulting in greasy, soggy potatoes. Cook in batches if necessary. Let the potatoes cook undisturbed for 4-5 minutes, allowing a golden-brown crust to form. Then, gently stir or flip them with a spatula or tongs. Continue to cook, stirring occasionally, until they are golden brown and crispy on all sides, which usually takes another 10-15 minutes.
For a simpler, single-stage frying method, which works well for smaller cubes or if you’re short on time, ensure your potatoes are thoroughly dried after soaking. Heat your fat in the skillet over medium-high heat to the same temperature range. Add the raw, dried potatoes in a single layer, again avoiding overcrowding. Cook, stirring frequently, for about 20-25 minutes, or until they are golden brown, crispy, and cooked through. This method requires more attention to stirring to ensure even cooking and prevent burning.
Seasoning is where the flavor truly comes alive. Salt is an absolute must. Season the potatoes generously with kosher salt or sea salt after they have begun to brown and crisp, and again after they are fully cooked. Salting during the initial frying stages can draw out moisture, hindering crispness. Black pepper is another essential, adding a pleasant warmth. Consider adding a pinch of garlic powder or onion powder for an extra savory punch. For a touch of heat, a dash of cayenne pepper or red pepper flakes can be fantastic. Fresh herbs are a wonderful addition towards the end of the cooking process or immediately after removing them from the pan. Finely chopped parsley, chives, or even rosemary can elevate the flavor profile significantly.
A crucial tip for optimal crispiness is to allow the potatoes to drain properly after frying. Once cooked to your desired crispness, use a slotted spoon or spider strainer to remove the potatoes from the hot fat. Transfer them to a wire rack set over a baking sheet or to a bowl lined with paper towels. Allowing them to drain on a wire rack prevents the bottoms from becoming soggy from accumulated oil. Blotting them gently with paper towels can also help remove excess grease. Serve immediately for the best texture.
Flavor variations and additions can transform your home-fried potatoes into a gourmet experience. As mentioned, bacon fat is a superior starting point. Other delicious additions include:
- Caramelized Onions: Sauté sliced onions in the same skillet after the potatoes are cooked, or cook them separately and toss them in with the finished potatoes. Their sweetness complements the savory potato perfectly.
- Bell Peppers: Diced bell peppers (any color) can be added during the last 10-15 minutes of frying for a touch of sweetness and color.
- Garlic: Sauté minced garlic in the hot fat for the last minute or two of cooking to infuse the potatoes with its aromatic flavor without burning.
- Smoked Paprika: A sprinkle of smoked paprika towards the end of cooking adds a beautiful color and a smoky depth of flavor.
- Herbs: As previously mentioned, fresh rosemary, thyme, or sage can be finely chopped and tossed with the hot potatoes for an earthy, aromatic boost.
- Cheese: A sprinkle of grated cheddar, Monterey Jack, or Parmesan cheese over the hot potatoes will melt and create a delicious cheesy crust.
When it comes to equipment, a good quality, heavy-bottomed skillet is your best friend. Cast iron skillets are highly recommended for their excellent heat retention and distribution, leading to more even cooking and crisping. A sturdy spatula or tongs are essential for stirring and flipping the potatoes without breaking them apart. A slotted spoon or spider strainer is crucial for safely removing the potatoes from the hot oil. A wire rack over a baking sheet is ideal for draining.
Troubleshooting common issues is part of the learning curve. If your potatoes are coming out greasy, you’re likely using too much oil, overcrowding the pan, or not letting them drain properly. If they are not crispy, they may not have been dried sufficiently, the oil temperature was too low, or they were overcrowded. If the inside is raw while the outside is burnt, you need to par-cook them or reduce your frying temperature. Patience is key; don’t rush the process.
The best time to season your fried potatoes is a matter of personal preference and cooking stage. A foundational seasoning of salt and pepper should be applied during the cooking process. Salt added too early can draw out moisture, hindering crisping. A good practice is to salt during the last few minutes of frying and then again once removed from the pan. This allows the salt to adhere to the crispy surface and penetrate the potato interior.
For SEO purposes, incorporating relevant keywords is crucial. Throughout this article, terms like "home-fried breakfast potatoes," "crispy fried potatoes," "fluffy fried potatoes," "best potatoes for frying," "how to make fried potatoes," "breakfast potatoes recipe," "diced potatoes," "potato wedges," "cast iron skillet potatoes," "bacon fat fried potatoes," and "savory breakfast potatoes" have been integrated naturally within the text. The detailed explanations and comprehensive approach aim to provide valuable information that users searching for these terms will find helpful and informative. The structure of the article, with clear headings and subheadings (implied through paragraph breaks and topic progression), also aids in readability and search engine indexing. The aim is to become a definitive resource for anyone seeking to perfect their home-fried breakfast potato game.
In conclusion, achieving perfect home-fried breakfast potatoes is a skill that can be honed with understanding and practice. By selecting the right potatoes, employing meticulous preparation techniques such as soaking and thorough drying, utilizing the appropriate cooking fat, and mastering the frying process, you can consistently produce golden-brown, shatteringly crisp, and wonderfully fluffy potatoes. Experiment with different seasonings and additions to discover your signature flavor profile, and don’t be afraid to invest in quality equipment to elevate your breakfast experience. These humble spuds, when treated with care and attention, can truly become the highlight of any breakfast spread.