
The Best Reverse Sear Method For Thick Steaks
The Ultimate Reverse Sear Method for Thick Steaks: Unlocking Perfect Tenderness and Flavor
The reverse sear is a culinary technique that has revolutionized the way home cooks prepare thick-cut steaks. It offers a foolproof method to achieve unparalleled tenderness, a uniform rosy-pink interior, and a perfectly developed crust, regardless of your steak-cooking experience. Unlike traditional searing first, then finishing in the oven, the reverse sear flips this order, gently cooking the steak in a low oven until it’s just below its final desired temperature, followed by a high-heat sear. This process minimizes the gray band often seen in traditionally cooked steaks and ensures even doneness throughout, making it the undisputed champion for thick cuts like ribeyes, porterhouses, and New York strips.
Understanding the "Why" Behind the Reverse Sear: The Science of Steak Perfection
The core principle of the reverse sear lies in gentle, controlled cooking followed by rapid searing. Traditional searing, while crucial for flavor development, often involves high heat from the outset. This high heat can quickly cook the exterior of a thick steak, leaving the center still significantly undercooked. To compensate, cooks often leave the steak in the oven for an extended period, which inevitably leads to overcooking the outer layers and creating that undesirable gray band of well-done meat. The reverse sear bypasses this problem by gradually raising the internal temperature of the steak in a low oven. This controlled environment allows heat to penetrate the steak evenly, bringing it to a consistent internal temperature from edge to center. Once this internal temperature is reached, the steak is removed from the oven and immediately seared. The high heat of the sear then caramelizes the exterior, creating a delicious Maillard reaction and a beautiful, flavorful crust without significantly overcooking the interior. This two-step approach is what elevates thick steaks from good to exceptional, ensuring every bite is as tender and flavorful as the last.
Choosing the Right Steak for the Reverse Sear: Thickness is Key
The reverse sear method is ideally suited for steaks that are at least 1.5 inches thick, and ideally 2 inches or more. Thicker cuts benefit the most from the gentle, even cooking of the low oven, as they have enough mass to withstand the prolonged, low-temperature exposure without drying out. Ribeyes, Porterhouses, T-bones, and New York strips are prime candidates. Thinner steaks, typically less than 1 inch thick, are better suited to traditional searing methods as they cook too quickly in the oven to effectively benefit from the reverse sear’s gentle approach. For these thinner cuts, a quick sear on both sides in a hot pan or on a grill will achieve optimal results without the risk of overcooking. When selecting your thick-cut steak, look for good marbling – the flecks of intramuscular fat that melt during cooking, contributing to juiciness and flavor. Dry-aged steaks also lend themselves exceptionally well to the reverse sear, as the aging process concentrates their flavor and tenderizes the meat further.
The Essential Equipment for a Flawless Reverse Sear
While the reverse sear is surprisingly forgiving, having the right tools will significantly enhance your success and elevate the overall cooking experience.
- Oven: A reliable oven is your primary cooking vessel. Ensure it can maintain a stable low temperature, ideally between 225°F and 275°F (107°C and 135°C). An oven thermometer can be a valuable addition to verify the accuracy of your oven’s thermostat.
- Baking Sheet: A sturdy baking sheet is essential for placing your steak in the oven.
- Wire Rack: Elevating the steak on a wire rack placed inside the baking sheet is crucial. This allows for even air circulation around the steak, promoting consistent cooking and preventing the bottom from becoming steam-logged.
- Meat Thermometer: This is arguably the most important tool for the reverse sear. An instant-read digital meat thermometer is highly recommended for accurate temperature monitoring. Aim for a thermometer that can provide readings within seconds.
- Cast Iron Skillet or Heavy-Bottomed Pan: A well-seasoned cast iron skillet is the gold standard for searing. Its excellent heat retention and distribution ensure a beautiful, even crust. Alternatively, a heavy-bottomed stainless steel or carbon steel pan will also perform admirably.
- Tongs: Sturdy, long-handled tongs are necessary for safely flipping the steak and transferring it between the oven and the searing pan.
- High Smoke Point Oil: For searing, you’ll need an oil that can withstand high temperatures without burning and imparting an acrid flavor. Grapeseed oil, avocado oil, canola oil, or refined peanut oil are excellent choices.
- Butter (Optional): For that extra layer of richness and flavor during the searing process, a tablespoon or two of unsalted butter can be added in the final minute of searing.
- Fresh Herbs and Garlic (Optional): A sprig of rosemary or thyme and a smashed clove of garlic can be added to the pan with the butter towards the end of searing to infuse the steak with aromatic flavors.
Step-by-Step Guide to the Perfect Reverse Sear
Executing the reverse sear is a straightforward process, but attention to detail at each stage is key to achieving optimal results.
-
Bring Your Steak to Room Temperature: This is a critical first step. Remove your thick-cut steak from the refrigerator at least 1 hour, and up to 2 hours, before cooking. This allows the steak to equalize in temperature, promoting more even cooking. A cold steak placed directly into the oven will cook unevenly, with the exterior overcooking before the interior reaches the desired temperature.
-
Preheat Your Oven and Prepare the Baking Sheet: Preheat your oven to a low temperature, ideally between 225°F and 275°F (107°C and 135°C). Line a baking sheet with parchment paper or foil for easier cleanup, and place a wire rack inside the baking sheet.
-
Season Generously: Pat your steak thoroughly dry with paper towels. This is crucial for developing a good sear. Moisture on the surface will steam the steak rather than sear it. Season generously on all sides with coarse sea salt and freshly cracked black pepper. Don’t be shy with the salt; a good portion will fall off during cooking. You can also add other dry seasonings like garlic powder or onion powder at this stage, if desired.
-
Low and Slow Oven Cook: Place the seasoned steak on the prepared wire rack, ensuring it’s elevated. Transfer the baking sheet with the steak to the preheated oven. The goal here is to gently bring the internal temperature of the steak up slowly and evenly. The cooking time will vary significantly depending on the thickness of the steak and your oven’s temperature, but expect anywhere from 30 to 90 minutes.
-
Monitor Internal Temperature: This is where your meat thermometer becomes indispensable. Begin checking the internal temperature of the steak about halfway through the estimated cooking time. Insert the thermometer probe into the thickest part of the steak, avoiding any bones. You are aiming for an internal temperature that is about 10-15°F below your desired final serving temperature.
- Rare: Aim for 110-115°F (43-46°C)
- Medium-Rare: Aim for 115-120°F (46-49°C)
- Medium: Aim for 120-125°F (49-52°C)
-
Resting Before Searing: Once your steak reaches the target internal temperature, remove it from the oven. Tent it loosely with aluminum foil and let it rest for about 10-15 minutes. This resting period allows the muscle fibers to relax and redistribute their juices, which contributes to a more tender and moist steak. This step is often overlooked but is crucial for maximizing juiciness.
-
Prepare for the Sear: While the steak is resting, heat your cast iron skillet or heavy-bottomed pan over medium-high to high heat. Add a tablespoon or two of high smoke point oil. You want the pan to be smoking hot before adding the steak. A hot pan is essential for achieving a rapid, beautiful sear.
-
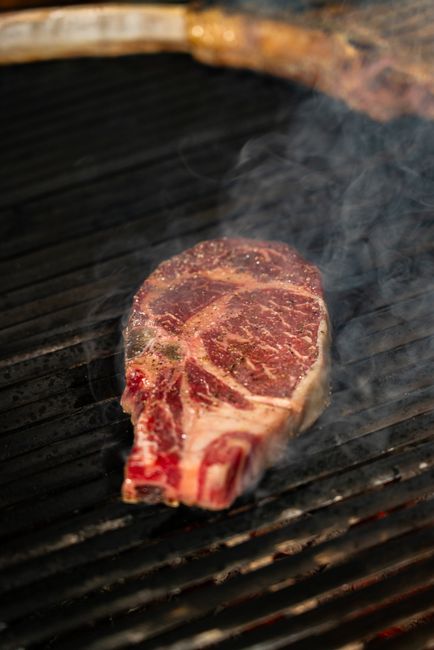
The Searing Phase: Carefully place the rested steak into the smoking hot pan. Sear for 1-3 minutes per side, depending on how thick your steak is and how dark you want your crust. Avoid overcrowding the pan; cook steaks in batches if necessary. For an even better crust and added flavor, you can add a tablespoon of unsalted butter, a sprig of rosemary or thyme, and a smashed clove of garlic to the pan during the last 30 seconds to 1 minute of searing. Tilt the pan and baste the steak with the melted butter and aromatics for a truly decadent finish.
-
Final Temperature Check and Rest: After searing, immediately check the internal temperature of the steak. It should have risen by about 5-10°F during the sear.
- Rare: Aim for 125-130°F (52-54°C)
- Medium-Rare: Aim for 130-135°F (54-57°C)
- Medium: Aim for 135-140°F (57-60°C)
If your steak is still slightly below your target temperature, you can briefly return it to the hot pan or a hot oven (around 400°F/200°C) for a minute or two, but be vigilant to avoid overcooking. Once the desired final temperature is reached, remove the steak from the pan and let it rest on a clean cutting board for another 5-10 minutes before slicing. This final rest allows the juices to settle, ensuring a moist and tender steak.
-
Slice and Serve: Slice the steak against the grain into thick pieces. This breaks down the muscle fibers, making the steak even more tender and easier to chew. Serve immediately and enjoy the fruits of your perfectly executed reverse sear.
Common Pitfalls and Troubleshooting Tips for Reverse Searing
Even with a straightforward method like the reverse sear, occasional hiccups can occur. Here are some common pitfalls and how to avoid them:
- Gray Band: The most common issue with traditional steak cooking is the dreaded gray band. This is caused by overcooking the outer layers before the center is done. The reverse sear is designed to eliminate this. If you still notice a gray band, it likely means your oven temperature was too high during the initial cooking phase, or you didn’t rest the steak sufficiently before searing.
- Lack of Crust: A beautiful, flavorful crust is a hallmark of a well-seared steak. If your crust is weak or uneven, ensure your pan is sufficiently hot before adding the steak, and that you patted the steak thoroughly dry. Don’t move the steak around too much in the pan during the initial sear; let it develop its crust undisturbed.
- Steak is Tough: Toughness can be attributed to several factors. Overcooking is a primary culprit. If you’ve followed the temperature guidelines, the issue might lie in slicing. Always slice against the grain. Also, ensure you’ve brought the steak to room temperature before cooking and allowed it to rest properly.
- Steak is Dry: A dry steak is a tragedy. This often results from overcooking or insufficient resting. The reverse sear helps maintain moisture, but proper resting periods are crucial for allowing juices to redistribute.
- Inconsistent Temperatures: If your oven temperature fluctuates wildly, it can lead to uneven cooking. An oven thermometer can help diagnose this. For searing, ensure your pan is evenly heated and not scorching in one spot.
Tips for Enhancing Your Reverse Sear Experience
- Sous Vide Pre-cooking: For the ultimate in precision and guaranteed edge-to-edge doneness, consider pre-cooking your steak sous vide. After the sous vide bath, you can then proceed with the reverse sear’s high-heat finish. This combination offers unparalleled control.
- Dry Brining: For an even deeper flavor and enhanced moisture retention, consider dry brining your steak. This involves salting the steak and leaving it uncovered in the refrigerator for at least 24 hours, and up to 72 hours, before cooking. The salt will draw out moisture, which then gets reabsorbed, seasoning the steak throughout and creating a more tender texture. Pat dry thoroughly before proceeding with the reverse sear.
- Experiment with Fats: While high smoke point oils are essential for the initial sear, don’t underestimate the power of butter, beef tallow, or even duck fat for the final basting stage. These fats add incredible flavor and help create a beautiful, golden-brown crust.
- Reverse Sear and Grill: You can adapt the reverse sear for grilling. Place your seasoned steak on the cooler side of a preheated grill (indirect heat) until it reaches your desired internal temperature. Then, move it to the hot side of the grill for a quick sear on both sides.
Conclusion: Mastering the Reverse Sear for Steak Supremacy
The reverse sear method is not just a cooking technique; it’s a philosophy for achieving steak perfection. By understanding the science behind gentle cooking followed by rapid searing, and by paying attention to the details of temperature, resting, and searing, you can consistently produce thick-cut steaks that rival those from the finest steakhouses. This method demystifies the art of cooking steak, making it accessible and achievable for any home cook. Invest in a good meat thermometer, practice patience, and prepare to be amazed by the incredible tenderness, uniform doneness, and exquisite flavor that the reverse sear bestows upon your thick-cut steaks. It’s a technique that, once mastered, will become your go-to for elevating any steak dinner.


