
Easy Standing Rib Roast
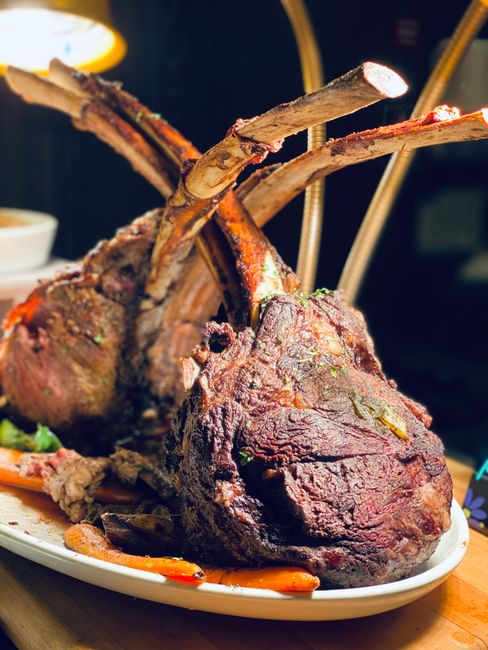
The Ultimate Guide to Effortless Standing Rib Roast: A Masterclass in Culinary Simplicity and Flavor
Achieving a restaurant-quality standing rib roast at home might seem daunting, but it’s surprisingly accessible, even for novice cooks. The beauty of this prime cut lies in its inherent richness and tenderness, which requires minimal intervention to produce spectacular results. This comprehensive guide will demystify the process, providing step-by-step instructions, essential tips for success, and advice on selecting the perfect roast, ensuring a stress-free and delicious experience. The goal is to deliver a succulent, perfectly cooked standing rib roast that will impress your guests and become a staple in your entertaining repertoire. We’ll focus on a straightforward, yet effective, method that prioritizes flavor and ease of preparation, allowing the quality of the beef to shine.
Understanding the anatomy and selection of your standing rib roast is paramount to its success. A standing rib roast, also known as a prime rib, is cut from the primal rib section of the cow. It typically contains between two and seven ribs. The number of ribs dictates the size of the roast; a two-rib roast will serve approximately 2-3 people, while a seven-rib roast can feed 10-14. For optimal tenderness and flavor, opt for a roast with good marbling – those thin streaks of fat interspersed within the muscle. Marbling melts during cooking, basting the meat from within and contributing to its juicy, rich taste. Look for a roast that is at least 1.5 to 2 inches thick per rib. Thicker roasts are more forgiving and less prone to overcooking. The USDA Prime grade signifies the highest quality beef, characterized by abundant marbling. USDA Choice is also an excellent option, offering good marbling and flavor at a more accessible price point. If possible, purchase your roast from a reputable butcher. They can often provide advice on specific cuts, trim excess fat if you prefer, and even tie the roast for you if it has a bone guard removed. Ask for a "bone-in" roast; the bones act as a natural insulator, protecting the meat from drying out and contributing to a more even cook. When selecting a roast with multiple ribs, consider the "first cut" versus the "second cut." The first cut is from the chuck end and is generally more tender and has more marbling. The second cut, closer to the loin, is leaner but still delicious. For an effortless cooking experience, consider asking your butcher to "French" the bones. This involves scraping away the meat from the rib bones, exposing them and creating a visually appealing presentation. While not essential for flavor, it elevates the aesthetic of the final dish.
Prepping your standing rib roast is a critical step that sets the stage for a perfect cook. Allow your roast to come to room temperature for at least 1-2 hours, or even up to 4 hours for larger roasts, before cooking. This is a crucial step that many home cooks overlook. A cold roast will cook unevenly, with the exterior potentially overcooking before the interior reaches the desired temperature. Bringing the roast to room temperature allows for a more consistent and gentle cooking process. Pat the entire surface of the roast thoroughly dry with paper towels. Moisture is the enemy of a good sear, and a dry surface is essential for developing a beautiful, flavorful crust. Once dry, generously season the roast on all sides. A simple yet effective seasoning blend consists of kosher salt and freshly ground black pepper. Don’t be shy with the salt; it not only enhances the beef’s flavor but also helps to draw out moisture from the surface, further aiding in the searing process. Some recipes advocate for a more complex rub, incorporating garlic powder, onion powder, and herbs like rosemary and thyme. While these can be delicious, for an truly "easy" standing rib roast that lets the beef shine, a simple salt and pepper approach is often sufficient. If you choose to use herbs, tie fresh sprigs of rosemary and thyme around the roast with kitchen twine. This infuses subtle aromatic notes during the cooking process. For an even deeper flavor, consider rubbing a clove of garlic, halved, over the surface of the roast. The natural oils from the garlic will impart a mild garlicky essence. After seasoning, place the roast on a wire rack set inside a rimmed baking sheet. This allows air to circulate around the roast, promoting even cooking and preventing the bottom from becoming soggy. If your roast came with a bone guard (a layer of fat), you can choose to leave it on or remove it. Leaving it on will add additional flavor and moisture during cooking, but it can also make for a greasier final product. If you opt to remove it, do so carefully with a sharp knife.
The cooking method for an easy standing rib roast should prioritize simplicity and accuracy, yielding a perfectly cooked interior and a desirable crust. The reverse sear method is highly recommended for its superior results and relative ease of execution. This method involves slow-roasting the beef at a low temperature initially, then finishing with a high-heat sear. Preheat your oven to a low temperature, typically between 225°F and 275°F (107°C to 135°C). The lower the temperature, the more evenly the roast will cook, but it will also take longer. Place the prepared roast, fat-side up, on the wire rack within the rimmed baking sheet. Insert a reliable meat thermometer into the thickest part of the roast, avoiding any bones or large pockets of fat. This is crucial for monitoring the internal temperature accurately. Slowly roast the beef until it reaches about 10-15°F below your desired final serving temperature. For medium-rare, aim for an internal temperature of around 115-120°F (46-49°C). For medium, target 120-125°F (49-52°C). The exact cooking time will vary significantly depending on the size of your roast and the exact oven temperature. A general guideline is approximately 15-20 minutes per pound at 250°F. Once the roast has reached the target internal temperature, carefully remove it from the oven. Increase the oven temperature to a high setting, typically 450°F to 500°F (230°C to 260°C), or preheat your broiler. This high heat is essential for developing a beautiful, caramelized crust. While the oven is preheating to its high temperature, this is the opportune moment to create your crust. In a small bowl, combine a tablespoon or two of olive oil or rendered beef fat with your desired crust ingredients. This could be a simple mix of finely chopped fresh rosemary and thyme, minced garlic, or even a pinch of smoked paprika for an extra layer of flavor. Rub this mixture all over the surface of the partially cooked roast. Alternatively, you can simply brush the roast with a little olive oil and sprinkle with more kosher salt and black pepper. Once the oven has reached its high temperature, return the roast to the oven. Sear it for approximately 8-12 minutes, or until a deep brown crust has formed. Keep a close eye on the roast during this searing phase to prevent burning. Rotate the roast if necessary for even browning.
After the searing is complete, remove the standing rib roast from the oven. This is arguably the most critical step in achieving a tender and juicy roast: resting. Transfer the roast to a clean cutting board and loosely tent it with aluminum foil. Allow the roast to rest for a minimum of 15-20 minutes for smaller roasts, and up to 30 minutes for larger roasts. Resting allows the juices within the meat to redistribute. If you cut into the roast too soon, these juices will escape onto the cutting board, leaving you with a dry and less flavorful piece of beef. During the resting period, the internal temperature of the roast will continue to rise by approximately 5-10°F due to residual heat, often referred to as "carryover cooking." This means that if you pulled the roast from the oven at 115°F for medium-rare, it will reach around 120-125°F during resting, achieving your desired final doneness. While the roast is resting, you can prepare any accompanying pan sauces or gravies. The drippings left in the baking sheet are liquid gold and form the base of an exceptional sauce. For a simple pan sauce, deglaze the baking sheet with a splash of red wine or beef broth, scraping up any browned bits from the bottom. Simmer the liquid until it reduces slightly, then whisk in a knob of butter for richness. Season to taste with salt and pepper.
Carving and serving your masterpiece is the grand finale. For an easy standing rib roast, the carving process should be straightforward. Using a sharp carving knife, slice the roast against the grain. The grain refers to the direction in which the muscle fibers are running. Identifying and slicing against the grain will result in more tender, easier-to-chew slices. For bone-in roasts, you can either carve between the ribs, or remove the entire roast from the bone first, carve it into desired thickness slices, and then return the carved meat to the bone for presentation. The latter is often easier for consistent slice thickness. Serve immediately with your prepared pan sauce or gravy, and your favorite side dishes. Classic accompaniments include roasted potatoes, creamed spinach, Yorkshire puddings, or a fresh green salad. The beauty of a perfectly cooked standing rib roast is that it requires minimal adornment. Its rich, beefy flavor speaks for itself. Ensure that your serving platter is warmed to keep the meat at an optimal temperature. For optimal guest satisfaction, consider presenting the roast whole at the table before carving. This allows guests to admire its impressive presentation before you carve it into individual portions. When carving, aim for slices that are approximately ½ to ¾ inch thick. Thicker slices can be more forgiving if the roast is slightly rarer than desired, while thinner slices might be preferable for a more well-done roast. Always have extra serving spoons and forks readily available to ensure a smooth service. The goal is to make the dining experience as effortless for your guests as the cooking process was for you.
Troubleshooting and tips for elevated results can transform your easy standing rib roast into an extraordinary culinary triumph. One common challenge is overcooking. The key to avoiding this is consistent use of a reliable meat thermometer. Invest in a digital instant-read thermometer for the most accurate readings. Calibrate your thermometer regularly to ensure its accuracy. If your roast is slightly undercooked, you can always return it to the oven for a few more minutes. However, overcooked beef is irreversible. Another common issue is a lack of a good crust. Ensure your roast is thoroughly dry before seasoning and searing. High oven heat is also critical for crust development. If you’re concerned about overcooking the interior while achieving a good sear, you can perform the searing step in a cast-iron skillet on the stovetop after the initial roast, rather than in the oven at high heat. For an even more tender roast, consider dry-aging your beef for a period before cooking, although this is a more advanced technique. For a truly “easy” approach, stick to the reverse sear method. If you’re cooking a very large roast (more than 5-6 ribs), you might consider cutting it into two smaller roasts for more even cooking. This will also reduce the overall cooking time. Don’t discard the rib bones after carving; they can be used to make a rich beef stock. For a more intense beef flavor, consider injecting the roast with beef broth or a mixture of beef broth and Worcestershire sauce before cooking. This adds internal moisture and flavor. If you don’t have a rimmed baking sheet, use a roasting pan with a rack. The rack is essential for air circulation. When serving, consider offering a selection of condiments, such as horseradish sauce, Dijon mustard, or a béarnaise sauce, to cater to different preferences. The simple elegance of a perfectly cooked standing rib roast is its greatest asset, and with these tips, you are well-equipped to master this impressive dish with confidence and ease. Remember that practice makes perfect, and with each attempt, you will become more attuned to your oven and the nuances of cooking this exceptional cut of beef, solidifying your reputation as a skilled home chef.


